A voucher is a voucher code with a defined number of letters and numbers.
This will be credited with a corresponding nominal value (“voucher”) for the order and can be entered by your customers in the “shopping cart” order step.
The discount is calculated on the net value of the goods excluding shipping costs.
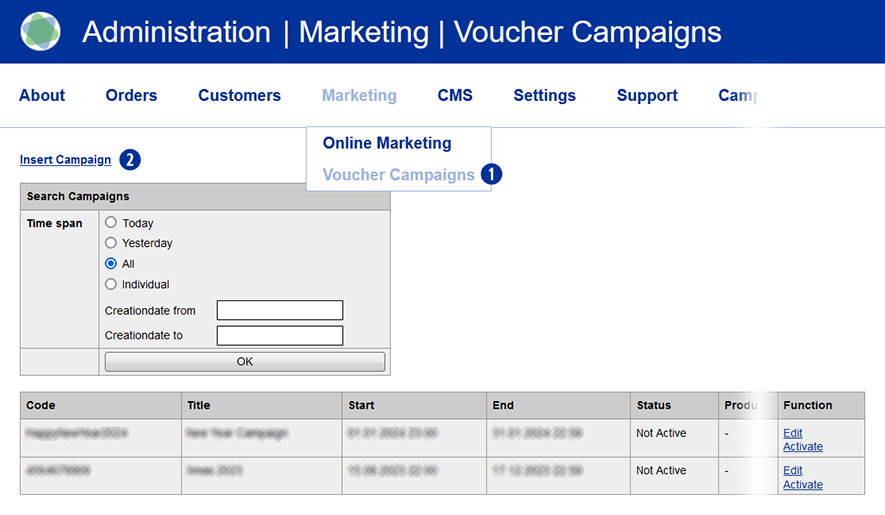
To create one or more vouchers, go to the Marketing / Voucher Campaigns menu in the Partnershop backend. [1]
The overview page is displayed.
To create a new voucher, click the “Insert Campaign” link. [2]
Configure your voucher with the following setting options.
- Enter a name for the voucher under “Title” [3].
- The “campaign code” [4] can consist of up to 25 characters.
Uppercase and lowercase letters are permitted, but no special characters. - Specify the start date [5] including the start time [6] of the voucher for the validity period of the voucher.
Please pay attention to the correct spelling. When you click in the “Start date” input field, a “calendar” opens. - Specify the end date [7] including the end time [8] of the voucher for the validity period of the voucher.
Please pay attention to the correct spelling. When you click in the “End date” input field, a “calendar” opens. - From the “Product kind” list [9], select whether the voucher should be valid for all products or only for a specific product group.
- For “Users” [10] you specify which customers the voucher is valid for.
– “All Registrations” – the voucher is valid for all registered users
– “New Customer only” – the voucher is only valid for customers without a previous order
– “Customer list” – the voucher is only valid for one or more manually selected customers - Select the desired voucher type under “Voucher Type” [11].
Set it as a percentage or a fixed amount. - Enter the desired voucher value under “Voucher” [12].
Please note the instructions for input. - Set a minimum order value for the voucher in the “Min amount” input field [13].
- In the “Number of mailings” input field [14] you determine how many customers can redeem the voucher.
Complete the entry for the new voucher to be created by clicking on the “Insert” button. [15]
The voucher is saved in the database.
You can return to the overview page at any time using the “List Campaigns” [16] link.
Entries that were not saved using the “Insert” button [15] will be lost.

You will then be returned to the overview page.
There you will be shown all the vouchers you have created in list form, depending on your selection.
A newly created voucher is deactivated by default.
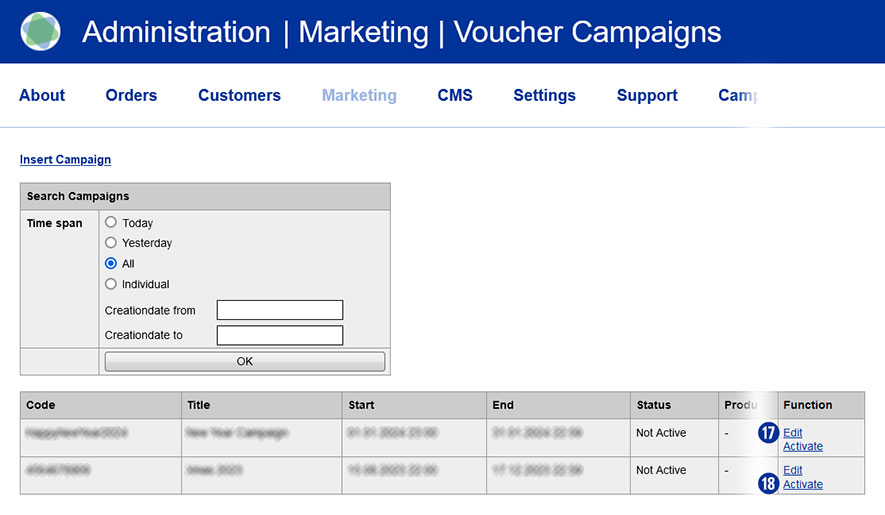
From the list view you have the option to edit the voucher (“Edit”) [17] and/or activate it (“Activate”/“Deactivate”). [18]
An activated voucher can be deactivated at any time. An active voucher cannot be edited.
Notification
The use of vouchers is only possible for registered users. Guest users cannot enter coupon codes.
A voucher code is intended exclusively for use in one campaign and may not be used for further campaigns.
This also applies to a code that was used as part of an order but was canceled.

