CMS (19)
PayPal payment processing is not carried out via the Payment Service Provider Worldline | Six Payment Services, but directly between them and PayPal.
For you as a Partnershop operator, a PayPal business account is required.
To use the payment method “PayPal” within your Partnershop, it is necessary to enter the data from the PayPal business account in the Partnershop Backend – Settings > Payment > Indicate your PayPal business account.
To do this, follow the steps below.
-
- Log in to your PayPal account. [1]
Use the URL https://www.paypal.com/mep/dashboard or go directly to the developer settings https://developer.paypal.com/dashboard/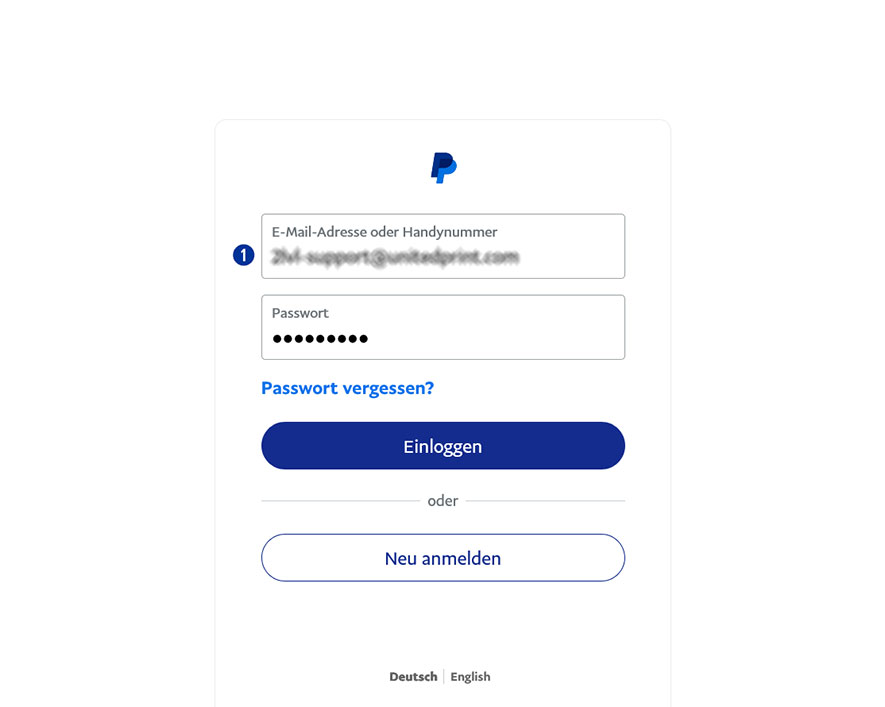
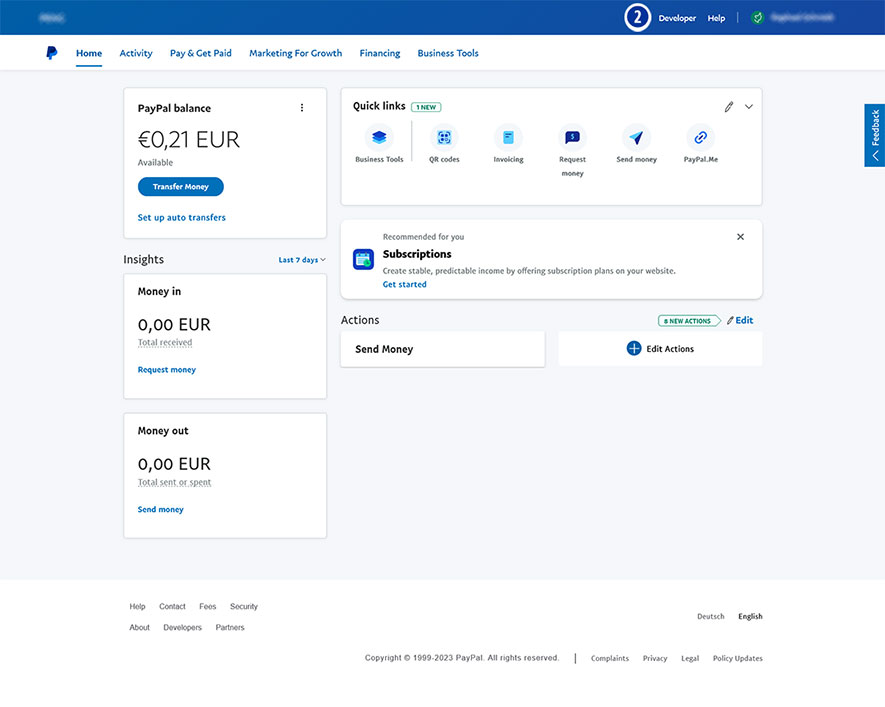
- Click the link “Developer” in the main navigation. [2]
- Select “Apps & Credentials”. [3]
- Click the button “Live”. [4]
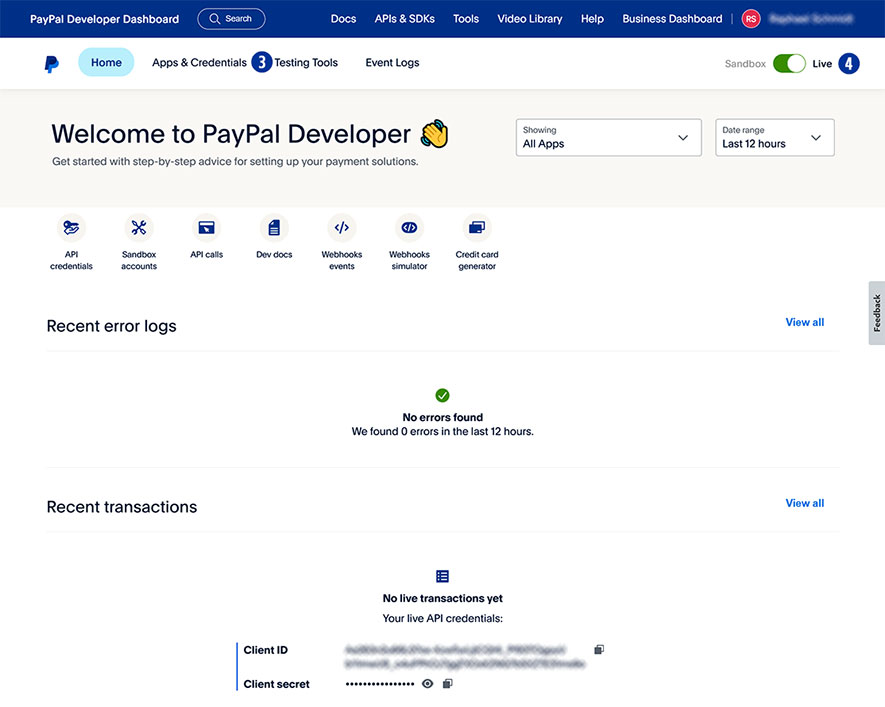
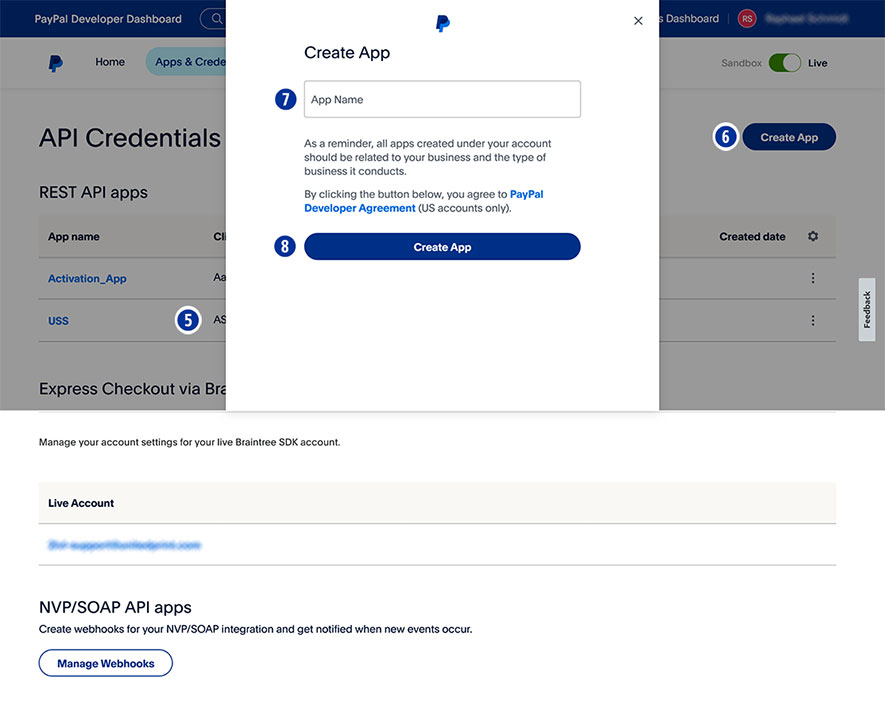
- Under “App name” select your shop name. [5]
- If there is no shop name yet, click “Create App” [6] and assign an “app name” for your Partnershop (e.g. brand name). [7]
- Confirm your entry by clicking the button “Create App”. [8]
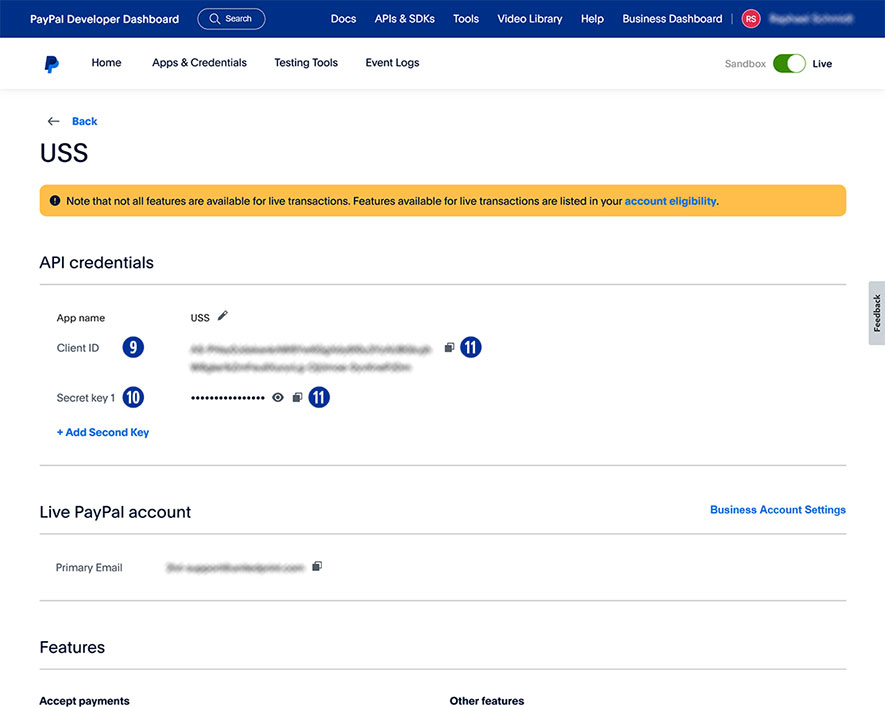
- Under “App name”, copy the “Client ID” [9] using the “Copy to clipboard” icon [11] and paste it into the Partnershop Backend – Settings > Payment > Indicate your PayPal business account. [12]
- Under “App name” copy the “Secret key 1” [10] using the “Copy to clipboard” icon [11] and paste it into the Partnershop Backend – Settings > Payment > Indicate your PayPal business account. [13]
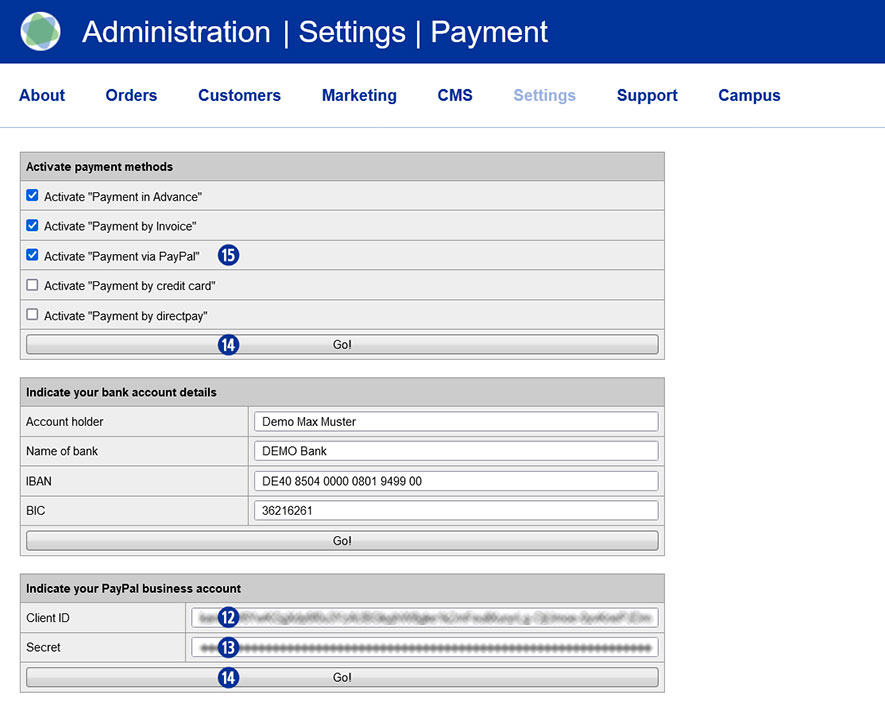
- Confirm your entries by clicking the button “Go!”. [14]
- Finally, activate the payment method “PayPal” for all customers in the Partnershop backend – Settings > Payment > Activate “Payment via PayPal”. [15]
- Confirm your entries by clicking the button “Go!”. [14]
- Log in to your PayPal account. [1]
Yes, by using badges you create an opportunity to emphasise or identify certain services.
In principle, badges can be displayed as visual labelling for every product on the homepage of your partner shop. [1]

To do this, switch to your Partnershop backend – CMS / Content / Pages / Product. [2]
Select the desired product in the left navigation under Page. [3]
Go to the ‘General Page Data’ component [4] and open it. [5]

Scroll to the ‘Badge’ area [6] and select the desired type. [7]

There are various types of badges to choose from.
- None
- free Text
- blue angel
- nature paper
- nature paper transparent
- 24h
- 24h transparent
Option „Free Text“
You can make the following changes to this selection.
- Free Text
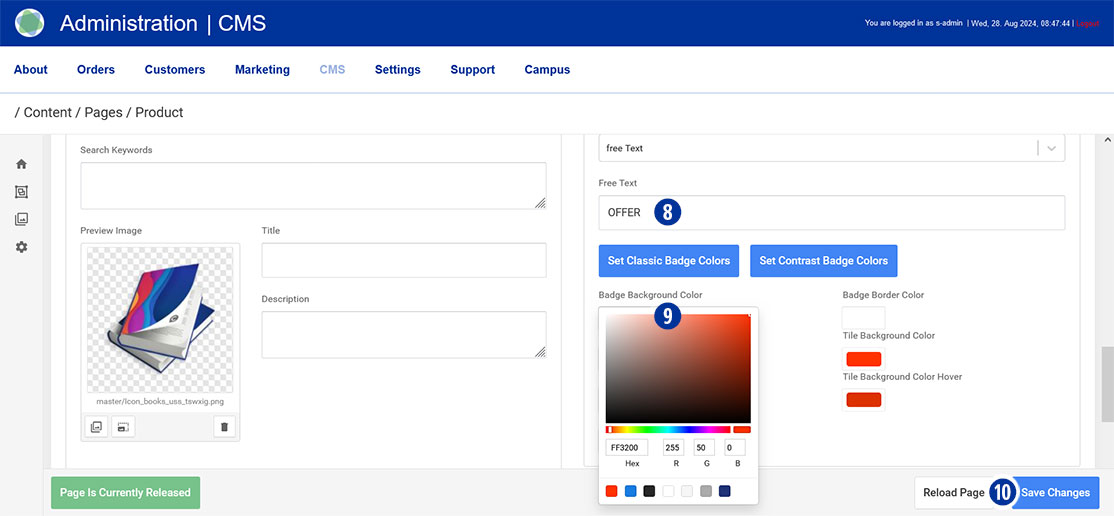
Enter the desired badge text in the input field. [8] - Badge Color
Specify the desired badge colours. Click in the respective input field. [9] Select the desired colour from the colour palette displayed. Close the palette by clicking next to it. Cancel the colour selection by clicking on the icon.
Alternatively, you have the option of using predefined badge colours. To do this, click the ‘Set Classic Badge Colours’ or ‘Set Contrast Badge Colours’ button.
Save your changes by clicking on the ‘Save Changes’ button. [10]
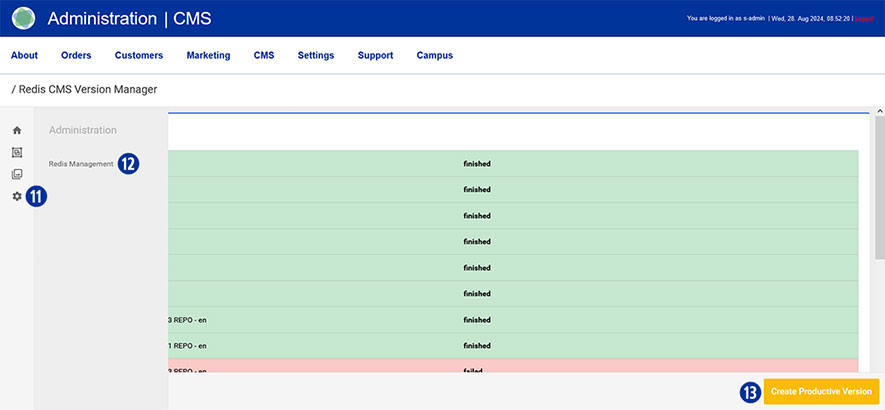
After completing all changes, switch to your Partnershop backend – CMS / Administration / Redis Management / Exports. [11][12]
Click the ‘Create Productive Version’ button. [13]
Graphics are an important part of your Partnershop and can be customised.
The following steps are required to provide customised graphics for your USS Partnershop.
- Create the desired graphics using the specification for USS Partnershop graphics.
Please note the applicable specifications for USS graphics at the end of the article. - Upload the created graphics to your USS partner shop media library.
To do this, switch to your partner shop backend – CMS / Media / Media Upload. - Select the desired category.
Category for category header graphics
Product for product header and product detail graphics
Product Variant for product header and product detail graphics (e.g. GreenLine, calendar formats, etc.)
Calculation Images for product icon graphics
Use your own graphics on product pages
The following steps are required to change the graphics of individual product pages in your USS Partnershop.
- Switch to your Partnershop backend – CMS / Content / Pages / Product.
- Select a product from the page list (e.g. Banderoles).
- Open the ‘General Page Data’ component.
- Replace the two graphics ‘Open Graph Image’ and ‘Preview Image’.
- Under ‘Open Graph Image’, click on the media centre icon on the left below the graphic.
- Then select the category in the window – Category ‘calculation-images’.
If no graphic is displayed, click on the refresh icon at the top right. - Select the desired product icon (e.g. Banderoles).
- Repeat steps 5-7 for the ‘Preview Image’.
- Then open the ‘Header’ component.
- Under ‘Background Image’, click on the media centre icon on the left below the graphic.
If no image is displayed, click on the refresh icon at the top right. - Select the desired header graphic (e.g. banderoles).
- Then open the ‘Free Texts Two Columns’ component.
- Select ‘Compose ON’ in the right-hand section.
- Click on the media centre icon on the left below the graphic.
- Select the desired detail graphic (e.g. banderoles).
- Save your changes by clicking on the ‘Save Changes’ button.
Use your own graphics in category pages
The following steps are required to change the graphics on the category pages in your USS Partnershop.
- Switch to your Partnershop backend – CMS / Content / Pages / Category.
- Select a category from the page list (e.g. 24-hour service).
- Open the ‘Header’ component.
- Under ‘Background Image’, click on the media centre icon on the left below the graphic.
If no image is displayed, click on the refresh icon at the top right. - Select the desired header graphic (e.g. 24h service).
- Save your changes by clicking on the ‘Save Changes’ button.
Use your own graphics in the product icons (calculation image)
- To do this, switch to your Partnershop backend – CMS / Content / Product Data / Editor.
- Select a product from the ‘Product Alias’ list (e.g. Banderoles).
- Replace all graphics by clicking on the media centre icon on the left below the graphic.
- Then select the category in the window – Category / ‘calculation_images’.
If no graphic is displayed, click on the refresh icon at the top right. - Select the desired product icon (e.g. Banderoles).
- Repeat these steps for all graphics that you wish to replace.
Please note that the ‘Calculation image’ must be maintained on several pages.
Change pages via the ‘Pages’ navigation above the graphic. - Click the ‘Save’ button as soon as you have finished editing the ‘Calculation image’ for a product (e.g. banderoles).
Publish changes
- After saving, the changes must be published.
Switch to your partner shop backend – CMS / Administration / Redis Management / Exports. - Click the ‘Create Productive Version’ button.
Your changes will be visible to all customers in the shop after approx. 2 minutes.
Specification for USS product graphics
The following specifications apply to the processing of USS Partnershop graphics.
Product-Icon
Size: 360x 360px
Format: *.png with transparent background
Name convention: Icon_xxx.png
Product- / Category-Header
Size: 1770 x 320px / 96dpi
Format: *.jpg mit seitlichem grauem Verlauf
Name convention: Product_Header_xxx.jpg / Category-Header_xxx.jpg
Product-Detail
Size: 785 x 385px / 96dpi
Format: *.jpg
Name convention: Product_Graphic_xxx.jpg
It is possible to use the implemented AI assistant (chatbot) to process customer enquiries.
Take advantage of the AI assistant to respond to customer enquiries quickly and efficiently, regardless of time and resources.
Instead of making personal contact by dialling a service telephone number, you can receive support requests via the AI assistant. They receive these enquiries in the form of an email with all the information provided by the customer.
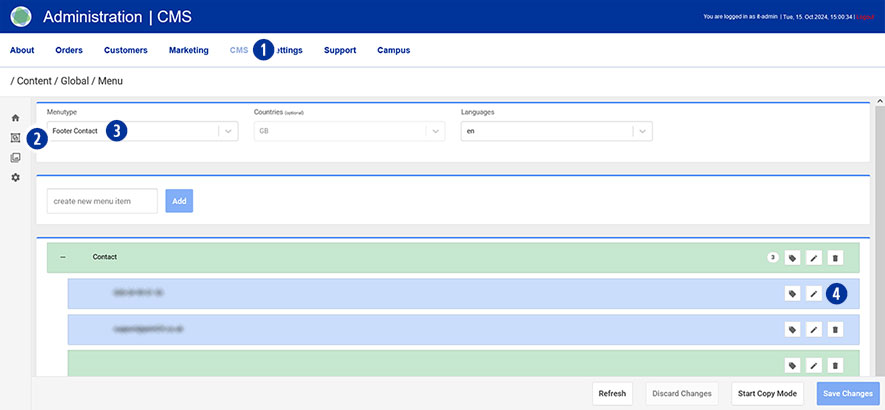
To do this, go to your Partnershop backend – CMS / Content / Global / Menu. [1][2]
Select Menutype / Footer Contact in the left navigation. [3]
Select the first menu item under ‘Contact’ and click on the ‘Edit’ icon [4].
Change your entries.
Under ‘Text Type’, change the radio button from ‘contact’ to ‘text’. [5]
Enter your content in the ‘Text’ input field (e.g. Callback requested?). [6]
Next, under ‘Link Type’, change the radio button from ‘contact link’ to ‘redirect to chatbot’. [7]
Select the ‘Send Message Callback’ option in the ‘Chatbot Function’ navigation on the right. [8]
Save your changes using the ‘Save Changes’ button. [9]

Publish changes
After saving, the changes must be published.
Switch to your Partnershop backend – CMS / Administration / Redis Management / Exports.
Click the ‘Create Productive Version’ button.
Your changes will be visible to all customers in the shop after approx. 2 minutes.
Use the “Media Upload” option to update existing image material (e.g. home page banners/sliders). This eliminates the need to edit content via the Content / Pages area.
Ensure that the new images meet the technical requirements and are identical in terms of file naming. Check the required image sizes and resolutions of the new images. Adapt the new image material if necessary.
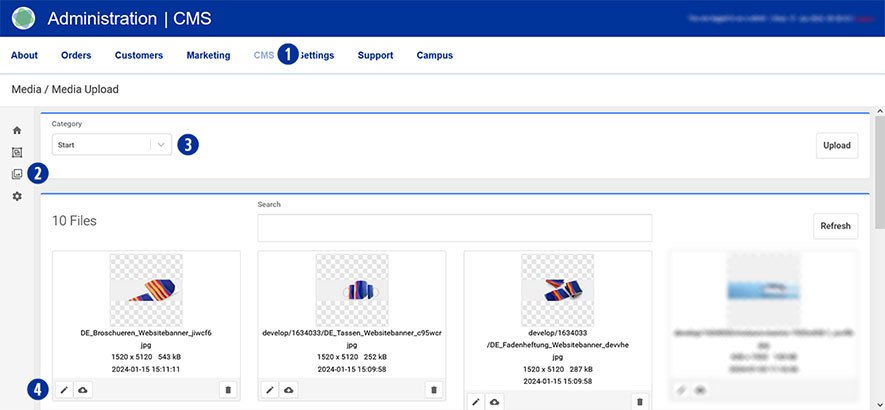
To do this, go to your Partnershop backend – CMS / Media / Media Upload. [1] [2]
To update, e.g. the start page banner/slider, select Category / Start in the left-hand navigation. [3]
Select the image to be updated and click on the “Edit” icon. [4]
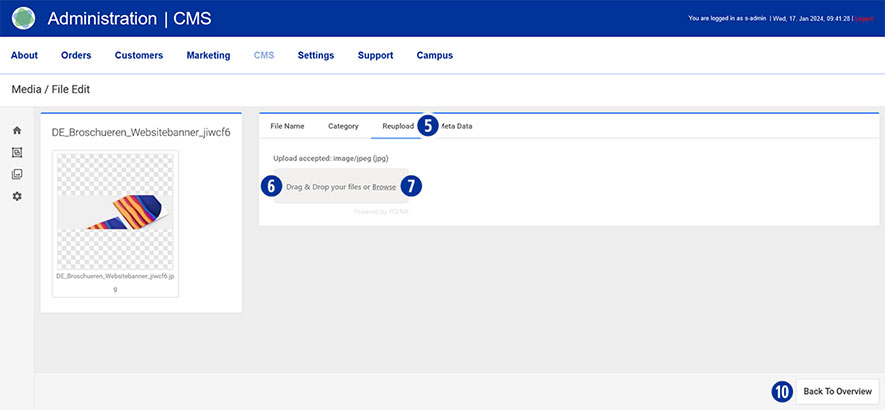
In the next step, click on the “Reupload” tab [5].
Drag the corresponding file of the start page banner/slider (*.SVG or *.PNG) onto the greyed-out area “Drag & drop your files…” [6] or click on the “Browse” link [7] and select the desired file.
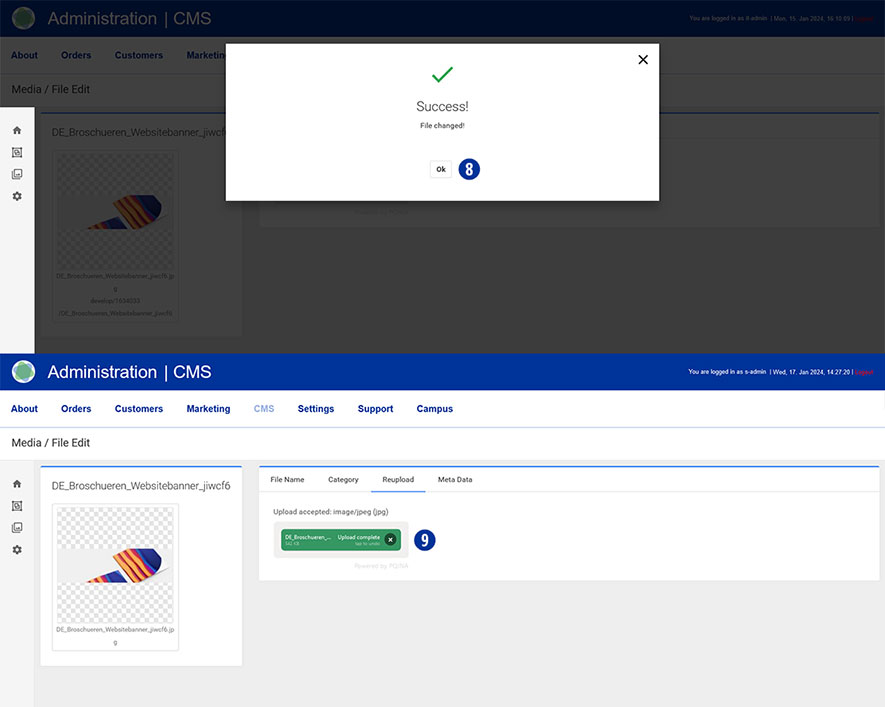
Wait until the process is complete and a layer with the message “Success! File changed!” is displayed. Click the “Ok” button or close the layer. [8]
The successful upload process is also displayed in the form of the file name in a green button. [9]
Click the “Back To Overview” button at the bottom right. [10]
The uploaded image is displayed in the overview.
Note
The updated image of the start page banner/slider will be displayed the next time the start page of your partner shop is called up.
In order to achieve the best possible search results for your partner shop on Google, we recommend making the following adjustments and customisations.
The aim of optimisation is to enable search engines to better understand and present the content of your Partnershops.
Meta Descritpion Tag
Here you have the option of storing SEO-relevant content for search engines.
The meta description is read by search engines together with the page title and the shop URL. This website information is then used to show the user a preview of the content of the individual websites in the search results.
Robots Directive (Index, Follow)
Only activate the two checkboxes if you have previously created customised content.
Non-individualised content does not lead to a positive search engine ranking.
Slug (URL Slug)
The URL slug is an important element of search engine optimisation (SEO). The URL slug is the part of a URL that identifies a page and is usually displayed directly after the domain extension.
Canonical Tag
The canonical tag is used to correctly label shop pages with duplicate content.
If such pages are recognised by search engines (e.g. Google), this results in downgrades in the ranking of search results.
Pages with a cannonical tag therefore link from one or more pages to the original.
Tags
Use tags to further label and categorise topics and content.
Editing
To do this, switch to your partner shop backend – CMS / Content / Product [1] [2] and select the product to be edited under “Page”. [3]
Go to the “General Page Data” component [4] and open it. [5]
Make your individual adjustments to the points mentioned above.
Save your changes by clicking on the “Save Changes” button. [6]

Go to your Partnershop backend – CMS / Content / Global / Style. [1][2]
Drag your logo file (*.SVG or *.PNG) onto the gray area “Drag & Drop your files…” or click the “Browse” link and select the desired file. [3]
Drag your icon file onto the gray area “Drag & Drop your files…” or click the “Browse” link and select the desired file. [4]
![]()
The successful upload process will be shown to you on the left in the form of the file name in a green button. [5]
![]()
Note
Please pay attention to the following technical specifications when creating your logo.
- Image size 175 x 40 Pixel
- Save as SVG or PNG file
- No umlauts or spaces
Go to your Partnershop backend – CMS / Media / Media Upload. [1] [2]
Select Category / Start [3] in the left navigation and click the “Upload” button on the right. [4]

Drag at least two or three home page banners (*.SVG or *.PNG) onto the gray area “Drag & Drop your files…” [5] or click the “Browse” link [6] and select the desired files out of.
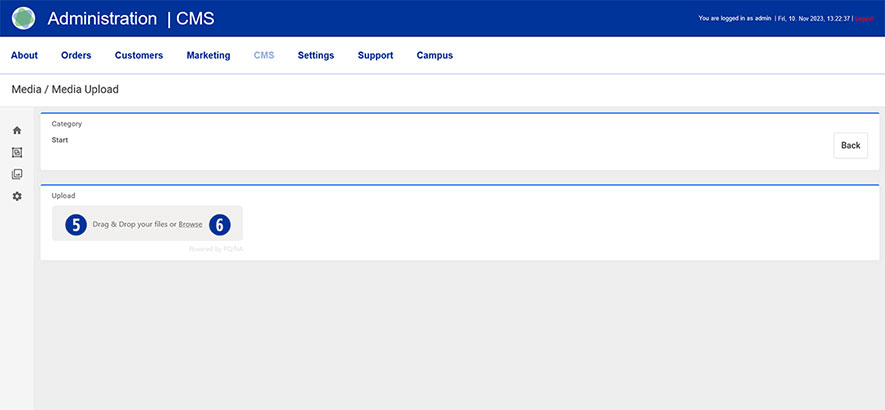
The successful upload process is displayed on the left in the form of the file name in a green button. [7] Click the “Back” button on the right. [8]
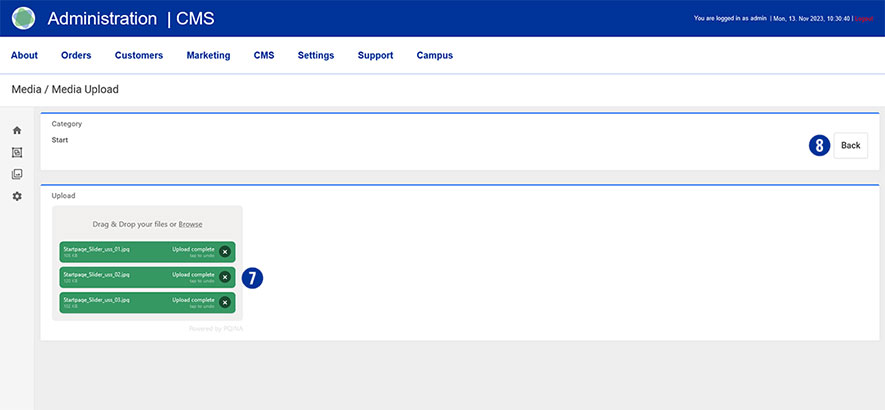
The uploaded images are displayed in the overview. [9]
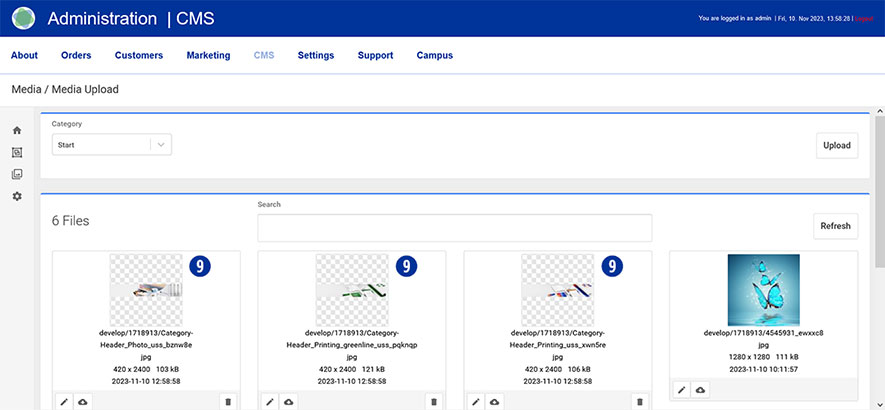
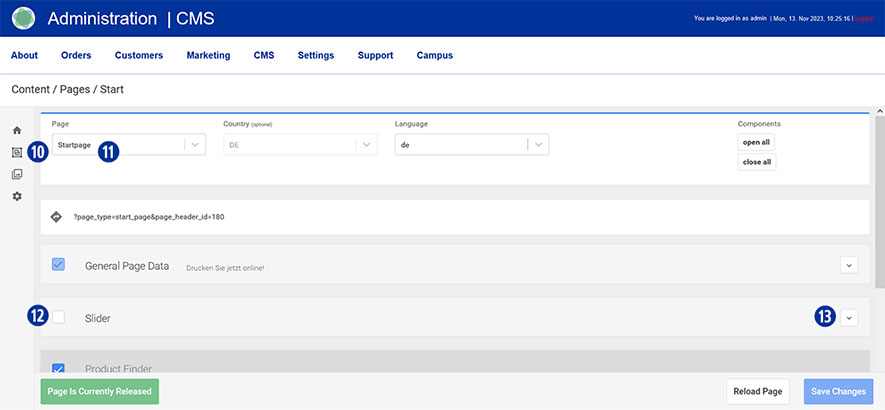
Switch to the area using the navigation (left) Content / Pages / Start. [10] You are here Page / Startpage. [11]
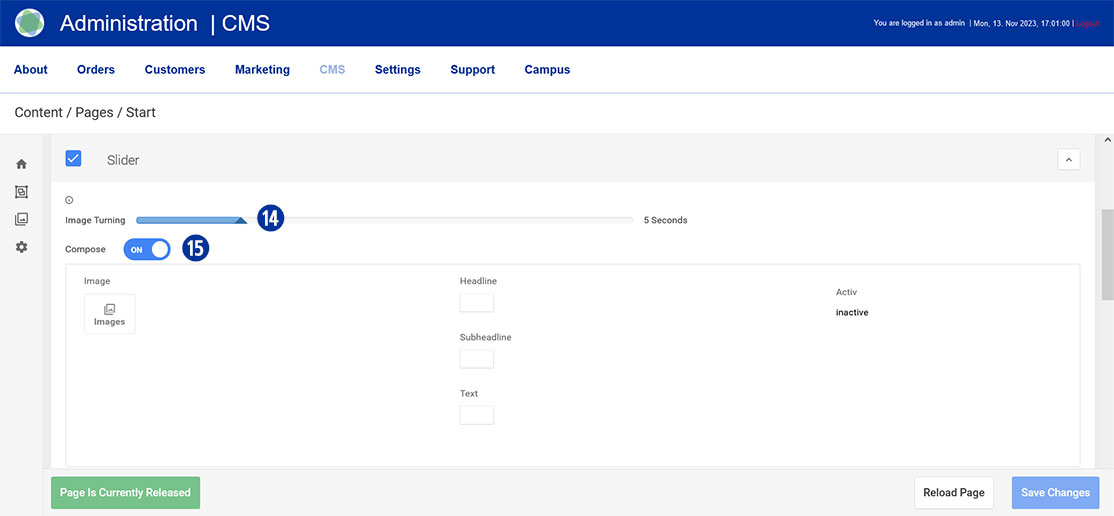
Scroll to the “Slider” tab, click on the checkbox to activate [12] and open it. [13]
Move the slider under “Image Turning” [14] to the right or left to determine the time for a horizontal change of the home page banner. A value between 1 and 20 seconds is possible.
Under “Compose” drag the slider to “ON”. [15]
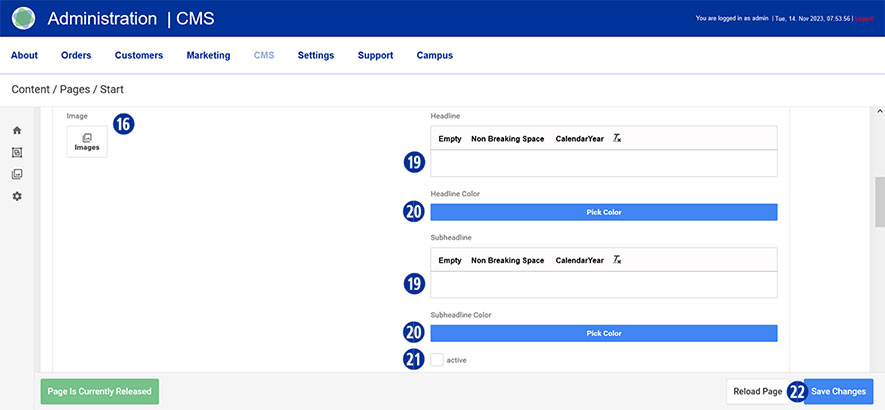
Select the first uploaded homepage banner under “Image”. To select an image, click the “Images” icon. [16]
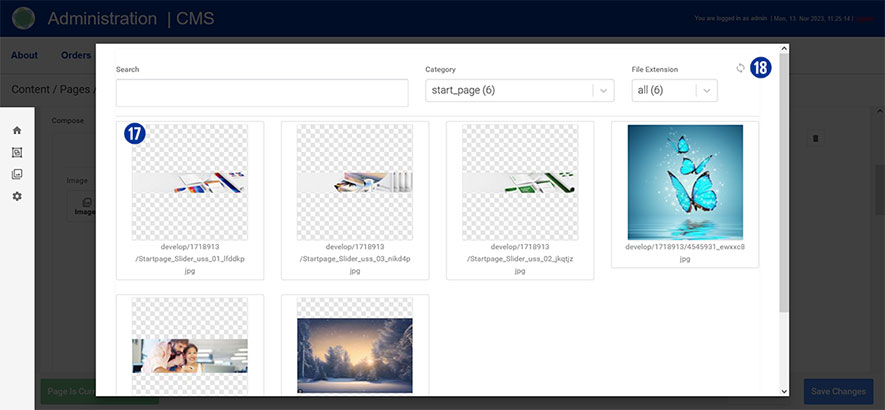
You will be shown an overview of the uploaded files. [17] Optionally, update the view using the “Update” icon at the top right. [18]
Enter the desired text in the “Headline” and “Subheadline” input fields. [19]
Optionally select a text color by clicking on the “Pick Color” button. [20]
Activate the input by clicking on the “active” checkbox. [21]
Repeat the process for additional homepage banners below.
Save your changes by clicking on the “Save Changes” button. [22] Close the “Slider” tab. [13]
Note
Please pay attention to the following technical specifications when creating your home page banner.
- Image size 5120 x 1520 Pixel with 72 dpi
- Save as a web-optimized JPEG file
- Background color of the sliders HEX F0F0F0
File names must not contain umlauts or spaces.
To create further sliders, please use only the Photoshop template below.
Download
Slider_Template.zip
Various offline and online payment methods are available to you within your Partnershop.
The offline payment methods currently supported are payment in advance (bank transfer) or payment on account.
For online payment methods, please use the options provided by your payment service provider Worldline | Six Payment Services.
You can also pay via PayPal.
The individual payment methods are activated/deactivated via the partner shop backend under the menu item Settings / Payment [1] in the “Activate payment methods” module. [2]

Adjust your payment methods on the homepage.
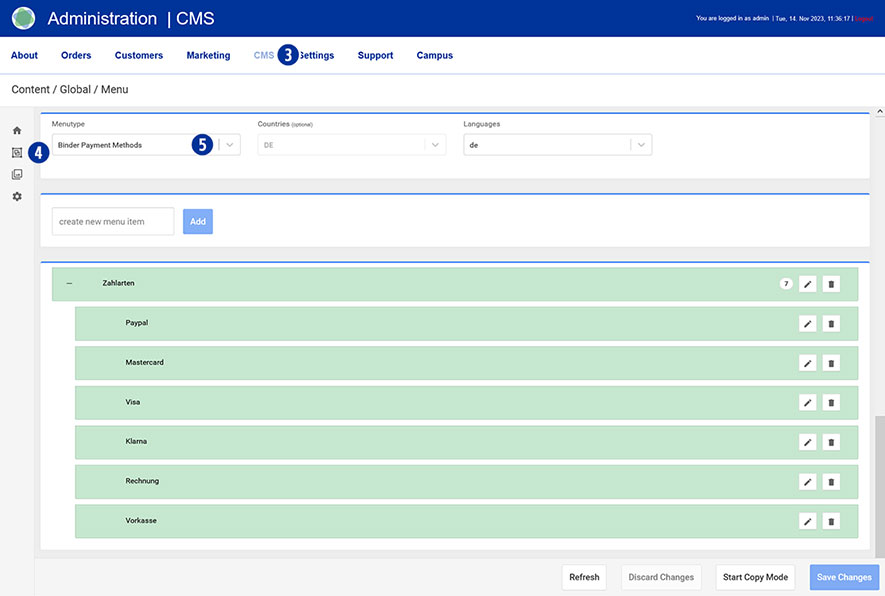
Switch to your Partnershop backend – CMS / Content / Global / Menu. [3] [4]
Select in the left navigation Menutype / Binder Payment Methods. [5]
Note
Please check payment transfers using the above-mentioned offline payment methods outside the shop via your regular business account.
For security reasons, the offline payment method “payment on account” is only available to registered users.
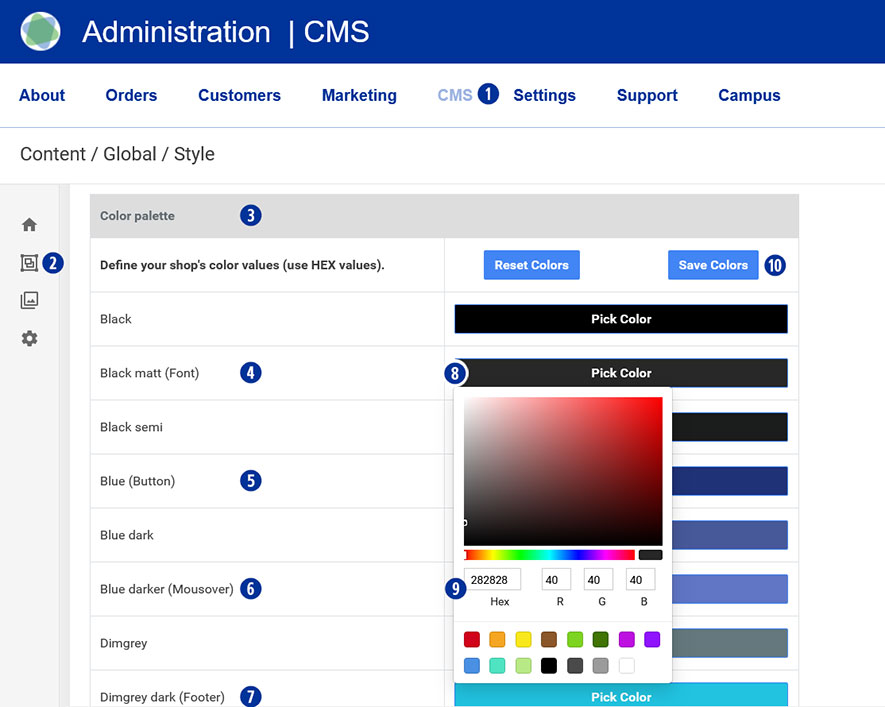
Switch to your partner shop backend – CMS / Content / Global / Style. [1][2]
Under “Color palette” [3], change the colors for font [4], button [5], mouseover [6] and footer. [7]
To do this, click on the “Pick Color” field [8] and select the desired value using the color palette. [9]
Save your changes using the “Save Colors” button. [10]
Go to the homepage of your Partnershop. Your individual colors will be displayed.
On the homepage of the Partnershop you can present your company attractively in the form of images and text.
Switch to your Partnershop backend – CMS / Content / Pages / Start. [1][2].
You are here Page / Startpage. [3]
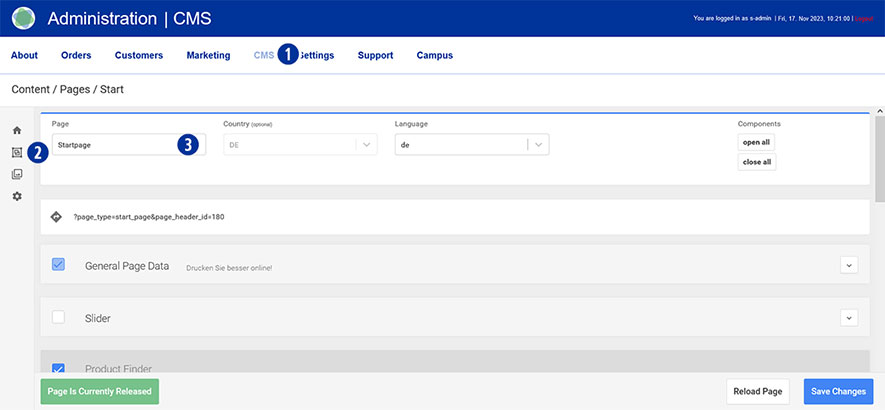
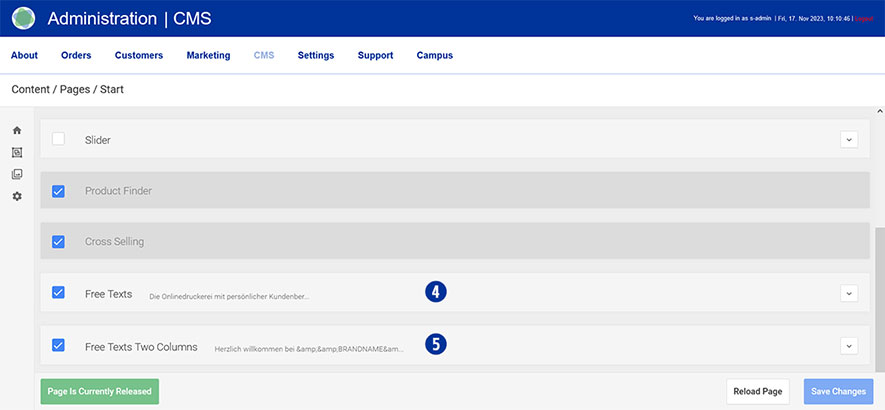
To display it, select a variant from one of the two tabs “Free Texts” [4] or “Free Texts Two Columns”. [5]
Setting options tab „Free Texts“
• Headline
• Content (1-spaltic)
Setting options tab „Free Texts Two Columns“
• Headline
• Content (2-spaltic)
Media Upload
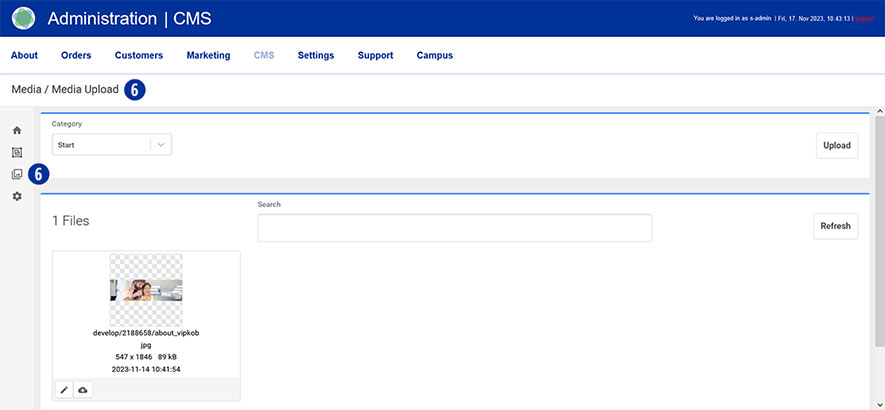
In order to use graphics in your content, images must first be uploaded in “Media Upload”.
Detailed information on the topic of “Media Upload” [6] can be found via this link.
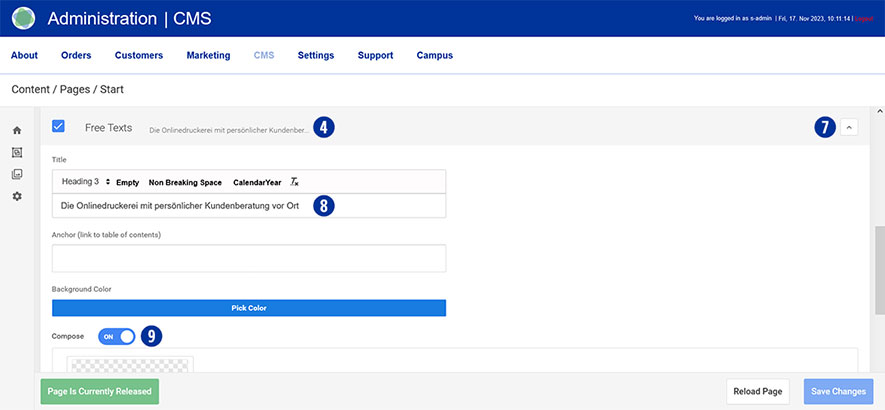
Scroll to the “Free Texts” [4] or “Free Texts Two Columns” [5] tab and open it. [7]
Enter the desired text in the “Title” input field. [8] Make sure to maintain the “Heading 3” formatting.
Under “Compose” drag the slider to “ON”. [9]
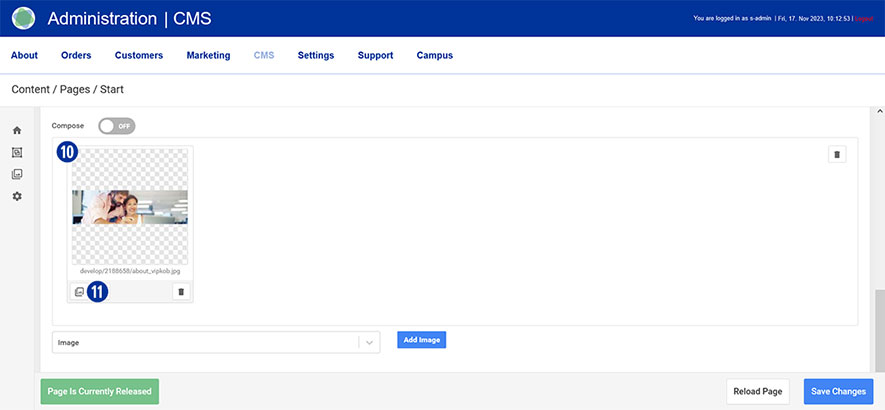
Select the homepage image [10] previously uploaded via “Media Upload” [6].
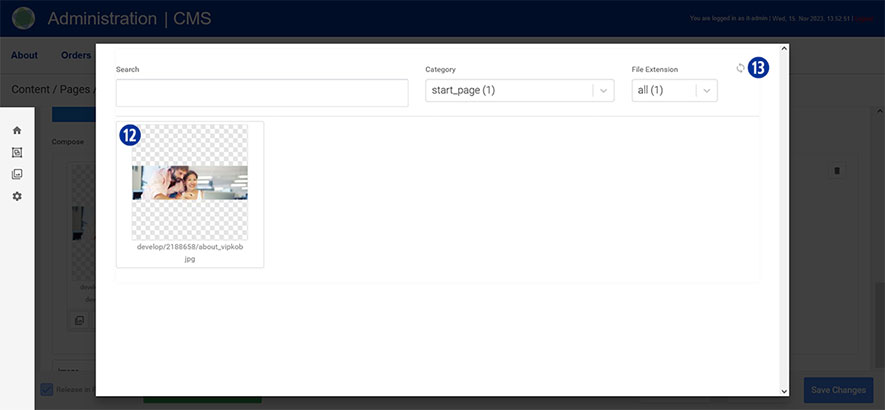
To select an image, click the “Images” icon. [11] You will be shown an overview of the uploaded files. [12]
Optionally, update the view using the “Update” icon at the top right. [13]
Do the same with the “Free Texts Two Columns” tab. [5]
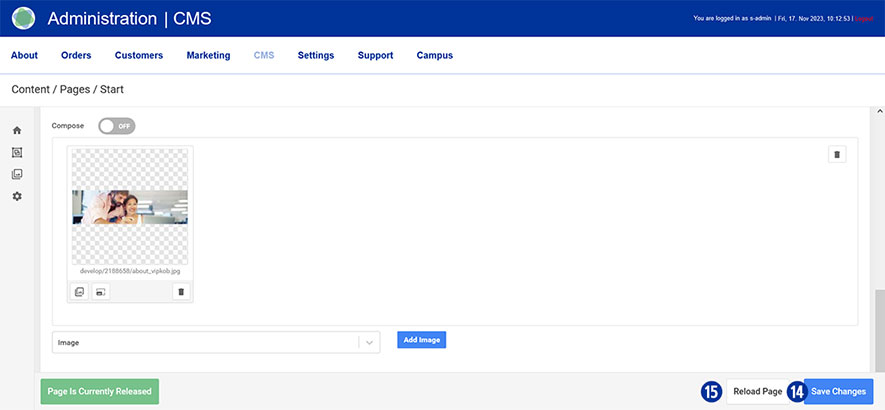
Save your changes by clicking on the “Save Changes” button. [14]
By clicking on the “Reload” button you will return to the original state of the page without saving any changes. [15]
Close the “Free Texts” [4] or “Free Texts Two Columns” tab. [5]
Note
Please pay attention to the following technical specifications when creating your home page text (image).
- Image size: 1530 x 450 Pixel with 72 dpi
- Save as a web-optimized JPEG file
File names must not contain umlauts or spaces.
Content changes that you make via the Partnershop backend CMS module must be saved and published in order to be displayed in the shop. [1][2][3].
The prerequisite for this is that the edited page has the status “Page Is Currently Released” (green button) [4] and has been saved. To do this, click the “Save Changes” button. [5]
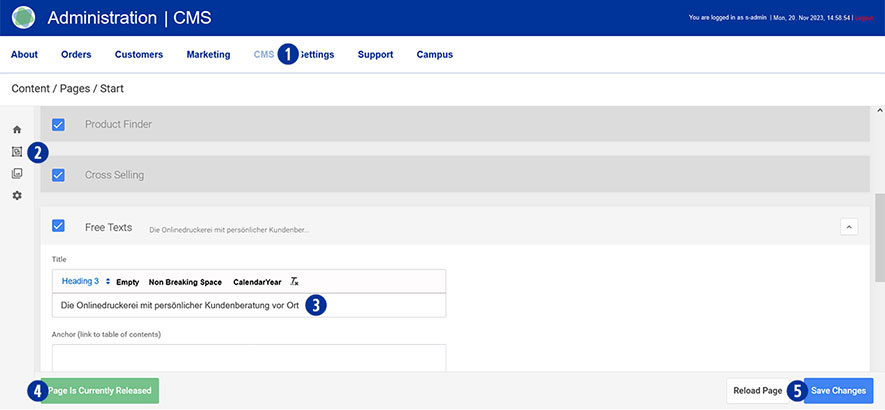
After completing all changes, switch to your Partnershop backend – CMS / Admninistration / Redis Management / Exports. [6]
Click the “Create Productive Version” button. [7]
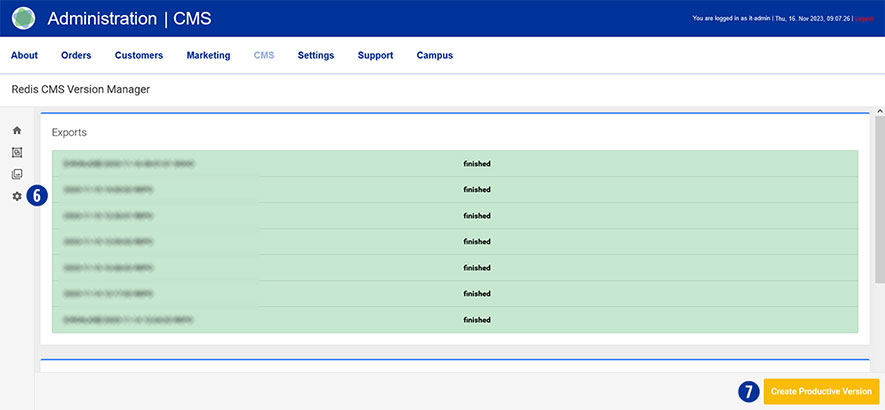
Your changes will be visible to all customers in the shop after around 2 minutes.
Switch to your Partnershop backend – Customer. [1]
You can use various search fields [2] to display information about your customer data.
It is also possible to export customer data from the partner shop backend.
To do this, click the “Go!” [4] button under “All customers export” [3].

The data is saved in a *.CSV file separated by commas.
This data can then be imported into a spreadsheet program (e.g. Microsoft Excel).
It is important that the previously created *.CSV file is not opened – but imported.
The following steps must be taken into account when importing data.
Switch to your Partnershop backend – CMS / Content / Global / Contacts. [1][2]
Change your details using the input fields [3] for
- Fax number (company)
- Phone number (Company, Service)
- E-mail address (Support, Finance)
Save your changes using the “Save Changes” button. [4]

Note
The data stored in the input fields [3] can be adopted in other content areas (e.g. general terms and conditions, imprint) by using these variables.
| Input | Variable |
| ServiceCall | &&SCALL&& |
| FAX | &&OFAX&& |
| &&SEMAIL&& | |
| E-Mail (Finance) | &&PSEMAIL&& |
Switch to your Partnershop backend – CMS / Content / Global / Menu. [1][2]
Select in the left navigation Menutype / Footer Service Times. [3]
Under “Service times” click on the “Edit” icon [4].
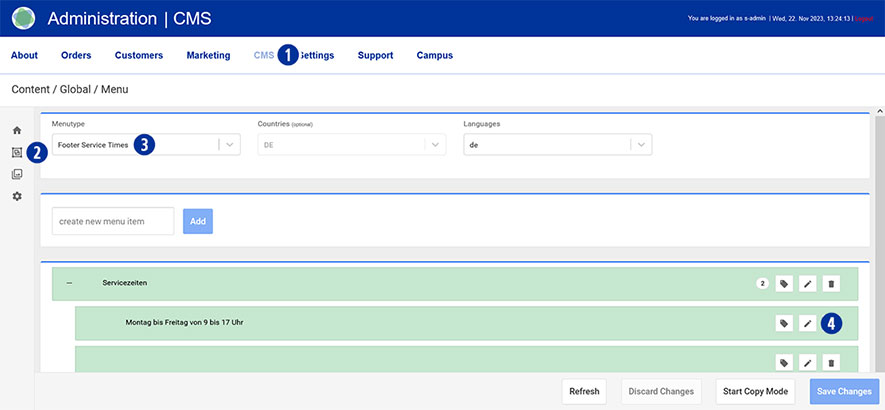
Change your entries. [5]
Save your changes using the “Save Changes” button. [6]

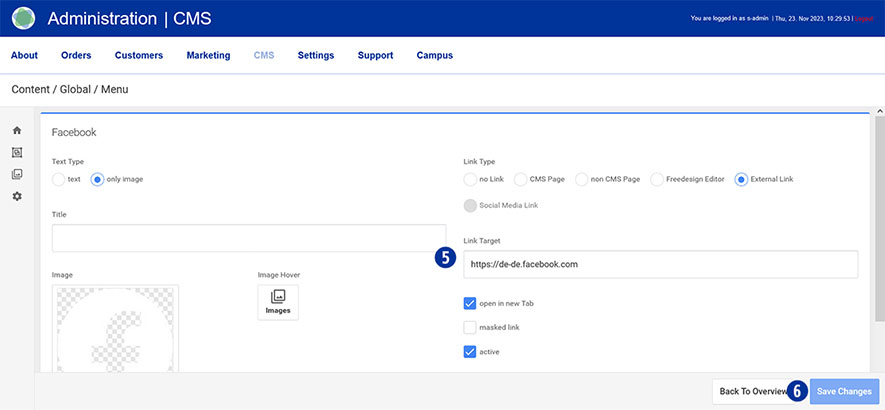
Switch to your Partnershop backend – CMS / Content / Global / Menu. [1][2]
Select in the left navigation Menutype / Footer Social Media. [3]
Select the desired link (e.g. Facebook) under “Social Media” and click on the “Edit” icon [4].
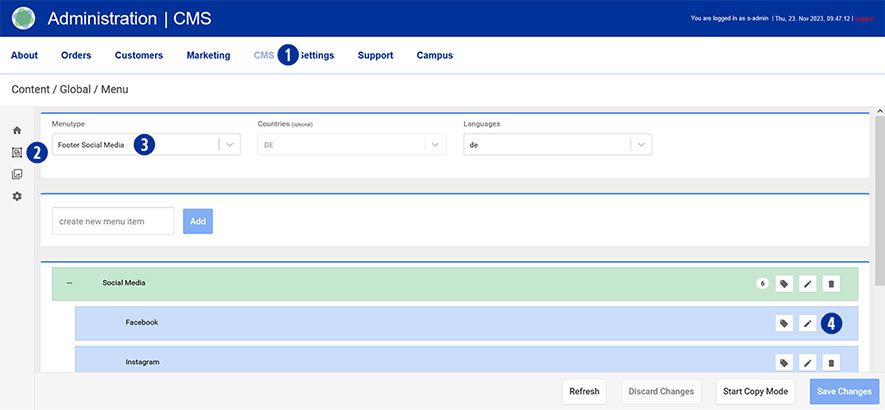
Change your entries. [5]
Customize your display on the homepage. To do this, activate or deactivate individual links.
Save your changes using the “Save Changes” button. [6]
You yourself are the operator of your Partnershop. This requires the provision of legal texts. Yours are affected by this
- General terms and conditions
- Privacy policy
- Imprint
Please ensure that your information is correct and check it regularly to ensure it is up to date.
Switch to your Partnershop backend – CMS / Content / Pages / Content. [1][2]
Select in the left navigation Page / Imprint. [3]
Alternatively, choose Privacy Policy oder Terms + Conditions.
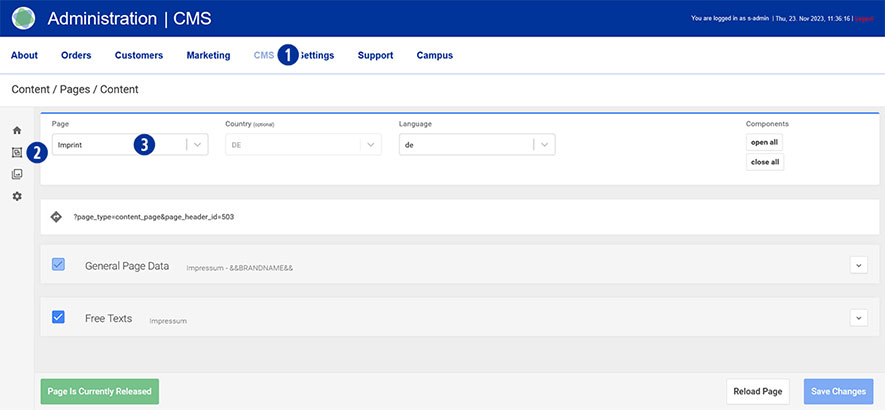
Scroll to the “Free Texts” tab [4] and open it. [5]
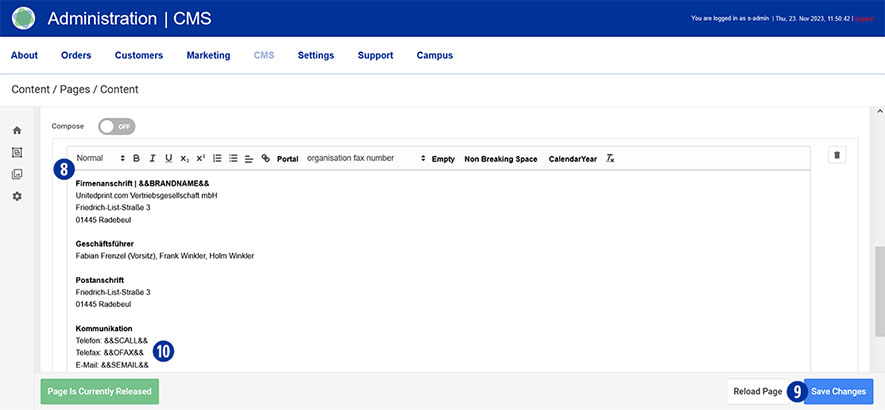
Enter the desired text in the “Title” input field. [6] Make sure to maintain the “Heading 3” formatting.
Under “Compose” drag the slider to “ON”. [7]

Enter or change the desired text in the input field and optionally carry out formatting. [8th]
Save your changes by clicking on the “Save Changes” button. [9]
Do the same with the pages Privacy Policy sowie Terms + Conditions.
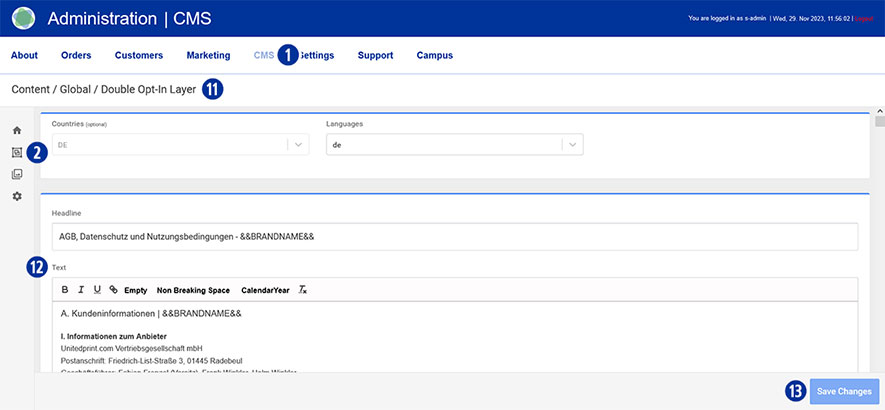
Make sure to also store your legal texts (general terms and conditions and privacy policy) in the Partnershop backend – CMS / Content / Global / Double Opt-In Layer. [1][2][11]
Enter or change the desired text in the input field and optionally carry out formatting. [12]
Save your changes by clicking on the “Save Changes” button. [13]
Note
The variables stored in the input fields [3] in your Partnershop backend – CMS / Content / Global / Contacts can be adopted in the “Imprint” content area. [10]
This eliminates the need for redundant recording of information for brand name, telephone, fax and email.
In the Partnershop you have the option of customizing and editing your product information in the form of images and text.
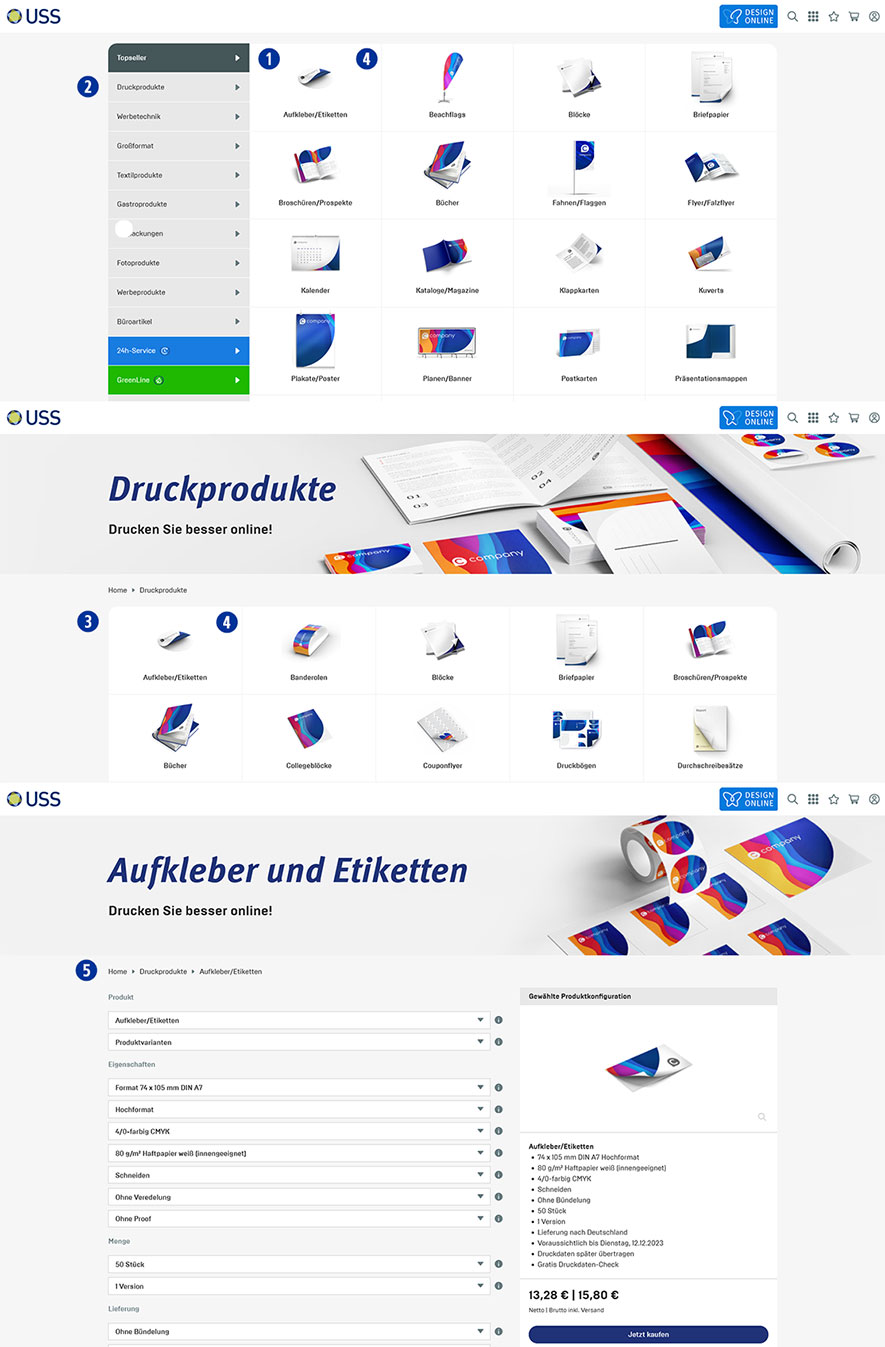
The product catalog is displayed visually in the form of a product overview in your Partnershop.
Frontend
The product overview of the “Top Sellers” product category is automatically displayed on the homepage of your Partnershop. [1]
This feature allows you to discover the most popular products directly.
Change the product category using the navigation bar on the left. [2]
By clicking on a product category you will be taken to a page where all products in this category are listed. [3]
Clicking on a product image [4] takes you to the product detail view. [5]
There you will find further detailed product information and prices.
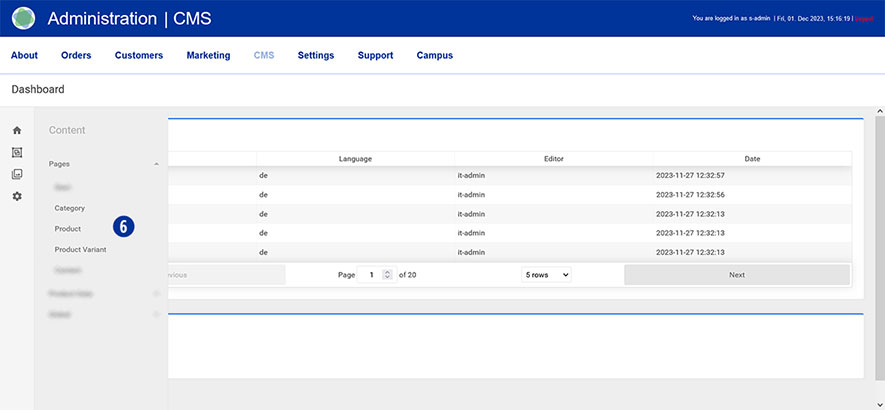
Backend
There are three areas available in your Partnershop backend for making changes to the product catalog.
- Category
- Product
- Product Variant
These three areas offer you the opportunity to flexibly adapt your product catalog and keep it up to date.
Switch to your Partnershop backend – CMS / Content / Pages and select an area. [6]
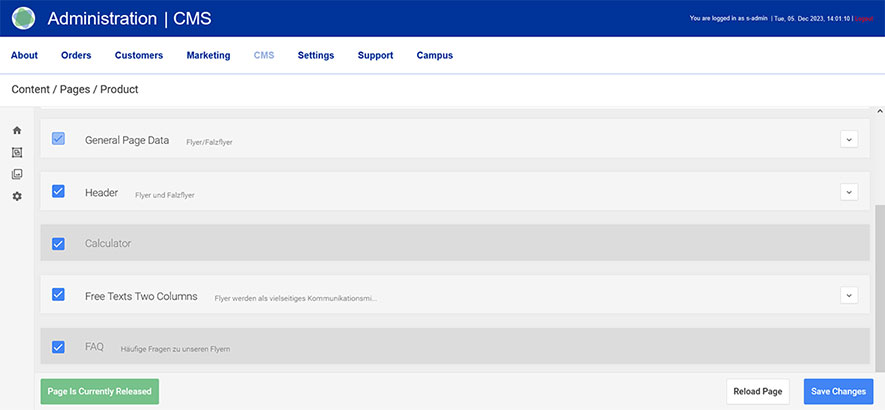
The following components are released for editing.
- General Page Data
- Header
- Free Texts Two Columns
Note
The content structure is identical for every area and every product, with a few exceptions.
Unreleased components contain system-dependent content that cannot be changed.
Your editing options in detail
Exemple
Product category: Printing Products
Product: Flyer/Leaflets
To do this, go to your partner shop backend – CMS / Content / Product [7] and select the product you want to edit under “Page”. [8th]
Go to the “General Page Data” component [9] and open it. [10]
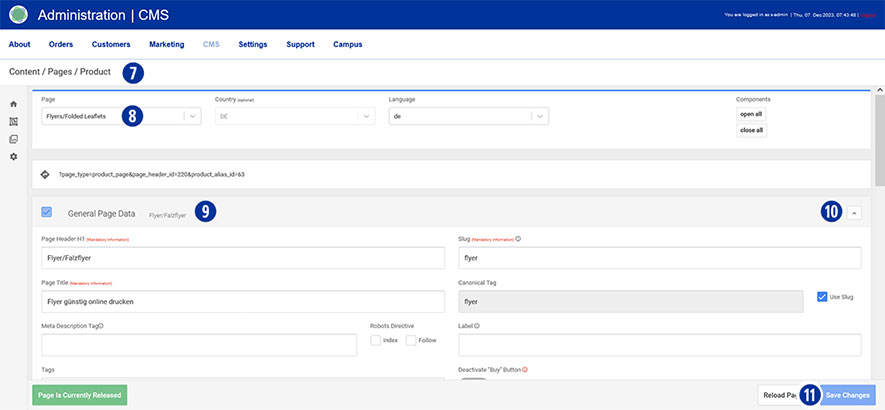
Component “General Page Data”
- Page Header H1
Please note that a change has a direct impact on the display of the product name on the relevant pages. - Page Title
A change directly affects the browser title and the mouseover information text within the product overview.
The browser title should contain keywords relevant to the search.
Make sure that the length of your entry does not exceed 70 characters. - Meta Description Tag
Here you have the opportunity to store SEO-relevant content for search engines. - Robots Directive (Index, Follow)
Only activate the two checkboxes if you have created individual content (product information texts).
Non-individualized content does not lead to a positive search engine ranking. - Open Graph (Image, Title)
Using Open Graph information gives them more control over how content appears when sharing on social platforms. - Search
Under “Search Keywords”, define suitable search terms that will lead to your content as keywords in search queries.
The “preview image” is used to display the product within the product overview.
Save your changes by clicking on the “Save Changes” button. [11]
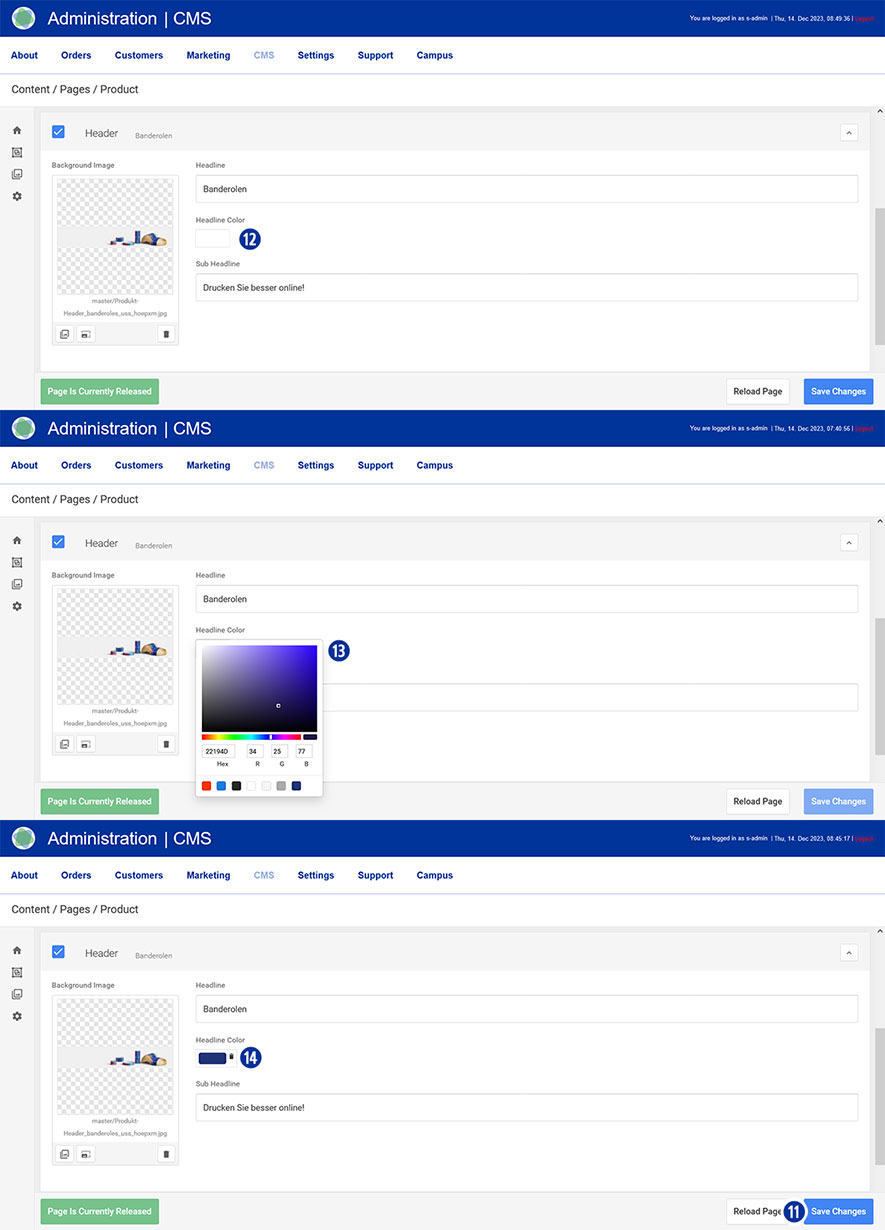
Component “Header”
In this area you can make the following changes.
- Headline
- Headline Color
Click in the input field [12]. Select the desired color from the color palette displayed. [13] Close the palette by clicking next to it. Cancel the color selection by clicking on the icon. [14] - Sub Headline
- Headline Image
Save your changes by clicking on the “Save Changes” button. [11]
The adjustments affect the display of the “product detail view” – not the product catalog.
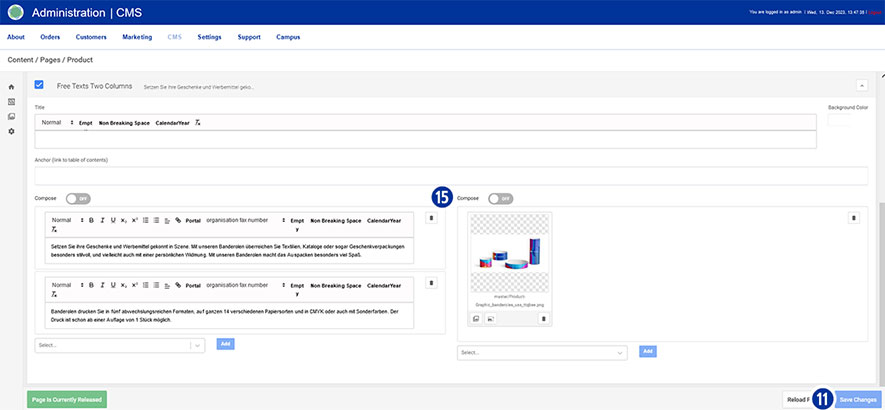
Component “Free Texts Two Columns”
In the 2-column component you have the opportunity to adapt SEO-relevant content for search engines (text and images). [15]
Changes in this area affect the display of the content on the “Product Detail View” page – below the calculation.
Save your changes by clicking on the “Save Changes” button. [11]
Components “Category” and “Product Variant”
The other two areas “Category” [4] and “Product Variant” [6] are processed in a similar way to the “Product” area.
Note
After you have saved your changes in the partner shop backend, it may take some time until the product name is updated accordingly.
In order to use graphics in your content, images must first be uploaded in “Media Upload”.
You can find detailed information on the topic of “Media Upload” via this link.
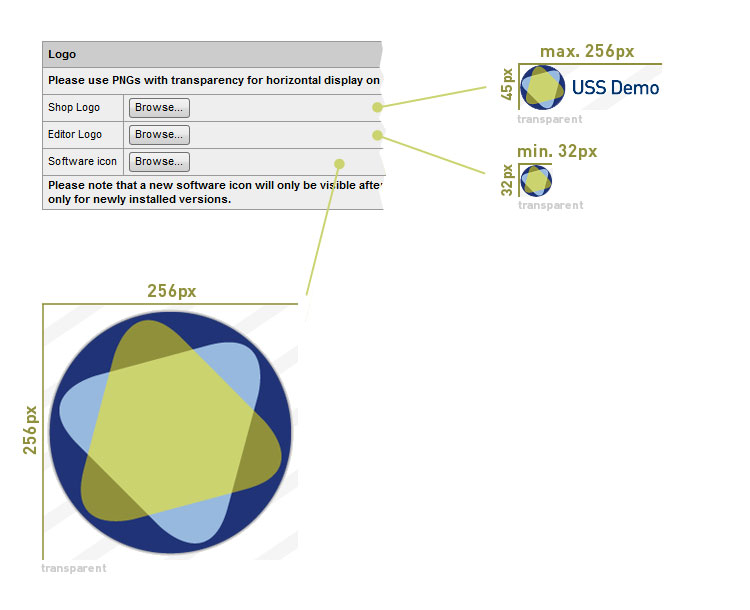
Yes. Please switch to the Partnershop Backend section CMS an choose Design. Under the option Logo – Shop Logo, click the “Browse …” button and select the Shop Logo file. Confirm the upload by clicking on the button “GO!”. The Shop Logo will displayed after opening the editor in the upper left corner.
Note
The file for the shop favicon requires the following properties.
File format: PNG
Height: 45px (Fixed value)
Width: 256px (Maximum value)
Under the option Logo – Editor Logo, click the “Browse …” button and select the Editor Logo file. Confirm the upload by clicking on the button “GO!”. The Shop Logo becomes will displayed after opening the editor in the upper left corner.
Note
The file for the editor favicon requires the following properties.
File format: PNG
Height: 32px (Fixed value)
Width: 32px (Maximum value)
Note
The file for the software icon requires the following properties.
File format: PNG
Height: 256px
Width: 256px
Please use PNGs with transparency for horizontal display on selected background color if they should contain a shadow.
Finance (26)
As a Partnershop operator, you have the option of ordering your own marketing materials and samples via your shop. Such an order can be treated as an “Internal Order”.
No automatic invoice is created in the Partnershop for this type of order.
Your invoice from the producer print24 remains unaffected.
The “Internal Order” option is intended exclusively for your own use as a Partnershop operator!
The “Internal Order” checkbox in the customer account should therefore only be activated in your own account.
Automatic process
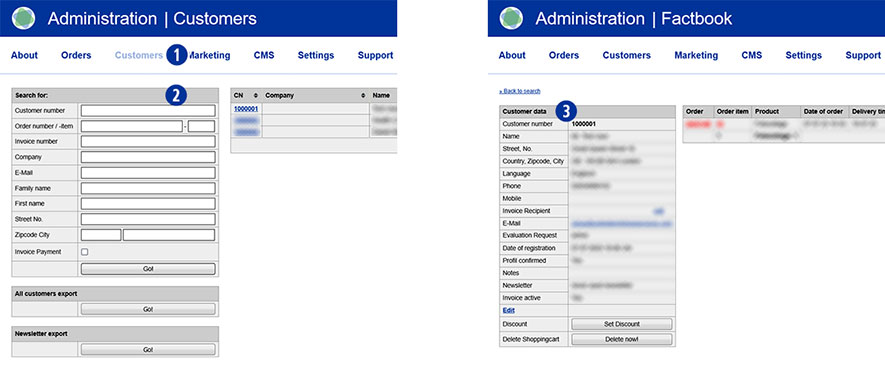
To execute an “Internal Order”, switch to your Partnershop backend – Customers. [1]
Search for your customer account (customer number, email address, etc.). [2] Under “Customer data”, click the “Edit” button. [3]

Activate the “Internal Order” checkbox under “Payment methods”. [4] Confirm your entry by clicking on the “Save” button. [5]

Then switch to your shop and place an order.
As a logged-in user and with the “Internal Order” checkbox activated in your customer account, the “Order type” [6] selection is automatically displayed in the shopping basket.
If you activate the checkbox labelled “Internal” [7], the order is immediately zeroed.
Finalise your order.

Note
The “Internal Order” setting has no influence on the prices displayed in the calculation.
Worldline | Six Payment Services is a so-called Payment Service Provider (PSP), through which your customers are offered various online payment methods within the Partnershop. Six Payment Services has contracts and technical connections with the individual online payment services and thus acts as a link between the merchant and the merchant bank.
The operation of a USS Partnershop does not necessarily require registration with Six Payment Services, as your customers do too
Offline payment methods are available (invoice, payment in advance). However, we recommend activating online payment methods. To do this, you need to register with Six Payment Services. This takes place via a separate process.
If you have any questions, please contact the Setup Manager at the following e-mail address: setup@unitedprintshopservices.com
The following online payment methods are currently available to you when you register for Six Payment Services.
- Credit card
- Direct payment (SOFORT)
Saferpay is the payment system from Worldline | Six Payment Services for all online solutions. The cloud-based payment solution ensures the secure payment processing of all orders via your Partnershop. Saferpay provides access to a variety of payment methods and supports all known payment methods, including those of third-party providers.
Credit card payments are made in the partner shop via the provider Worldline | Six Payment Services offered.
First you need to register with Six Payment Services.
If you have any questions, please contact the Setup Manager at the following e-mail address: setup@unitedprintshopservices.com
When the registration with Six Payment Services has been completed, you will receive your activation data and access data for My Saferpay and the Merchant Portal (My Portal) from Six Payment Services by e-mail.
To receive the data required to activate the credit card payment method in your Partnershop, please proceed as follows:
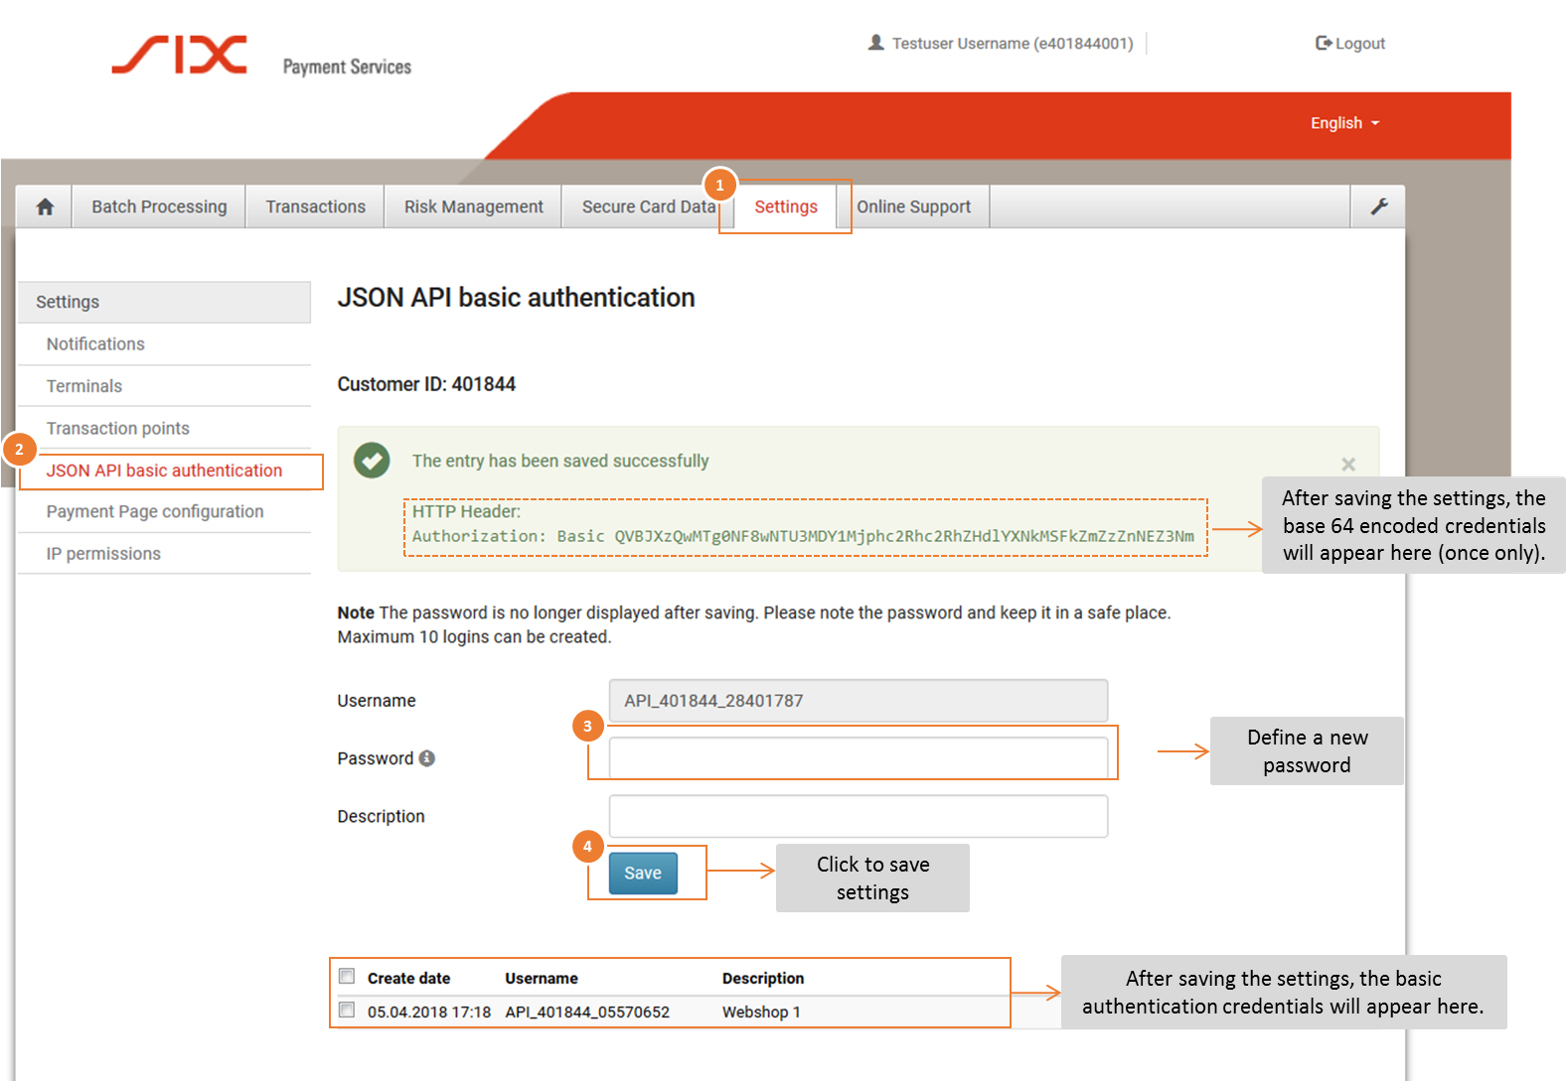
- Log in to the Saferpay Backoffice (My Saferpay) with your Saferpay user name and the corresponding password in order to create the JSON API access data.
- After successfully logging in, navigate to “Settings” (1) and then to “JSON API Basic Authentication” (2).
- Define your API password (3). Click the “Save” button (4) to save your entries.
Activation in the Partnershop backend
Open your Partnershop backend in the Finance > Payment area and enter the required data in the “Indicate your Worldline business account” module.
- API username: This is the username which is displayed in My Saferpay > Settings> JSON API Basic Authentication, e.g. API_401844_28401787
- API password: This is the password that you have defined in My Saferpay.
- Customer ID: The CustomerID is a 6-digit sequence of numbers and is displayed in My Saferpay > Settings > JSON API Basic Authentication. It is also part of the username API, e.g. 401844
- Terminal ID: You can find the Terminal ID (for e-commerce transactions) on the one hand in My Saferpay > Settings > Terminals and on the other hand in the activation data sent to you by SIX Payment Service by e-mail. The Terminal ID usually has the format 17xxxxxx.
Confirm the entries in the Partnershop backend with the button “Go” .
You can then activate the “Activate Payment by credit card” checkbox in the “Activate payment methods” module on the same page (Finance > Payment) and confirm here with “Go”.
The payment method is then available to customers in the shopping cart.
If an order was placed by your customer with the payment method “Advance payment”, you must confirm receipt of payment.
To do this, proceed as follows.
Switch to the Partnershop backend – Orders / Track menu. [1]
To find a desired order, use the possible search options, such as “Order number” or “Order date”. [2]
Confirm your entry by clicking on the “Go!” button. [3]
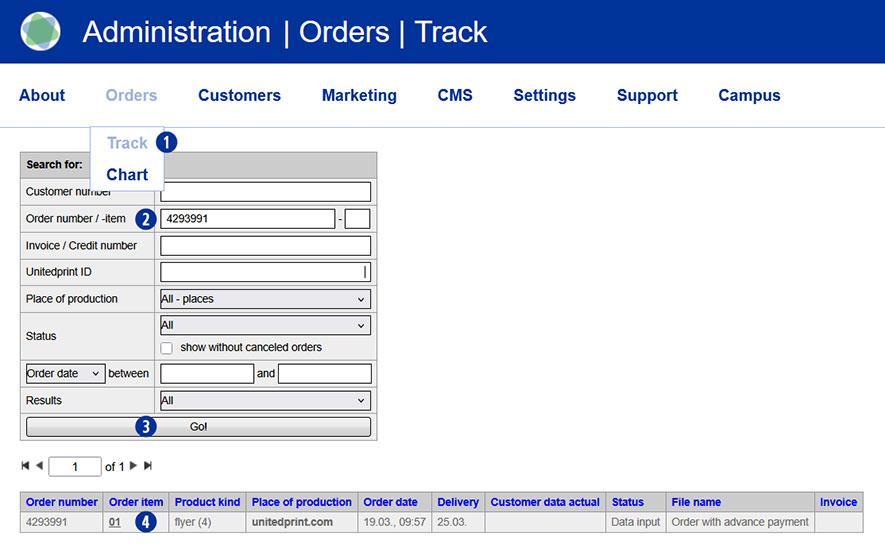
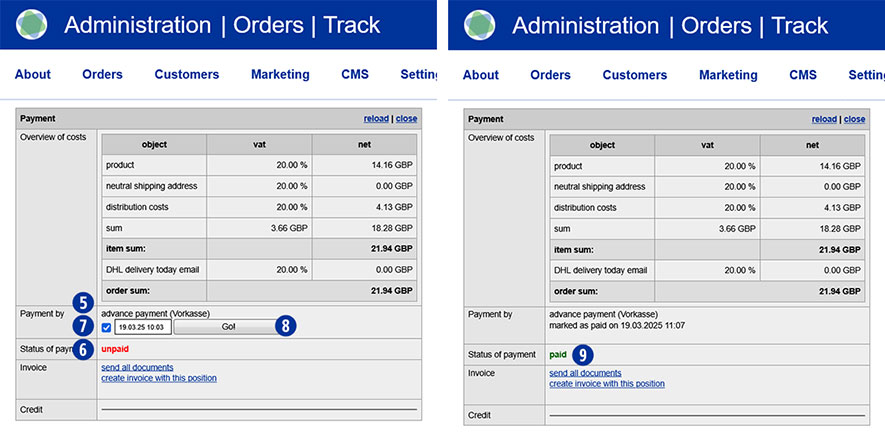
Navigate to the “Payment” module. [5]
In the “Status of payment” line, the current order status is displayed as “unpaid”. [6]
Activate the “Advance payment” checkbox by clicking in the “Payment by” line. [7]
Confirm the activation by clicking on the “Go!” button. [8]
In the “Status of payment” line, the order is displayed as “paid” and is therefore released for production. [9]
Note
Only after the status has been changed from “unpaid” to “paid” will a prepayment order be automatically transmitted to Unitedprint.
If a PayPal payment is displayed as “unpaid”, please check the payment transactions in your PayPal business account.
If the payment has been received, confirm receipt of payment there.
If no payment has been received, please inform your customer.
Unconfirmed PayPal payments for partner shop orders will not be transmitted to Unitedprint and therefore will not be produced.
Yes, the ‘Invoice’ payment method can be activated for individual customers.
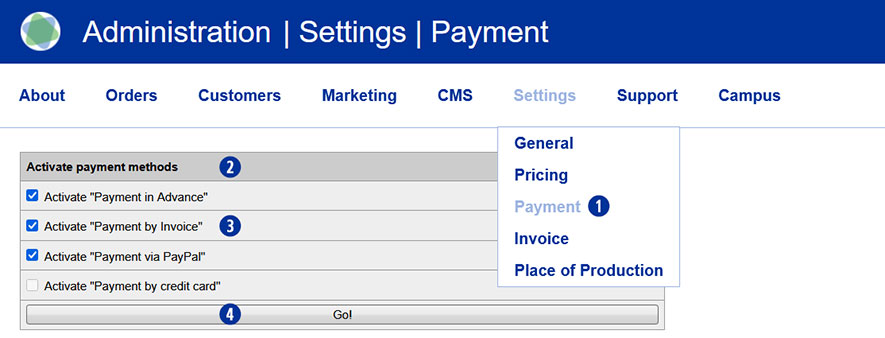
Go to the Partnershop backend – Settings / Payment. [1]
Navigate to the ‘Activate payment methods’ module. [2]
Activate the “Payment by Invoice” checkbox. [3]
Save the change using the ‘Go!’ button. [4]
Then switch to the Partnershop backend – Customers. [5]
Navigate to the ‘Search for’ module [6] and search for the customer for whom you would like to authorise invoice payment. Use one or more of the search criteria, such as customer number, e-mail address, name, etc., to do this. [7]
Confirm the search by clicking on the ‘Go!’ button [8]
If you know the customer number, you can select it directly from the overview on the right under ‘CN’ by clicking on the number. [9]
This will open the corresponding customer data record.

For further editing, click on the ‘Edit’ link in the ‘Customer data’ module. [10] [11]
In the ‘Edit customer data’ module [12], all possible payment methods are displayed – regardless of the options activated under. [2] [13]
To activate the ‘Invoice’ payment method for the previously selected customer, tick the “Invoice” [14] checkbox in the ‘Payment methods’ area as a permitted payment method.
Save the change using the ‘Save’ button. [15]

Note
The ‘Invoice’ checkbox in the ‘Edit customer data / Payment methods’ module is deactivated by default and must be activated for each customer if required.
If you cancel an order already transferred to print24, a cancellation fee of 15.00 Euro will be charged. Whether the cancellation fee is due depends on the order status (e.g., pooling) at the time of cancellation.
Note
The manual billing in the Partnershop must take place before the cancellation at print24.
The cancellation fee can be charged by you as a partner to your customer. To do this, a manual invoice must be created via the backend of your Partnershop. Go to the backend section Production > Track > Payment > Invoice and click the link “Create Invoice with this position”.
In the displayed invoice form, change the invoice item and click the “save” button. Then click the button “back” and then the button “create”. The invoice is generated and a PDF document is created. Choose Open or Save.
To send the invoice by e-mail, first click on the button “track”. This returns you to the order detail view. Then click the link “send”. An e-mail with the invoice PDF attached will be sent to your customer. The delivery status of the e-mail is displayed under the item “Mail tracking”.
The “Cancellation Fee as Damages” of EUR 15.00 collected as a print24 Partner is tax-exempt as VAT. 3 para. 2 offset. This means that the invoice to your end customer may not include VAT.
Yes. If your customers orders several items with the same product properties, these items can be shipped collectively. For these positions, your shop will offer a shipment voucher.
During the ordering process, your customers have the opportunity to select the option “Combined shimpment”. To do this, select the checkbox “Combined shimpment”. [1]
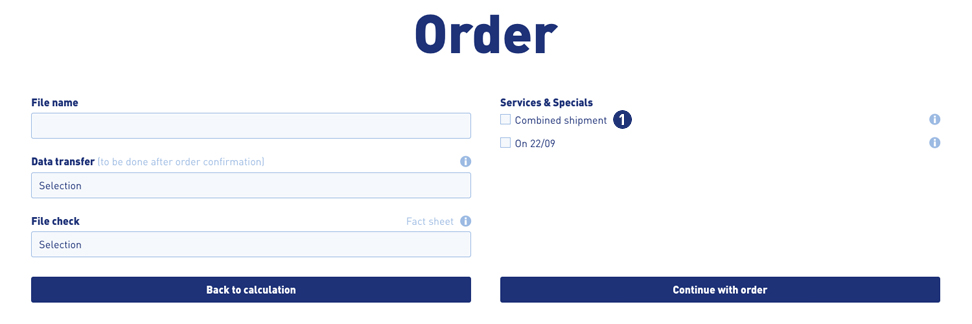
You can use the function “Copy product” in the shopping cart [2] to create several items of the previously configured item (for example, business cards) and to order these with a corresponding dicoount as a collective shipment. The result is displayed in the calculation overview in the shopping cart. [3]
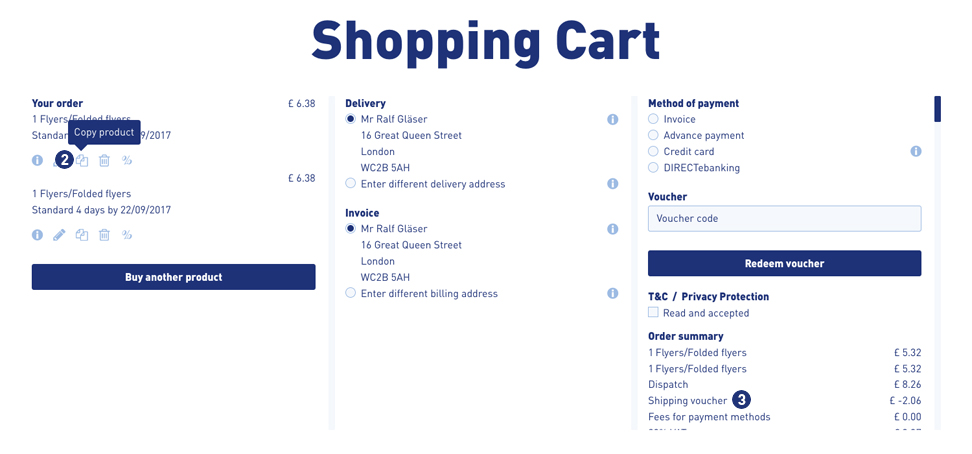
Alternatively, it is possible to configure the same product once or several times over the calculation page and place it in the shopping cart.
Note
An order with the option “combined shipment” is not triggered to production until the print data has been uploaded to all items.
The delivery date changes for the entire order!
Yes. If you are the sole producer, you will receive the entire invoice including the shipping costs. However, Worldline transaction fees are also charged for these orders.
Um Ihr PayPal Mandat zu prüfen und zu bestätigen, wechseln Sie bitte auf die PayPal-Seite https://www.paypal.com und melden sich dort mit Ihren Account-Daten an. In Abhängigkeit davon, ob Sie ein Privatkonto oder ein Geschäftkonto nutzen, erfolgen die weiteren Schritte.
Privatkonto
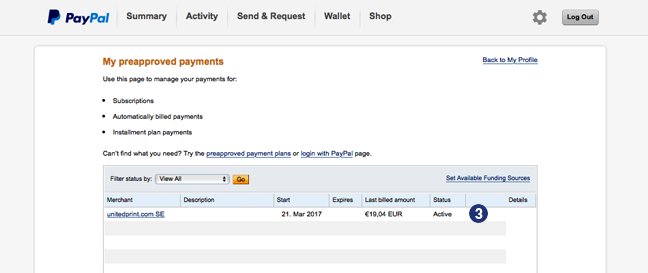
Nach erfolgreichem Login wechseln Sie über das „Zahnrad“ Icon in das Menü „Payments“. [1]
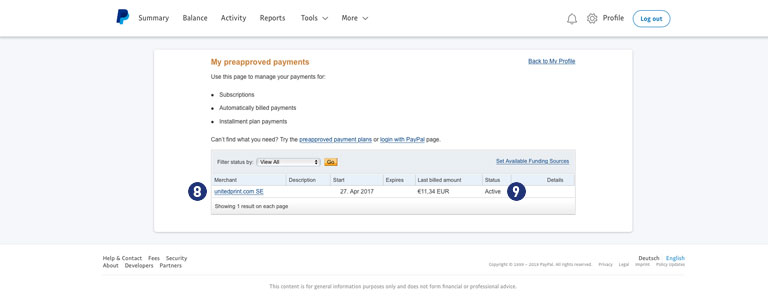
Klicken Sie dort den Button „Manage pre-approved payments“. [2]
 Bestätigen Sie in der Ansicht „Abrechnungsdetails“ Ihr PayPal Mandat für „unitedprint.com SE“. [3] Der Status muss dabei “Aktiv” anzeigen.
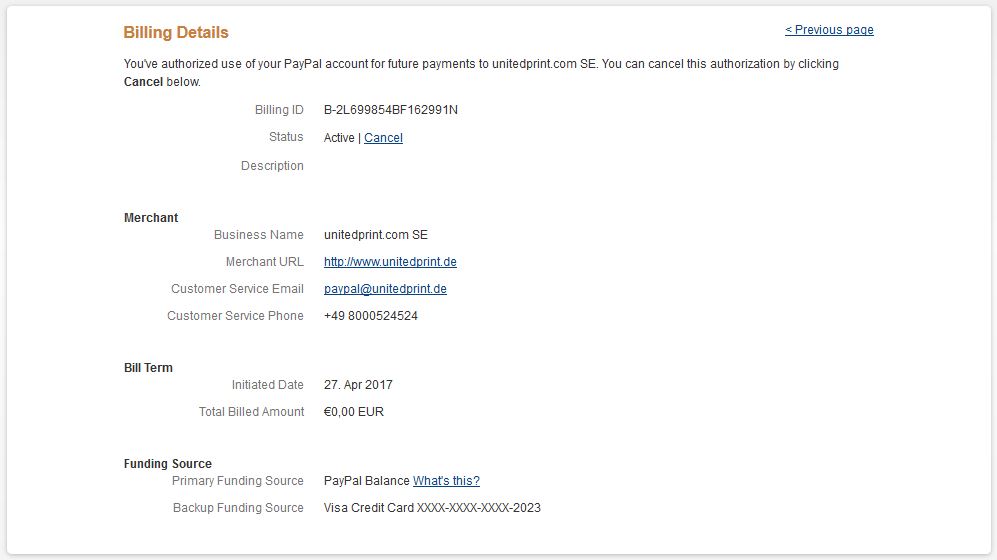
 Klicken Sie auf „unitedprint.com SE“ und prüfen Sie in den „Abrechnungsdetails“ ob unter dem Punkt „Zahlungsquelle“ -> „Alternative Zahlungsquelle“ Ihre Kreditkarte (Beispiel VISA-Kreditkarte) eingetrage ist.
Geschäftskonto
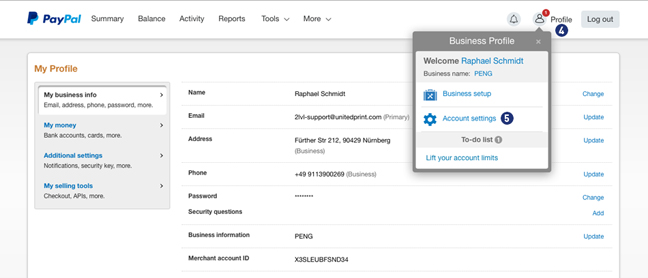
Nach erfolgreichem Login wechseln Sie bitte unter “Profile” [4] > “Account Settings” [5] > “My Money”. [6]
Klicken Sie bei dem Punkt “My preapproved payments” [7] den Link “Update”. [8]
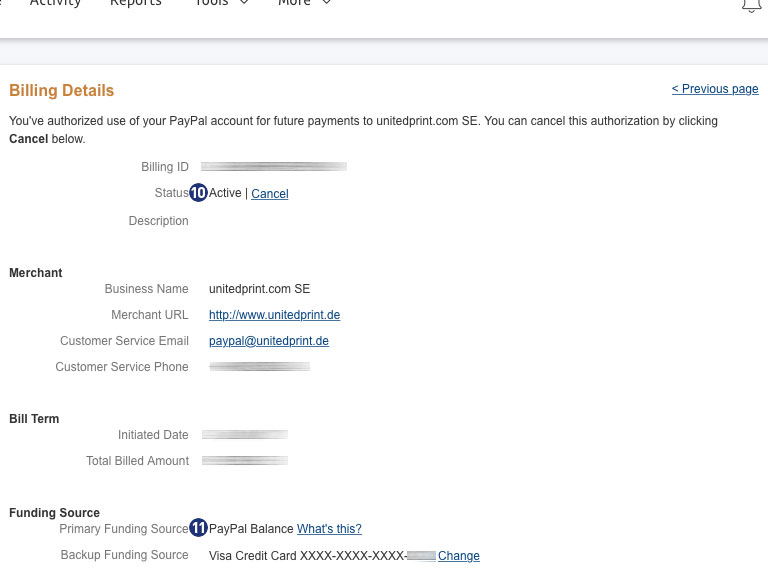
Bestätigen Sie in der Ansicht „Abrechnungsdetails“ Ihr PayPal Mandat für „unitedprint.com SE“. [9] Der Status muss dabei “Aktiv” anzeigen.
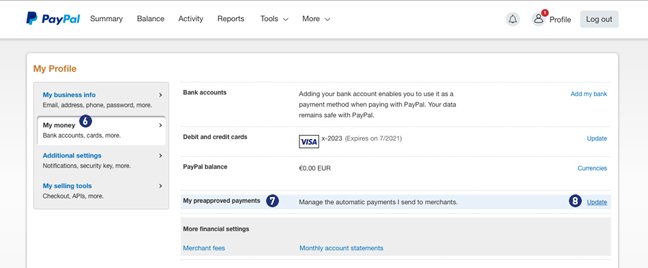
Klicken Sie auf „unitedprint.com SE“ und prüfen Sie in den „Abrechnungsdetails“ ob unter dem Punkt „Zahlungsquelle“ -> „Alternative Zahlungsquelle“ Ihre Kreditkarte (Beispiel VISA-Kreditkarte) eingetragen ist.
Hinweis:
Bitte beachten Sie das abweichende Layout sowie die unterschiedliche Navigation in den beiden Bereichen Privatkonto und Geschäftskonto.
Yes, you can define your own number ranges.
To do this, proceed as follows.
Go to the Partnershop backend – Settings / Invoice.
Navigate to the ‘Invoice Number range’ module.
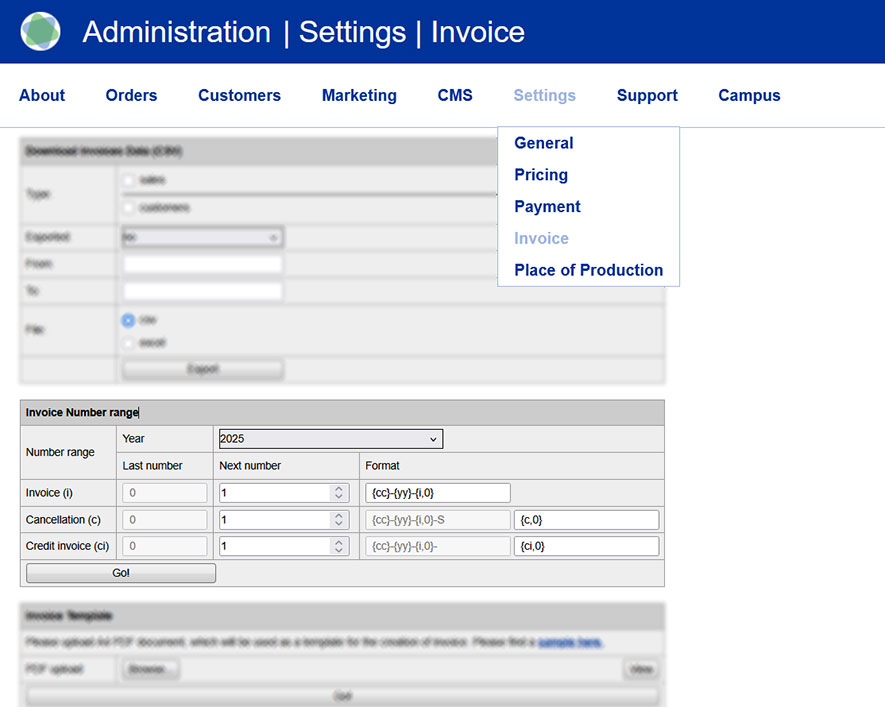
Via the modul ‘Invoice Number range’ [1] you can make inputs and enter your own number codes [2] for invoices [3], cancellations [4] and invoice credits [5].
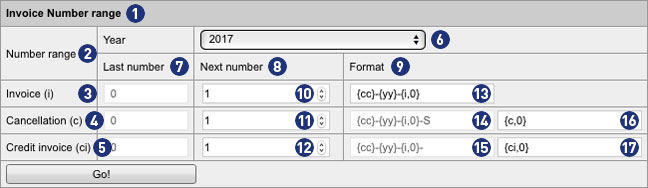
The displayed view always refers to the year selected by the combobox “Year” [6]. Alternatively, you can use this selection box to display settings for the previous year or the following year, make changes, and edit your own number ranges.

The fields in the column “Last number” [7] indicate how many invoices, cancellations and credits invoices were generated in the currently selected year [6]. The values are gray and can not be changed.
The fields in the columns “Next number” [8] and “Format” [9] can be customized in the “Invoice” line. The values are black and can be changed.
In the input field [10] you define a value (for example, 4). This determines that the next invoice generated by the backend will be given this number. Similarly, the numbering continues for each successive calculation (e.g., 5, 6, etc.).
Note
The entered value in field [10] is only valid if it is greater than the displayed value in the field “Last number” (In the example: 4 > 3).
In the input field [13], you define how the invoice number is to be displayed. You can define a prefix to prepend the invoice number. It is possible to specify a minimum length of the invoice number (without prefix).
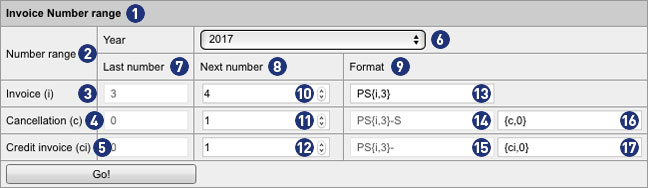
In our example, the following individual adjustments have been made.
In the field [13], the prefix “PS” has been added and the value 0 in the brace has been changed to 3.
In the example PS{i;3} the next invoice generated by the backend would be: PS004.
PS = Prefix
004 = Invoice number with a minimum length of 3 digits and leading zeros
4 becomes 004, 44 becomes 044 and 444 becomes 444. Since it is a minimum length, longer numbers remain unchanged: 4444 remains 4444.
A detailed explanation of the possible formats can be found later in the text.
Note
The adjustments made in field [13] are also transferred to the fields [14] and [15] via the button “Go!”.
The same algorithm applies to cancellations and credit invoices. By default, their numbering starts with the value 1. Unless otherwise specified, a different value is defined in field [10].
For cancellations, the invoice number is generated with the suffix “-S” plus the consecutive number.
In the example PS{i;3}-S {c;0} the next reversed cancellation created by the backend would be represented as follows: PS003-S1.
PS = Prefix
003 = Previous invoice number with a minimum length of 3 digits and 2 leading zeros
-S = Suffix for Cancellation
1 = Consecutive number without leading zeros
For credit invoices, the invoice number is generated with the suffix “-” plus the consecutive number.
In the example PS{i;3}- {ci;0} the next credit note created by the backend would be represented as follows. PS003-1.
PS = Prefix
003 = Previous invoice number with a minimum length of 3 digits and 2 leading zeros
– = Suffix for credit invoice
1 = Consecutive number without leading zeros
Note
The entries must not contain any umlauts or empty spaces.
The possible variables within the curly brace in field [13] are replaced by real values when the invoice is generated.
The gray text fields in format format [14] and [15] are inactive and can not be changed. For both fields, the format specified in field [13] applies.
If there are no entries for the current year, a number range with the format of the last year and the value for “Next number” for all invoice types is automatically set to 1. If no entry is found for the previous year, a default number range is generated.
Important
The prerequisite for an error-free billing – even beyond the turn of the year – is that in the field [13] an invoice number format with year {yy} or
{yyyy} is used.
Failure to do so creates duplicate records. The result is faulty invoices, which can not be processed and sent.
Notes for the formatting in the input fields
{yyyy} Year with 4 digits | Ex.: 2017
{yy} Year with 2 digits | Ex.: 17
{mm} Month with 2 digits | Ex.: 06
{dd} Day with 2 digits | Ex.: 28
{qq} Quarter with 2 digits | Ex.: 02
{i,n} Digit {i} with leading zeros {n} | as a 3-digit number with 2 leading zeros {i,3} | Ex.: 003
{c,n} Digit {c} with leading zeros {n} | as a 3-digit number with 2 leading zeros | Ex.: 003-S1
{ci,n} Digit {ci} with leading zeros {n} | as a 3-digit number with 2 leading zeros | Ex.: 003-1
To check and confirm your PayPal mandate, please go to the PayPal page https://www.paypal.com and login there with your account details. Depending on whether you use a private account or a business account, the further steps are taken.
Private Account
After successful login, switch to the second menu line and select the item “Payments”. [1] Then click on the link “View” under the item “Manage payments in the collection procedure”. [2]
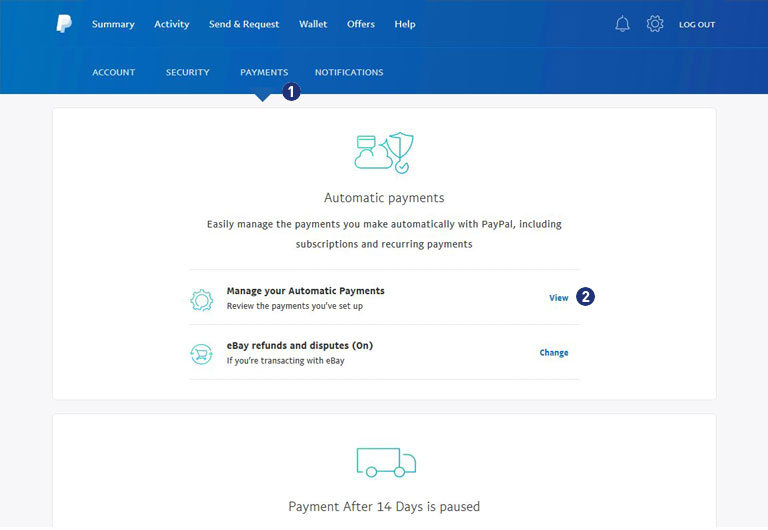
Choose your PayPal mandate for “unitedprint.com SE”. [3]
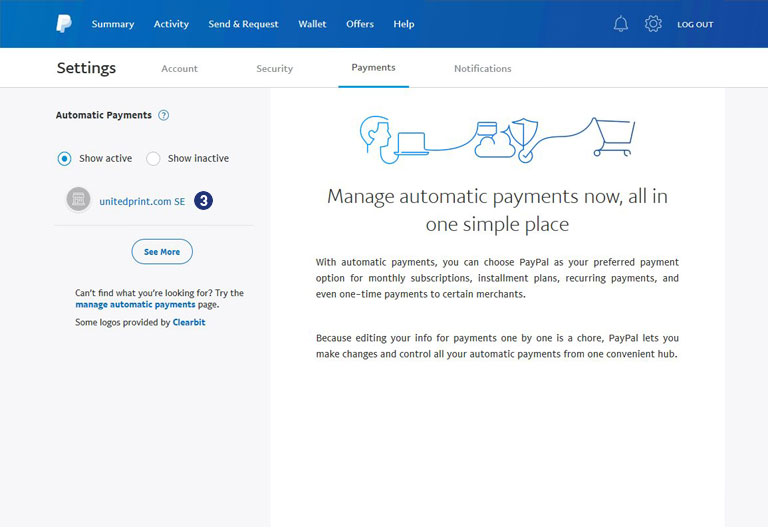
The status must show “Active”. [4]
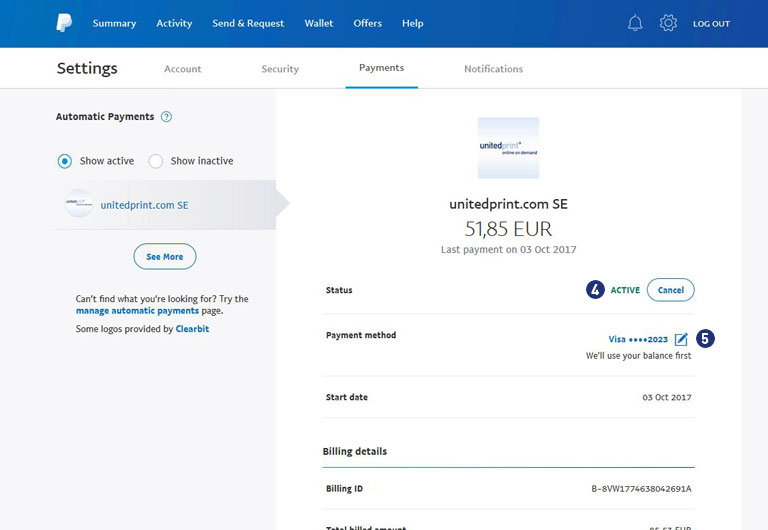
At “Payment source”, click on the edit icon (right) and check the completeness of your payment sources. [5]
Note
If you have a balance, it will be used first. If there is a problem with the selected payment source, a different bank account or credit card will be used to make the payment.
Business Account
After successful login you change over the gear icon (top right) under “My profile” to the point “Bank data”. [6]
At the end click on the button “Set Automatic Payment”. [7]
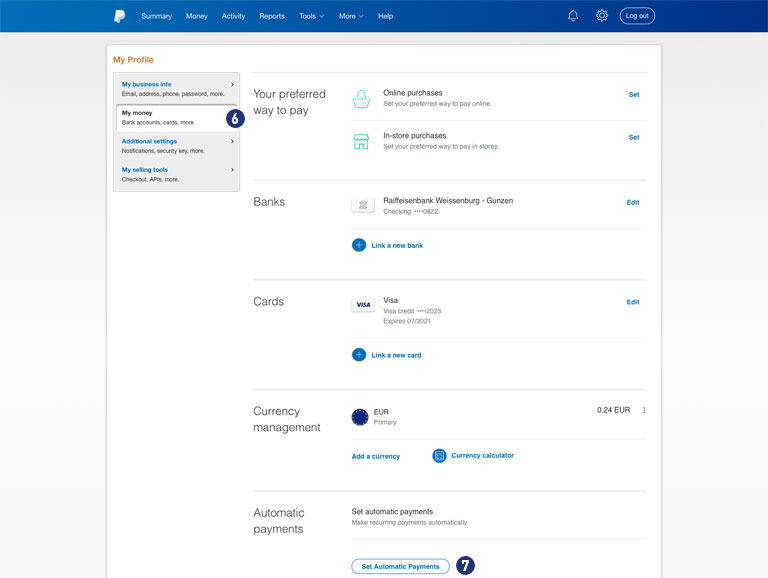
Check your PayPal mandate for “unitedprint.com SE”. [8] The status must be “Active”. [9]
Click on the link “unitedprint.com SE” [8] and check under “Billing Details” the status (Active) [10] as well as the completeness of your payment sources. [11]
Note
If you have a balance, it will be used first.
If there is a problem with the selected payment source, a different bank account or credit card will be used to make the payment.
Please note the different layout as well as the different navigation in the two areas private account and business account.
An invoice that was already created and sent to your customer can be changed later.
To do this, go to your Partnershop Backend > Production > Track and search for the order related to the invoice. Change to the detailed view and to the module “Payment”.
In the next step, the ordered and sent invoice has to be canceled. To do this, proceed as follows.
how-do-i-create-a-cancellation-invoice/
After successful cancellation, you can create a new invoice manually and send it to your customer manually. To do this, proceed as follows.
how-can-i-create-a-customer-invoice/
Using the edit function (pen) you have the possibility, to change the invoice address, the delivery or invoice date, and so on.n.
The requirement for creation of a customer credit note is that an invoice has been previously generated and sent for the corresponding order.
If an order is invoiced, the “Credit” sub-item is displayed in the “Payment” module of the Partnershop Backend under “Track”.
To create a new credit note, click the “new” link. In the opened input form, you select a credit date, store the desired credit amount for net charge, and choose the relevant VAT rate using the selection menu.
Close the credit note by clicking on the “Save & Create” button. Confirm the embedded message. The credit note is generated and a PDF document is created. Choose Open.
To send the credit note by e-mail, click on the “track” button. This returns you to the details of the order. Then click the “send” link. An e-mail with the credit note PDF in the appendix will be sent to your customer. The shipping status of the e-mail is displayed under the item “Mailtracking”.
Note
To check the shipping status “sent” within the mailtracking, you leave the order detail view and call the order again via “Track”. Do not update the job detail view by pressing the F5 key.
Invoicing for the customer takes place automatically. This means that the creation of the invoice is triggered as soon as the purchase order is sent to the customer or the order status changes to “Dispatch”.
If you want to create an invoice manually, please go to the backend area “Production” – “Track” – “Payment” – “Invoice” – “Create Invoice with this position”.
Change the delivery date (“edit delivery date”) as well as the invoice date (“edit invoice date”) and click the “save” button. Then click the “back” button and then the “create” button. The invoice is generated and a PDF document is created. Select “open” or “save”.
To send the invoice by e-mail, click on the “track” button. This returns you to the details of the order. Then click the “send” link. An e-mail with the invoice PDF in the appendix will be sent to your customer. The shipping status of the e-mail is displayed under the item “Mailtracking”.
Note
To check the shipping status “sent” within the mailtracking, you leave the order detail view and call the order again via “Track”. Do not update the job detail view by pressing the F5 key.
The creation of a reversal invoice is only necessary (and possible) if the actual invoice has already been created and sent by the system via e-mail to your customer (automatically with the dispatch of the goods).
USS differentiates between the cancellation of an order and the cancellation of the invoice. An order cancellation does not automatically create a cancellation invoice.
If an invoice has already been created and sent and should it be canceled and a cancelation invoice be created and sent, this can be done in the “Track” backend area. Locate and select the corresponding job item in “Track”. Scroll to the module “Payment”. There you will see the invoices already sent in the section “Invoice”. Click “Cancel” under the corresponding invoice to cancel this invoice.
Then click the link “send cancelation”. An e-mail with the reversal invoice PDF in the appendix is sent to your customer. The shipping status of the e-mail is displayed under the item “Mailtracking”.
Note
To check the shipping status “sent” within the mailtracking, you leave the order detail view and call the order again via “Track”. Do not update the job detail view by pressing the F5 key.
Your shop offers multiple offline and online payment methods. Offline payment methods include “payment in advance” and “payment by invoice”. Online payment methods are provided via Worldline. They vary from country to country and – in addition to all usual credit cards – include regional payment methods (e.g. EPS, Ideals, Przelewy24). An activated Worldline account is required in order to offer online payments.
From now on you will additionally be able to pay via PayPal.
The activation/deactivation of the individual payment methods takes place via the Partnershop backend under the menu item Finance > Payment > Activate payment methods.
You can individually activate/deactivate the two offline payment methods in your backend. You can do so in the backend section “Finance”. Offline payment transfers need to be managed outside the USS Partner Shop scheme (e.g. via your regular bank account interface).
Note
The offline payment method “payment by invoice” is for safety reasons only to registered users.
Online payments in turn can be viewed and managed in your Worldline backend.
Yes, in case you allow your customers to chose “payment by invoice” or “payment in advance”, you will receive these payments directly from your customer and without the involvement of Wirecard. Whether this is a bank transfer, a cash payment, or another means of money transfer, is irrelevant for USS.
To activate these payment methods, go to the backend section “Finance”. Under “Activate offline payment methods”, you’re able to activate/deactivate these two methods individually.
Important: In case you activated “Payment in advance” you should also define your account details further down in that backend section. After an order with the payment method “payment in advance”, your customers are informed about these account details.
Please refer to your contract for the fees for using your USS Partnershop.
Costs only accrue when you receive orders. In case an order is produced by Unitedprint, you will be charged the listed price (minus your personal discount). When you are producing the order yourself, you will be charged a commission fee.
The Payment Service Provider Worldline will charge fees in case your customers chose to use online payment methods. Worldline’s terms can be viewed at any time in your Worldline backend.
Note
Non-EURO accounts (for example, CHF, GBP, etc.) may result in differential amounts within Worldline settlements. These are customary foreign bank fees. As a payment provider, Worldline has no influence whatsoever.
In order to keep this amount as small as possible, Worldline can for you as a Partner can switch the payout period from weekly to monthly.
Another option would be to create a EURO account and pay out in EUR.
Payment between Unitedprint and you as a partner is made primarily via PayPal. In agreement with our finance department, an invoice payment may also be possible.
You must pay this invoice within the specified payment term. Fees for the use of online payment methods are billed directly by Worldline.
Yes, your print24 print credit will be automatically billed directly to the next incoming Partnershopshop order at print24.
This includes the automatic reduction of the order value upon receipt of a Partnershop order of max. 100% – depending on the available credit balance in your print24 partner account.
The prerequisite for this is that a print credit is stored in your print24 partner account.
To see the current status of your print credit, login to your partner account at print24.com. Then open the order overview via the button “MyOrders”.
Under the overview you will find the link “To the credit overview”. This link displays your currently available print credit and a credit history.
Notes
Payments of your customers in the Partnershop will not be affected.
If an order item from print24 is canceled, the remaining print credit will be credited back to you.
If an order item is canceled by yourself, the usual fees will apply. The remaining print credit will be credited to you.
Please, inform within 15 minutes after completion of order our support team Phone (länderspezifisch) / support@print24.de.
Otherwise, your trial order needs to be paid. Additionally please cancel your trial order directly into your Partner backend.
For callback please hold ready the United Print ID of each order.
The invoice template is similiar to your company’s official letterhead. Dynamic invoice information (such as the item list, prices, VAT, customers’ address) will automatically be added to the document, which will then be sent to your customers.
Your USS partner shop requires a correct invoice template, which needs to be uploaded first (A sample for your invoice template is being provided). For doing so, go into the backend section Finance and the page section Invoice Template. Click the Browse button and select the previously prepared invoice template. Then click Go. The selected document will be used for generating your partner shop’s invoices.
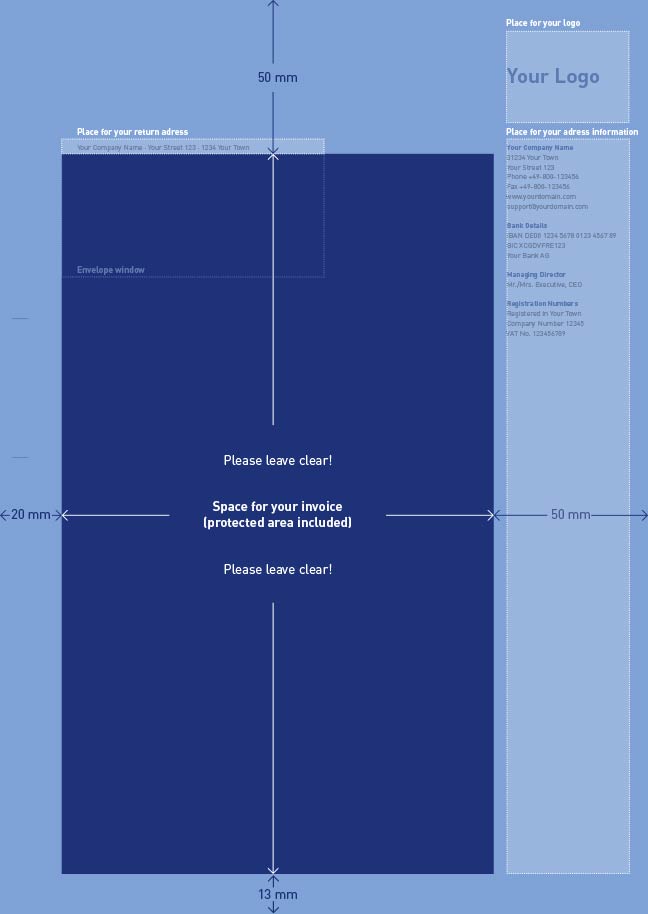
In order to generate invoices using your corporate design and official company information, your USS partner shop requires a corresponding template. You can generate such a template within just a few minutes. For general guidlines for the placement of your template’s content, please use the sample file provided.
Go into the backend section Finance. In the page section “Invoice template” you’ll find a link with our sample PDF file. Download the sample file and overwrite it with you componay’s information. Alternatively, you can of course generate such an invoice template yourself.
Note
When designing your own invoice template, please do not place text patterns or images in areas that are left white in the sample template. These areas (especially in the center and the top of the page are need for dynamic invoice information. Save the invoice document in PDF version 1.4 (Acrobat 5.x).
The version test can be carried out with the opened PDF document over the menu “File – Properties”.
General (19)
Worldline | Six Payment Services is a so-called Payment Service Provider (PSP), through which your customers are offered various online payment methods within the Partnershop. Six Payment Services has contracts and technical connections with the individual online payment services and thus acts as a link between the merchant and the merchant bank.
The operation of a USS Partnershop does not necessarily require registration with Six Payment Services, as your customers do too
Offline payment methods are available (invoice, payment in advance). However, we recommend activating online payment methods. To do this, you need to register with Six Payment Services. This takes place via a separate process.
If you have any questions, please contact the Setup Manager at the following e-mail address: setup@unitedprintshopservices.com
The following online payment methods are currently available to you when you register for Six Payment Services.
- Credit card
- Direct payment (SOFORT)
Saferpay is the payment system from Worldline | Six Payment Services for all online solutions. The cloud-based payment solution ensures the secure payment processing of all orders via your Partnershop. Saferpay provides access to a variety of payment methods and supports all known payment methods, including those of third-party providers.
If you make changes in the Partnershop backend CMS module but these are not visible in the shop, there may be various reasons for this.
Publish changes
Content changes that you make via the Partnershop backend CMS module must be saved and published in order to display them in the shop.
Details can be found here.
Publish
Empty cache
Empty the cookies and cache in your browser, refresh the page and check again.
Contact support
If the problem persists, our support team will be happy to help you.
2lvl-support@unitedprint.com
Would you like to log in to your partner shop and realise that it is not possible to log in despite entering the correct user data?
Or would you like to add a product to your shopping basket and instead you keep being redirected to the homepage of your Partnershop?
In such a case, it may be necessary for you to manually delete the shopping basket of your Partnershop.
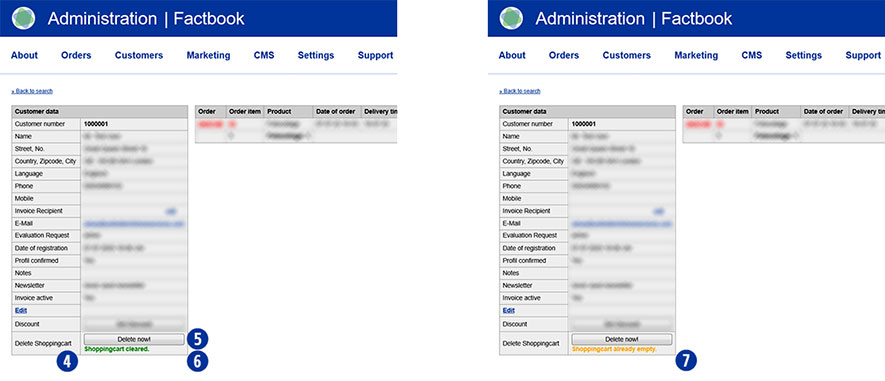
To do this, switch to your Partnershop backend – Customers. [1]
Search for your customer number, name, e-mail address, etc. [2]
The desired customer profile is displayed as a result. [3]
In the ‘Customer data’ module, you will find the ‘Delete shopping cart’ line at the end. [4]
Click the ‘Delete now!’ button. [5]
The message ‘Shopingcart cleared.’ appears. (highlighted in green). [6]
Then go back to the homepage of your Partnershop and place an order.
Log in with your login data. The shopping basket has been emptied in the background.
Now continue with your order.
Note
Depending on whether and when you were last logged in with the selected user, the message ‘Shopingcart already empty’ appears after clicking on the ‘Delete now!’ button. This means that there is no saved shopping basket data for this user. [7]
In order for your domain addresses to be able to call up the Partnershop, the following DNS settings are required at your domain provider.
| Domain | Typ | DNS-Eintrag |
| meinedomain.de | ANAME | uss.meinedomain.de |
| www.meinedomain.de* | CNAME | uss.meinedomain.de |
| uss.meinedomain.de | CNAME | elb.unitedprintshopservices.com |
| meinedomain.de | TXT/SPF | v=spf1 include:sendamail24.com -all |
| * optional | ||
The use of more than two addresses (domain + subdomain) or two subdomains is not intended.
A domain may only have one SPF entry.
Notice
It is expressly recommended to choose a provider that supports ANAME Records.
If your provider does not allow the use of ANAME/ALIAS entries, an IP address can be assigned for this exceptional case.
| Domain | Typ | DNS-Eintrag |
| mydomain.com | A | IP: XXX.XXX.XXX.XXX |
Please contact our support team by email at 2lvl-support@unitedprint.com.
The use of an IP address to access the partner shop is only possible temporarily and with reservations.
Your Partnershop is based on the Unitedprint portal print24.com both in terms of technical scope and external appearance.
In the Partnershop there is the possibility of individualization including adaptation to the corporate design of your company.
Important information at a glance
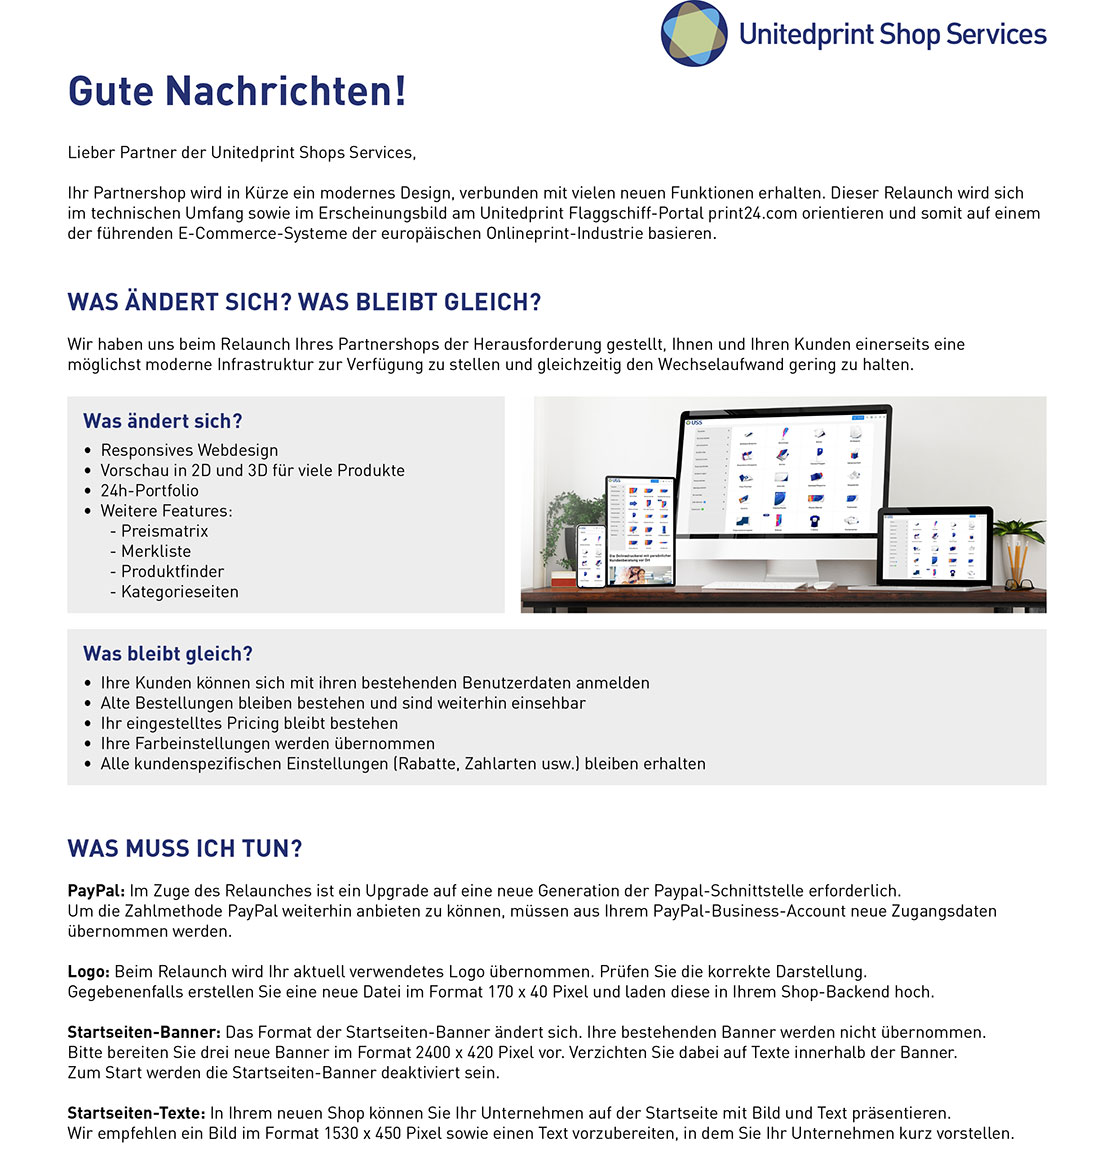
Your customization options in detail
- Logo [1]
- Homepage banners/ slider [2]
- Homepage texts (text and image) [3]
- Payment methods [4]
- Colors
- Product Catalog [9]
- Legal texts [5]
- Contact details [6]
- Service times [7]
- Social Media [8]
- Customer data
- Publish

If you only have the corresponding print24 order number for a Partnershop order, you can use your Partnershop backend to find out the corresponding Partnershop order.
Switch to the Partnershop backend – Orders / Track. [1]
Enter the print24 order number you have in the ‘Unitedprint ID’ input field. [2]
Confirm your entry by clicking on the ‘Go!’ button. [3]
Click on the respective order item (e.g. 01) in the ‘Order item’ column for a detailed view of the order. [4]
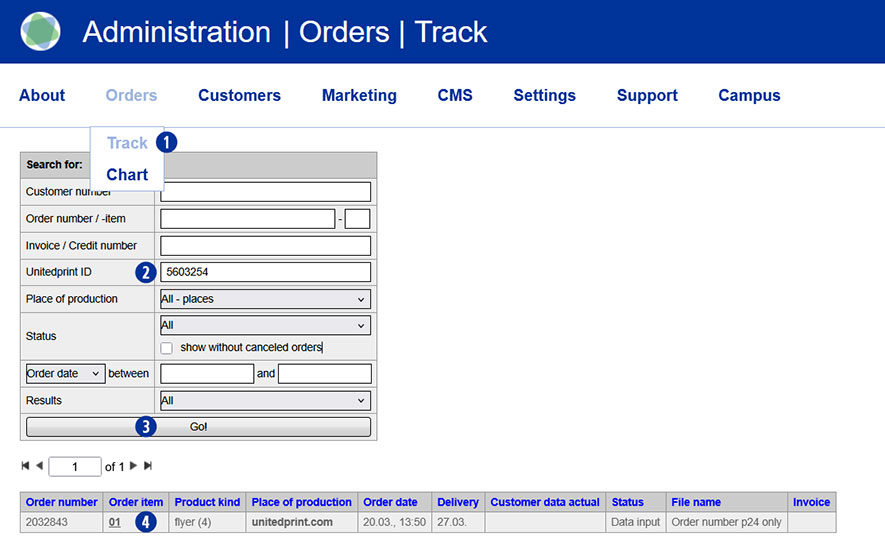
The desired partner shop order will be displayed as a result. [5]

Yes. You can allow selected customers to change the sender’s address for an order and thus to send the order in their own name. The prerequisite for this is that the respective customer is a registered user and has the status “Reseller”.
There are two ways to get the status “Reseller” for registered customers in your Partnershop:
- Automatic assignment of the status “Reseller” when registering in the Partnershop.
The customer can already select the customer card “reseller” when logging into the Partnershop. - Manual award status “Reseller” by request of the customer from them.
The customer gets the status “Reseller” on request (e-mail, phone) awarded by them.
The status (Reseller) will setup via the backend in Marketing > Customers area. By click the button “Edit” you can change the “Key Account Type” of the customer.
With the status “Reseller”, the customer is given the option of entering a different sender’s address in the first order step. To do this, the checkbox “Change sender’s address” is selected.
Users without the status “Reseller” will not see the selection “Change sender’s address” in the first order step.
By default, the Neutral Shipper Address (Backend > Settings > Sender’s address) is used as sender.
Note
The function “Different sender’s address” is only available for registered users – but not for guest users.
In case an order item was selected to be produced by yourself, this is the case because the item ordered is in correspondence with your settings in the backend section “place of production”, where you define which items you want to produce. However, in case you now received such an order but you’re not interested in producing it (e.g. because you changed your mind or because you’re out of paper) you can hand it to Unitedprint. To do so, select the order item in “Track” and click the “Reject order” option in the top section of the order view. You will be charged the price displayed.
Dealing with faulty data decides with the filecheck option selected when ordering. The following two options are available:
- Basic check (free)
- Premium-Check (including correction, paid)
If the premium data check was selected by your customer, mistakes can often be remedied by our team independently.
If new data are required, information is sent by e-mail to you as a partner as well as to the customer.
Example: e-mail content
–>
Dear Mrs./Mr.,
Thank you very much for your order! Our free Basic-Filecheck has led to the following result:
- Customer request not possible:
Your editing request cannot be processed.
Unfortunately, our team cannot correct the errors listed. Therefore we would like to ask you to send us corrected and complete printing data (all pages for order).
Please confirm in the detailed listing of your order (under MyOrders http://myshop.com?orderstep=1_cstmzng&id=2473) that you sent fully corrected printing data. Otherwise we cannot proceed with your order!
PLEASE CONSIDER: Without your response at MyOrders ‘Artworking’, we cannot proceed with your order.
<–
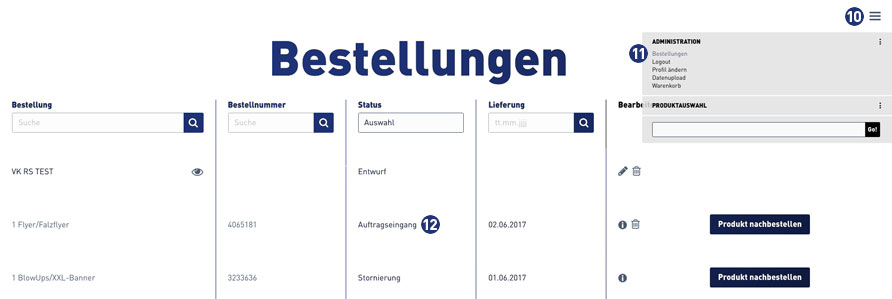
For a new data upload, it is necessary for your customer to use the link from e-mail above. The link leads directly to the order overview (orders). [1]
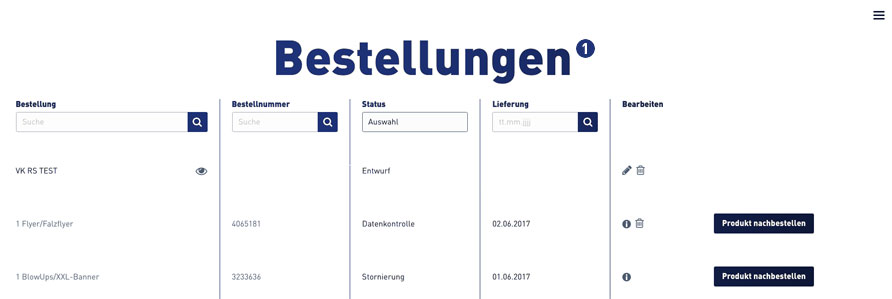
Select the relevant order within the order overview. Jobs that require new print data to be uploaded have the status “Processing approval”. [2]
A warning symbol [3] is displayed at the corresponding order item in the “Edit” column, which must be clicked by the customer.

After clicking on the warning symbol, the following window opens for the print data check. [4] Confirm the link “I’m sending my data” to continue. [5]
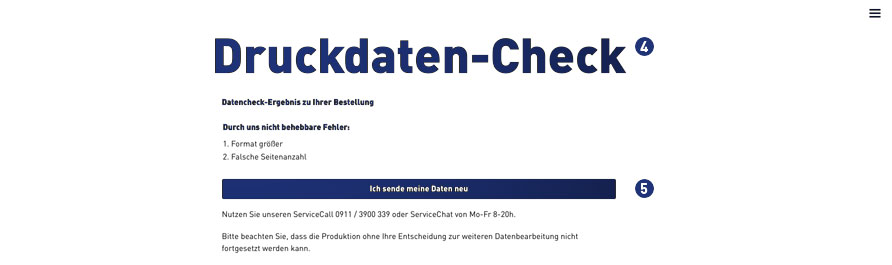
For further processing, the indicated and following instructions must be observed. [6-9]
 Select print job, click on “Upload print data”
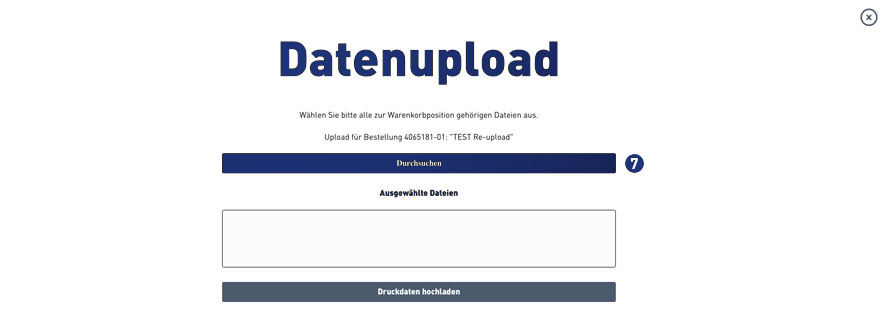 Select print data – click “Browse”
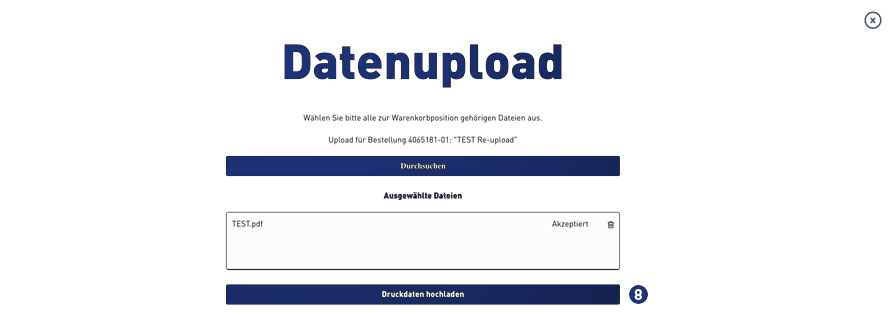 Analysis of the print data – accepted – click on “Upload print data”
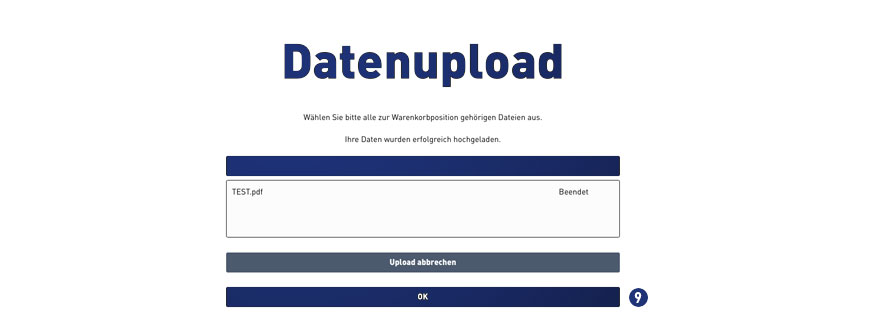 Status file upload – when “finished” continue with click on button “OK”
Then change to the order overview via the burger menu [10]. Click on the link “Orders”. [11]
When the file upload is completed successfully, the status in the order overview for this order automatically changes to “Order Inbox”. [12]
In case the place of production of your order item is Unitedprint: Yes.
Please note:
The automated forwarding of file check information mails to your customers is currently inactive (until June 2016). Please be prepared to forward such information manually to your customers.
There are two file check options for your customers to choose from: A free file check and a premium file check.
Free file check:
Free check of your data for a general printing usability. You will receive our file check feedback within 6 hours after the receipt of your data. Please note that your print data will not be checked for quality.
For example, your data will not be checked for:
– Resolution
– Trimming
– Objects in trim area
– Transparencies
– Bitmap-fonts
– Folding measures
– Color mode
However, if errors – restricting the printing – are found, we offer you three possibilities:
a) Re-delivery of corrected data
b) Approval for printing; this means you will have your artwork printed without further amendments (subject to type of error)
c) Change of order
Premium File check:
This service offers you a personal and comprehensive check of the quality of your print data as well as a file check with time-guarantee.
Your print data is checked based on the following criteria:
– Data matches your order (page format, number of pages, colour space, special colours)
– General useability (minimum size, file type, password, corrupt data, export errors, objects outside the printing area, RGB)
– Line thickness (min. 0.25 mm)
– Colour mode (CMYK, special colours excepted)
– Colour channel layout
– Page orientation/layout
– Overprinted elements
– (Embedded) text
– Printable comments
– Layers
– Data quality
– Bleed (2 mm)
– Setup (individual pages; magazine covers as double pages)
– Resolution (min. 300 dpi; A1 and A0: 150 dpi)
– Folding methods
– Displacement
– Transparency
– Objects in the bleed 1.5 mm from the cutting edge
– Printing area correct
– Stamping requirements
If errors – affecting the print result in a negative way – are found, we offer you four possibilities:
a) Re-delivery of corrected data
b) Processing of your data by our team (subject to type of error)
c) Approval for printing; this means you will have your artwork printed without further amendments (subject to type of error)
d) Change of order
Usually print data will created and sent in the PDF format (Portable Document Format). Please note the default settings for prepress.
You or your customers can also send us a TIFF or JPEG file. In a PDF file, the fonts needs to embedded.
Yes. Log in to the Partnershop backend with the login data sent to you.
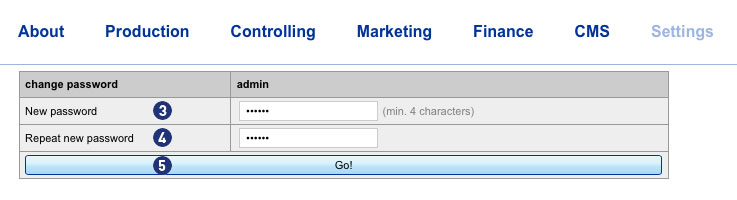
Then change in the menu Settings [1] to the module “change password”. [2]
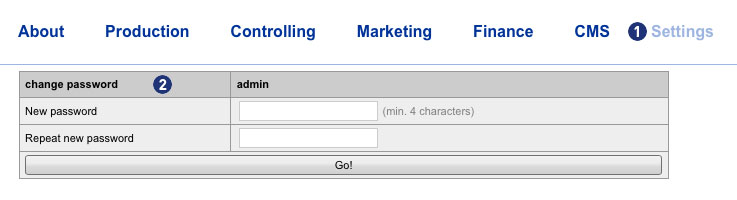 Enter your new password in the input field “New password” [3]. Repeat your entry in the field “Repeat new password”. [4]
Confirm your entry by clicking on the button “Go!”. [5]
 The next backend login is then only possible with the new password.
Note
The new password must be at least 4 characters long.
The entered password and its repetition must not be different.
This additional special allows your customers to select during the calculation to make a screen proof of their product. To do this, select “Screen proof” from the menu item “Proof”.
If your customer chooses the Screen proof option, he receives the link to the proof release via e-mail. The link leads to the order overview of your customer via the login page of the Partnershop. There, the customer can issue the print approval by means of the Screen proof or re-upload corrected print data after rejecting the Screenproof.
Attention
The display is in a resolution of 150 dpi. Due to the RGB color mode of the monitor, it is not colored.
Oblique texts and elements are displayed edged by the device-dependent resolution of monitors (72 or 96 dpi).
There is a time window of approx. 60 minutes for the Screen proof.
In the case of orders with the option Screen proof, which are ordered and released after 11.00 am, work can be extended by a full working day for each working day of the subsequent release.
Please, inform within 15 minutes after completion of order our support team Phone (länderspezifisch) / support@print24.de.
Otherwise, your trial order needs to be paid. Additionally please cancel your trial order directly into your Partner backend.
For callback please hold ready the United Print ID of each order.
For the Partnershop you do not need a web space (space for files on a Webserver) at your provider. Your entire shop is installed on the USS servers. A separate installation with you or your provider is not necessary.
If you want to use your Partnershop under your own domain you need a domain / subdomain.
You may, if not yet available, reserve through a Internet provider.
Examples
mydomain.com
www.mydomain.com
Yes, maintenance work is planned for your Partnershop every Monday from 12:00 to 18:00.
During this period, your Partnershop will be unavailable for approx. 30 minutes. Your Partnershop will be put into maintenance mode.
Please note that you do not make any changes during this time via the Partmershop backend.
Welcome at Unitedprint Shop Services!
When you receive your USS Partner Shop, it is already live, meaning that customers can already place orders, which will be forwarded to Unitedprint for production.
However: To fully customize your USS Partner Shop, please follow these 5 last steps:
- Upload an invoice template in PDF-Version 1.4 (Acrobat 5.x). To do so, please go to the backend section Finance. A sample template is being provided.
- Define your bank details for accounts receivable. Customers using payment in advance will be informed about these details. You define these details in the backend section Finance.
- Customize your pricing: As a default setting, you use the pricing (+10%) as Unitedprint. To change this, please change the pricing settings in the backend tool Pricing (in the Marketing section).
- Production: As a default setting, all orders are being forwarded to Unitedprint for production. To change this, please change the production settings in the backend tool Place of Production (in the Production section).
- Please check all pages for accuracy – especially your legal details such as Terms and Conditions, Privacy Policy and your Imprint. You can make changes to these pages in the Text tool (in the CMS section).
Extra
Your USS Partnershop initially only offers so-called offline payment methods (purchase on account, purchase in advance).
In order to also be able to offer your customers online payment methods, you need to register with the payment service provider
Six Payment Services required. This takes place via a separate process.
If you have any questions, please contact the Setup Manager at the following email address: setup@unitedprintshopservices.com
Having completed these 5+1 steps, you can fully focus on promoting your USS Partner Shop.
Marketing (23)
The use of a voucher in your Partnershop takes place in the “shopping cart” order step. [1]
Enter the voucher code in the “Voucher” field. [2]
Confirm the entry and use of the voucher by clicking on the “redeem” link. [3]
The stored voucher value is applied and displayed directly. [4]

Notice
An entered voucher code can be removed within the current order before the purchase is completed.
To do this, delete all items from the shopping cart.
As soon as you add a new item to your shopping cart, the previously used voucher code can be entered again.
A voucher code will not be accepted if the minimum order value is not met.
A voucher code can only be redeemed once.
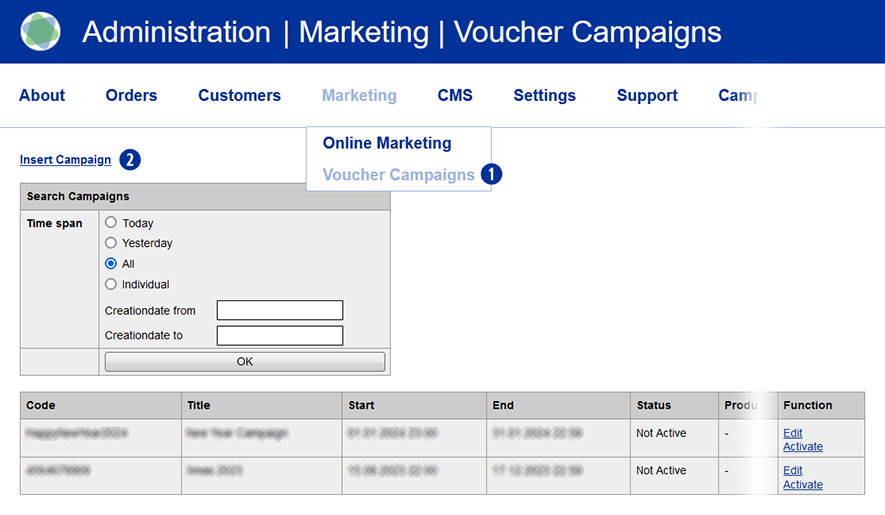
Go to the Marketing / Voucher Campaigns menu in the Partnershop backend. [1]
The overview page is displayed.
Vouchers can be searched for and displayed according to specific criteria (time span) using the “Search Campaigns” field [2]. [3]
- „Today“
- „Yesterday“
- „All“
- “Individual – from/to”
Select a criterion and confirm your search selection with the “OK” button. [4]
The search result is displayed in list form below the search window. The most recently created voucher is always at the top.
The search criterion “Individual – Creationdate from/to” refers to the creation date or creation period of the voucher, not its term.

A voucher is a voucher code with a defined number of letters and numbers.
This will be credited with a corresponding nominal value (“voucher”) for the order and can be entered by your customers in the “shopping cart” order step.
The discount is calculated on the net value of the goods excluding shipping costs.
To create one or more vouchers, go to the Marketing / Voucher Campaigns menu in the Partnershop backend. [1]
The overview page is displayed.
To create a new voucher, click the “Insert Campaign” link. [2]
Configure your voucher with the following setting options.
- Enter a name for the voucher under “Title” [3].
- The “campaign code” [4] can consist of up to 25 characters.
Uppercase and lowercase letters are permitted, but no special characters. - Specify the start date [5] including the start time [6] of the voucher for the validity period of the voucher.
Please pay attention to the correct spelling. When you click in the “Start date” input field, a “calendar” opens. - Specify the end date [7] including the end time [8] of the voucher for the validity period of the voucher.
Please pay attention to the correct spelling. When you click in the “End date” input field, a “calendar” opens. - From the “Product kind” list [9], select whether the voucher should be valid for all products or only for a specific product group.
- For “Users” [10] you specify which customers the voucher is valid for.
– “All Registrations” – the voucher is valid for all registered users
– “New Customer only” – the voucher is only valid for customers without a previous order
– “Customer list” – the voucher is only valid for one or more manually selected customers - Select the desired voucher type under “Voucher Type” [11].
Set it as a percentage or a fixed amount. - Enter the desired voucher value under “Voucher” [12].
Please note the instructions for input. - Set a minimum order value for the voucher in the “Min amount” input field [13].
- In the “Number of mailings” input field [14] you determine how many customers can redeem the voucher.
Complete the entry for the new voucher to be created by clicking on the “Insert” button. [15]
The voucher is saved in the database.
You can return to the overview page at any time using the “List Campaigns” [16] link.
Entries that were not saved using the “Insert” button [15] will be lost.

You will then be returned to the overview page.
There you will be shown all the vouchers you have created in list form, depending on your selection.
A newly created voucher is deactivated by default.
From the list view you have the option to edit the voucher (“Edit”) [17] and/or activate it (“Activate”/“Deactivate”). [18]
An activated voucher can be deactivated at any time. An active voucher cannot be edited.
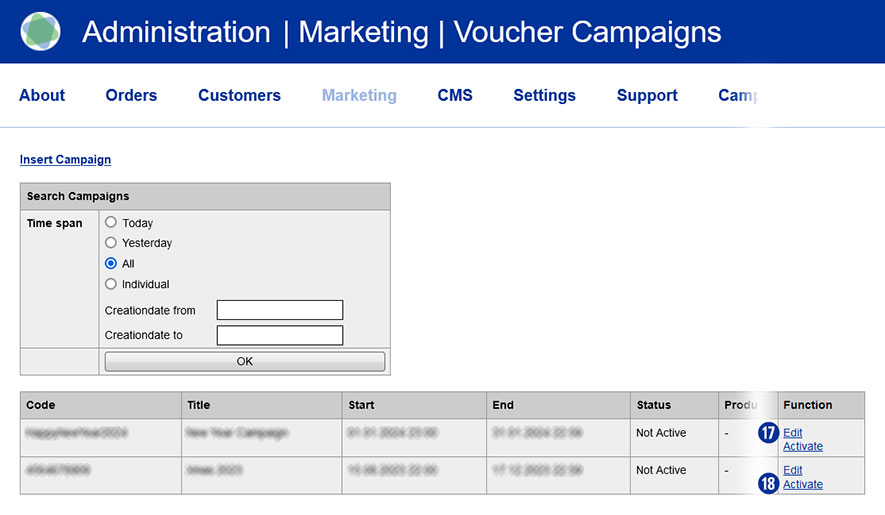
Notification
The use of vouchers is only possible for registered users. Guest users cannot enter coupon codes.
A voucher code is intended exclusively for use in one campaign and may not be used for further campaigns.
This also applies to a code that was used as part of an order but was canceled.
To register Google services, you need to confirm the ownership of your domain (verification).
In order to carry out such a Google Site Verification in your Partnershop, you must first ensure that you have access to the website.
For the Google Site Verification of your Partnershop, you have the option of storing a Google Site Verification Key so that it can be verified by Google.
To do this, switch to your Partnershop backend – Marketing / Online Marketing. [1]
In the “Google Site Verification” module [2], copy the verification key you have into the input field. [3]
Save your entry by clicking on the “Go!” button. [4]
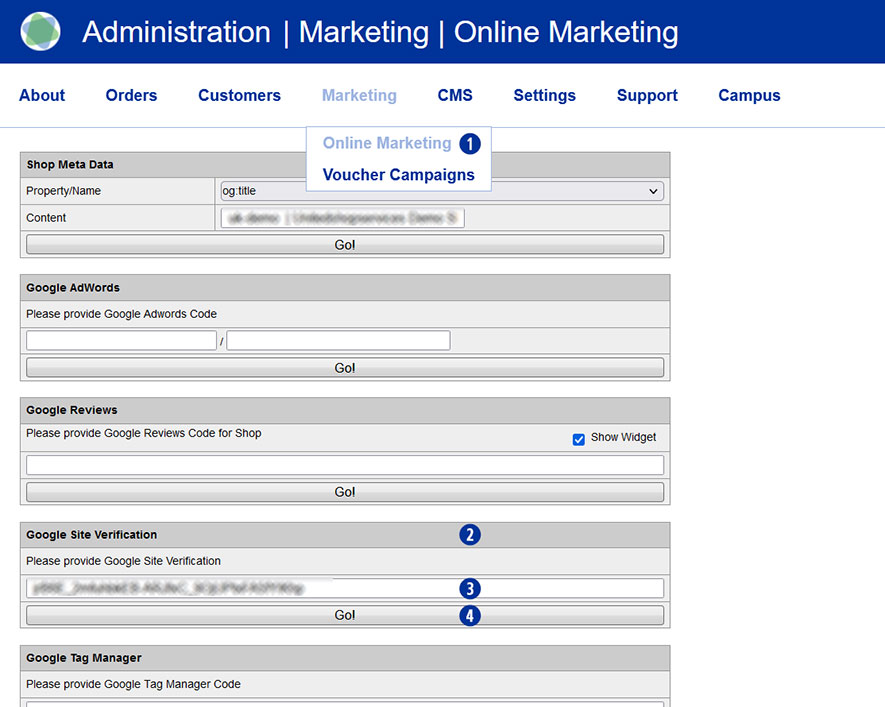
After completing all changes, switch to your partner shop backend – CMS / Administration / Redis Management / Exports.
Click on the “Create Productive Version” button.
Your online marketing changes are available in the shop after approx. 30 minutes.
Note
To create the Google Site Verification Key, log in to your Google account and go to Google Search Console (https://search.google.com/search-console).
Yes, you can integrate Trustpilot into your Partnershop.
Go to the Partnershop backend in the menu Marketing / Online Marketing. [1]
Under the Trustpilot module [2], please enter the data you have in the input fields. [3][4][5]
Click on the “Go!” button [6] to save the data permanently.
 The Trustpilot widget is displayed on the start page of your Partnershop. [7]

Note
The prerequisite for this is that you have a valid Trustpilot Business account.
This allows you to create and manage the Trustpilot link [3] and to apply for, create and download the required API key [4] and secret key. [5]
Trustpilot ratings are updated daily at 09:00.
It can take up to 24 hours to display the current values.
Google customer reviews can be submitted for your Partnershop.
To activate Google reviews in your Partnershop, you need a “Google Merchand ID”.
The prerequisite for this is that you have a Google Merchant Center account.
The Google Merchant Center is a tool with which you can make various Google services available (e.g. customer reviews).
You will also find your Merchant ID there. Your Merchant ID is a unique number that identifies your Merchant Center account.
Follow these steps:
Go to the Google Merchant Center website (https://merchants.google.com/).
Sign in with your Google account or create a new account if you don’t already have one.
You are on the Overview page of Google Merchant Center. [1]
Copy your dealer ID to the clipboard. [2]
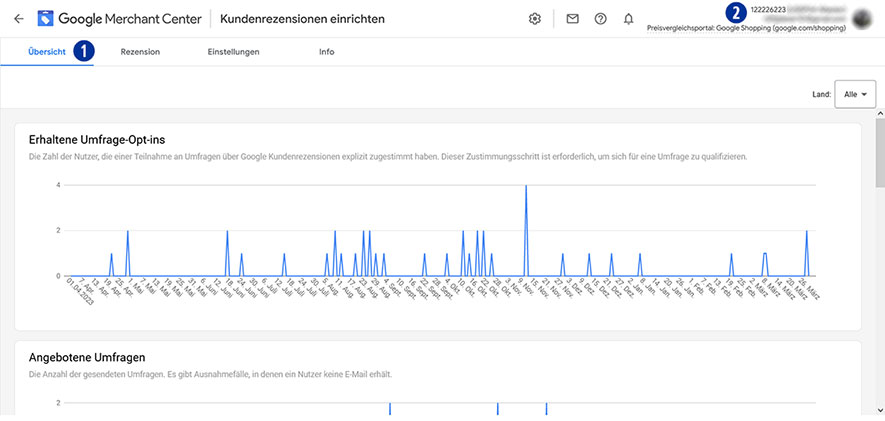
Go to your Partnershop backend – marketing / online marketing [3] to the “Google Reviews” module. [4]
Paste your “Google Merchant ID” [2] from the clipboard into the input field [5].
Activate the “Show Widget” checkbox [6] to display the “Google Reviews” tile on the homepage of your Partnershop.
Confirm your entry by clicking on the “Go!” button. [7]

Notice
Confirm that you are the owner of your website URL under “Company Information” in Google Merchant Center and then claim the URL for this Merchant Center account.
You can find detailed information about this under the link https://support.google.com/merchants/answer/188493?hl=de&ref_topic=3163841.
After completing an order, the customer will be shown a window on the order completion page to take part in the customer survey.
If the customer confirms the message, an email will be sent within X days, depending on the shipping method selected.
The customer then has the opportunity to make the assessment.
The customer reviews submitted are displayed via the Google review widget on the homepage of your partner shop within the slide above. [Fig. follows]
To display reviews, a minimum number of 150 customer reviews is required.
Yes, a robots.txt has been created directly below the shop domain.
The robots.txt file is a text file that specifies which directories may and may not be read by search engines.
The robots.txt is very important for all crawlers, which first search in the robots.txt and read it. It’s like a kind of manual that tells you what you can and cannot do.
The robots.txt defines exactly which crawler is allowed to search which directories, subdirectories or individual files and which are blocked for it.
Example
https://mydomain.com/robots.txt
The robots.txt refers to the “sitemap_index.xml”, among other things.
Link
https://faq.unitedprintshopservices.com/faq/verfuegt-mein-partnershop-ueber-eine-xml-sitemap/
In your Partnershop Backend Marketing > Customers you will find all relevant information about your customers in the result overview on the right. [1]
- Customer number (CN)
- Company
- Name
- Register
- Profil changed
- Orders
- Order Revenue (Umsatzübersicht)
- Invoice
Display Order Revenue
By default, always 25 entries are displayed. The selection box [2] below the display can be used to change the number of results to 10, 25, 50 or 100 per page.
In the column “Order Revenue” [4] the total net sales of the respective customer is displayed..
Sorting
The columns “Customer number”, “Company”, “Name”, “Orders” and “Order Revenue”) can be sorted in ascending or descending order by clicking on the column name. [5] The results overview opens with ascending sorting of the column “Customer number”.
Display invoice payment and open invoices
In the result overview, another column “Invoice” is displayed to the right of the “Order Revenue” column. [6] It is shown graphically with an icon (green dot) [7], if the customer has the option “Invoice”.
In addition – in the case of open invoices – an info text (red) is displayed. [8]
Example
(2 unpaid) for two invoices not marked as “paid”
If no invoices are open, no info text is displayed.
Note
The sorting of the results always refers to all registered customers.
Yes. The search mask on the left contains a new filter “Invoice Payment”. [1]
If you activate the checkbox and then click the button “GO!” [2] all customers of your Partnershop with the payment method “Invoice” will be displayed. [3]
The filter remains active until it is deactivated by youself or left the page.
Yes. Percentage of customer discounts can be granted. To set a customer discount, go to the Partnershop backend under Marketing> Customers. [1]
Enter a search criterion (e.g. customer number) in the input mask [2] and then click the button “Go!”. If the search result is successful, the window “Customer data” is displayed.
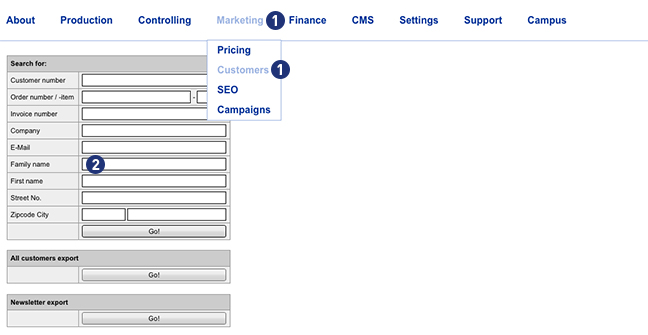
Click the button “Set Discount” to enter a customer discount. [3] A mask “Discount” will opened. If the customer has not yet deposited a discount, the mask “Discount” opens with the setting “Standard”. [4] Use from the selection list [5] a discount rate between 1 and 100%. [6] The setting changes to “Custom discount in %” [7] Save your selection by clicking on the button “Save”. [8]
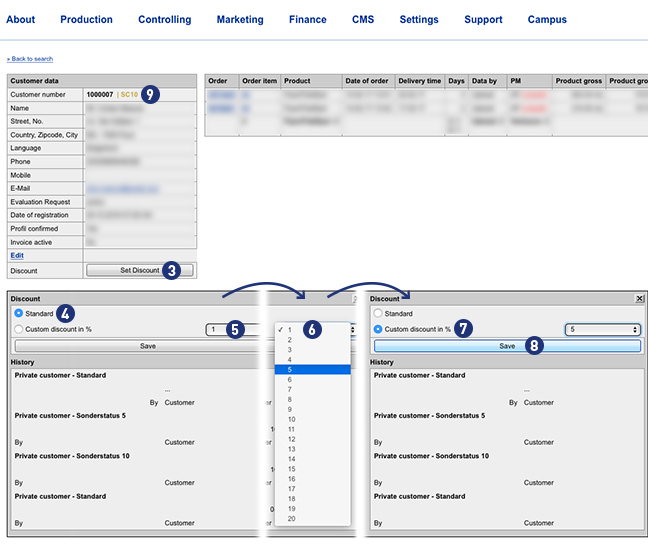
Apart from the reduction in the product price, a deposited discount does not trigger any further actions on the type of shipment and the production period.
Note
A customer registered in the Partnershop (login) receives the discounted price already at the product selection.
If the customer is not yet registered in the Partnershop (login), the discount is displayed in the shopping basket.
In both cases, the discount is shown on the later invoice.
A partner with a discount can be identified in the Partnershop backend at the “SC …” (Special Condition) in the “Customer data” window. [9]
In your Partnershop backend in the section Marketing > Product [1] you have the possibility to provide your own search engine optimized information for each product.
In the section Product page [2], select a product via the drop-down menu. [3]

After successful selection the standard product image as well as the standard product texts will be displayed. Via the individual input fields the entries can be individualized with your own texts and images. [5-14]

About the section Product image [4] allows you to replace the standard product image with your own product image. Changes at this point are taken over directly and displayed. Click on the active button “Browse” [6].
If you want to change your product image or switch to the standard product image, click the button “Delete”. [5]
The section Page description [7] can be used to store meta information (title and description) for browsers and search engines. These texts are displayed on the calculation page or the individual product page in your Partnershop.
The following entries are available in detail.
- Text: Text in the browser tab [8]
- Product-Slug: URL on the product page – with a speaking label [9] (max 64 characters)
z.B. http://my-shop-shop.unitedprintshopservices.com/print-products/business-cards/ - Description: Description text for search engine results [10]
On the calculation page there are two product information texts for each product – below the product photos. These are the two text blocks Header [12] and Detail [13] under Product information. [11]


All text boxes contain default texts and should be changed. Whether it is a default text, you can see the background color (Gray) of the text box.
To overwrite the default texts, select these and overwrite with your text.
Confirm your changes by clicking the button “Go!”. [14]
Whether your text has been saved can be recognized by the background color (White) of the text box.
To edit and format the texts, you can use the tools known from MS Office programs (such as bold, italic, alignment, etc.). [15]
After a reload of the Calculate page in the Partnershop (Browser > F5) your changed text will be displayed.
The general rule
All text boxes must be filled with text content. Empty text boxes are not saved but reset to the default text.
The text box Product-Slug may not contain special characters. HTML tags or Java script code can not be saved.
The maximum number of characters per input field is 1,024 characters (with spaces).
The headline on the pricing page (e.g. business cards) is the product name and can not be changed. [16]
Important note
A Product-Slug (max 64 characters) should not be changed too frequently – this is punished by search engines (e.g. Google) by a worse ranking “hard”!
Additional information worth knowing about search engine marketing can be found in our CAMPUS section SEM III: SEO-Onpage.
You can define product-specific surcharges for your customers. Go to Backend Marketing > Pricing. [1] Then select the desired product from the product list [2] and set the desired Markup for the selected product. [3] Confirm your entry by clicking on the button “Go!”.
Alternatively, you can simultaneously select multiple products from the product list by using the keyboard shortcut “Ctrl + click”.

By clicking on the button “Select all” [4], all products displayed in the “Product” list are automatically activated. Then enter a Markup value in the number input field and confirm your entry by clicking on the button “Go!”. [5]
To deactivate the selection, click on one of the products within the list.
If you have already set Markup / Markdown values for your products (for example + 10%), these will not be automatically applied to new products. You can use the “Default Markup / Markdown for new products” input field [6] to define a value that will be transferred to new products as soon as they are added to the “Pricing” list.
The “Pricing history” tool [7] gives you the ability to track your changes. Use the various selection criteria for this (Date, Week, Products and User). Confirm your query by clicking on the button “Go!”. [8]

Yes. You can integrate the Google Tag Manager into your Partnershop.
Switch to the backend area Marketing > SEO. [1]
Under the module Google Tag Manager [2] please enter the data you have in the input field – Google Tag Manager ID. [3]
By clicking on the button “Go!” The ID is stored permanently.
This requires that you have a valid Google Account.
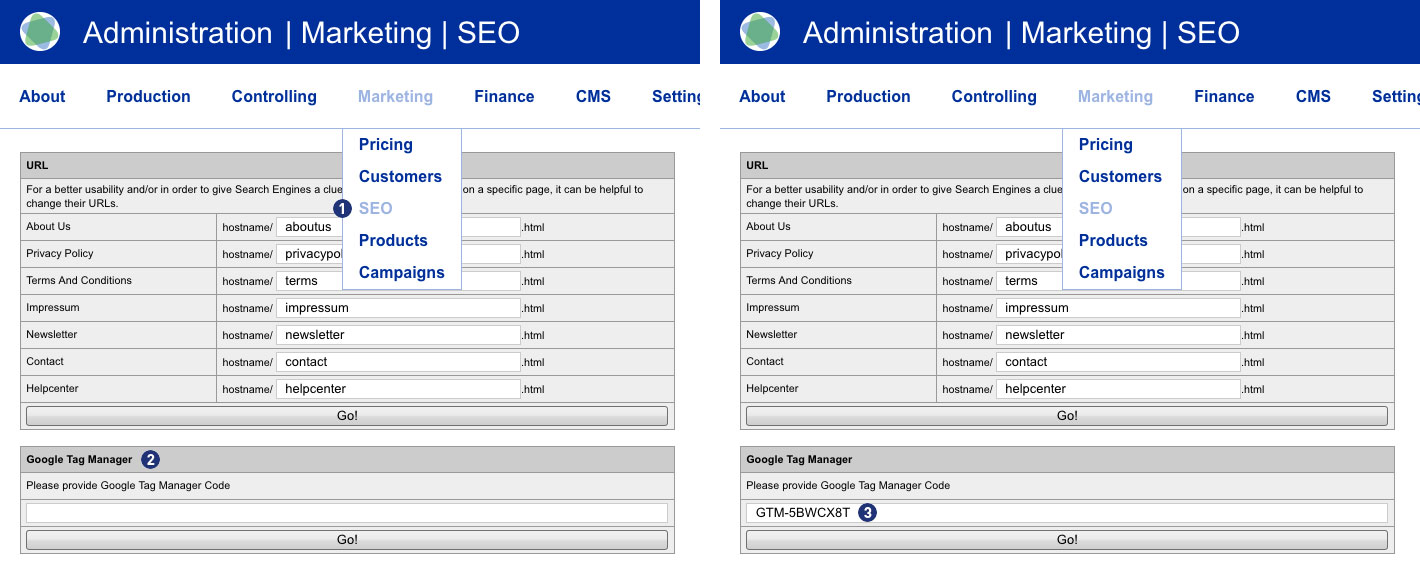
No. Unitedprint won’t contact or even communicate directly with your customers. All communication with your customer either takes place automatically via your USS Partner Shop (and hence in your name) or by yourself.
Example 1: Order confirmation
After successfully receiving an order, your USS Partner Shop sends our a confirmation mail to your customer. This mail uses your imprint information and email address.
Example 1: Errors
In case there’s an order-related issue, which cannot be solved through automated emails (e.g. faulty print files), Unitedprint will contact you about it – not your customer.
No. The USS/Unitedprint brand is not openly communicated. Neither in the shop frontend, nor on invoices or shipping labels, etc. All contact points are customized with your brand.
As a default setting, your shop’s URL will have a “…unitedprintshopservices.com” component. In case you want to hide this URL and have your own URL displayed, please contact us.
So you have collected a larger number of business contacts over the time and you wonder what to do with these contact details in order to promote your online print shop? No matter if these contacts are existing client or merely prospective buyers: Contact information is a valuable asset that you should use in order to meet your communication targets (such as the establishment of a local brand or the promotion of your portfolio). In today’s widely digitalized world to send out personalized content to a large number of recipients with just a few clicks, saving you time and money – if you do it all right. The most popular mass communication channel is e-mail Marketing. Software solutions manage your contacts and all they need is your contacts’ names and e-mail addresses. The convenience of this channel allows you to put more effort into the preparation of content (and of course into other Sales/Marketing activities).
In case you lack ideas of when and what to write to your contacts, we would like to provide a little inspiration you with a potential year-round-calendar of potential newsletters.
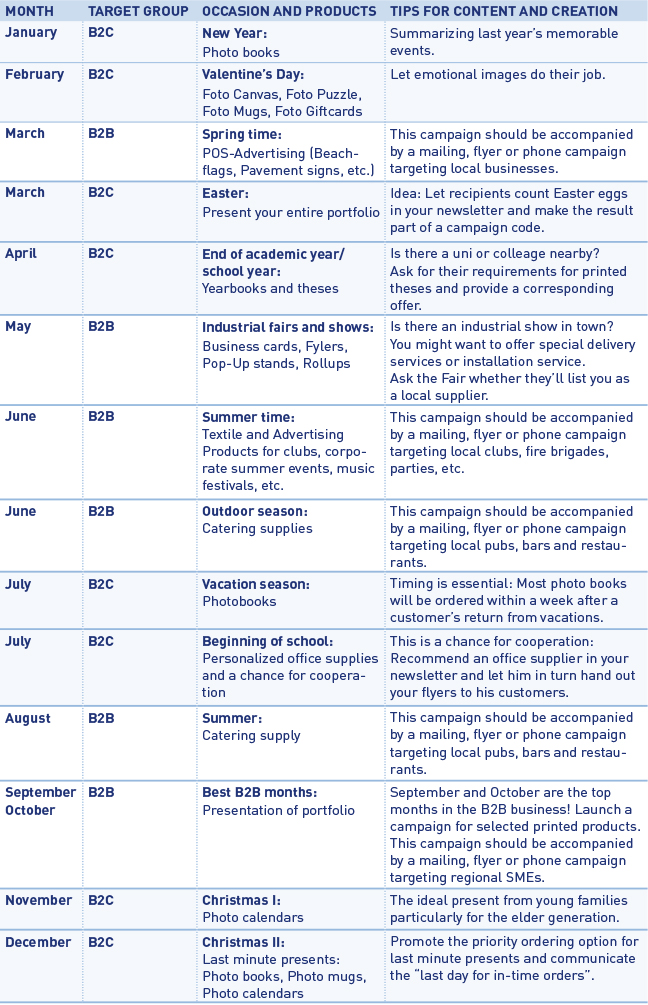
In addition to such seasonal newsletters, you might want to add special campaigns, e.g. for customers who haven’t ordered for a while (you would select/group these contacts in your newsletter management tool) and are now offered a special discount for returning customers.
No matter what the occasion and the actual content of your newsletter are, you should make sure the recipients of your newsletter become readers. The first thing (and unfortunately rather often the only thing) your audience will see of your newsletter is its subject. Hence, this subject should be as attractive as possible so that the newsletter will not be ignored/deleted immediately. Our advice is to for instance mention your town’s/region’s name and maybe a promised benefit in the newsletter’s subject line (e.g. “Birmingham bar owners now safe 10% on catering supplies”). Apart from price campaigns you might also want to mention your businesses’ special services or print shop’s special features. When creating the actual newsletter, put more effort in an attractive image and write as little text as possible. You don’t want to “waste” your target group’s time but make them visit your web shop as soon as possible. For this reason we advice to integrate a “call to-action” button into your e-mail.
For setting up and realizing your newsletter campaigns we recommend the software tool MailChimp (https://mailchimp.com), which is free of charge for campaigns with less than 5.000 recipients. In addition we recommend tracking your newsletter’s success (conversion rate) by using Google Analytics.
Yes. With the following links, you can download files for flyers about our Topseller products.
A 6-pages DIN A4 letter fold as well as a 6-pages DL (105 x 210 mm) letter fold are available.
You can customize the flyers in the design of your shop for your individual marketing activities.
Note
The files are prepared for high-resolution printing.
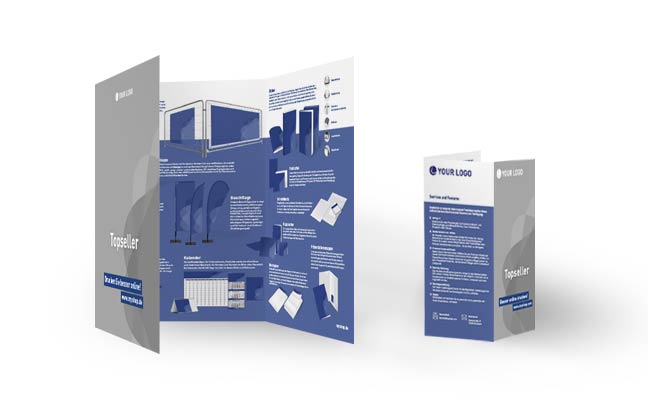
The “MailChimp” tool is a sophisticated newsletter editor offering a wide range of components.
For example, even the free version enables you to send up to 12,000 emails a month to 2,000 recipients (with a small advertising banner).
MailChimp provides a number of templates which, thanks to a “responsive design” also display correctly on mobile end devices.
The instructions below contain further details on using the newsletter tool, and the most important steps to follow for your newsletter campaign.
Note
For your domain to support the required authentication procedures DomainKeys Identified Mail (DKIM) and Sender Policy Framework (SPF), two additional DNS records are required.
To configure your domain for DKIM, add an entry with the following settings:
Type: CNAME
Prefix: k1._domainkey
Value: dkim.mcsv.net
Now add another entry for SPF with the following settings:
Type: TXT
Value: v = spf1 include: servers.mcsv.net? All
Your customers can subscribe to a newsletter list via the button “Newsletter” in the footer of your Partnershop. The collected data are stored in a list as a CSV file and can via the backend under “Marketing – Customers – Newsletter export” retrieved.
Note
The Partnershop system does not include a functionality newsletter tool!
The generation and delivery of a newsletter can be done individually through a separate newsletter software. For this you can import the previously exported list (CSV file) from the Partner Store in your newsletter software.
The administration of subscribe and unsubscribe to the newsletter is performed through the separate newsletter software and is not a function of the Partnershop.
The Facebook Pixel is an analysis tool that you can use to measure the effectiveness of your advertising. In the Ads Manager of Facebook you can see which ads generated which sales.
Entering or saving the Facebook Tracking ID (Facebook Pixel) is done via the Partnershop backend Marketing > SEO [1] in the module “Facebook Tracking Code”. [2] In the provided input field [3] enter your Facebook Tracking ID. Save the entry via the button “Go!”. [4]
![]()
Note
You will receive the Facebook Tracking ID if you create a business account with your Facebook page and create an ad account.
Create the Facebook pixel
- Go to the “Pixel” tab in Ad Manager.
- Click on “Create Pixel”.
- Enter a name for your pixel. You can only create one pixel per ad account. So choose a name that represents your company (Partnershop).
- Check the box to accept the terms of use.
- Click “Create Pixel”.
After you have set up the Facebook Pixel, you can start showing ads on Facebook with conversion optimization and tracking.
For detailed information how to set up a Facebook Business Account, including how to create a Facebook Pixel, you find in this step-by-step guide.
Yes. Please switch to your Partnershop backend to Marketing > SEO. [1]
At point Google AdWords [2] please enter the data you have in the two input fields – Google AdWords ID [3]
and Conversion Key [4]. With the button “Go!” teh ID and the key are saved permanently.
Requirement is you have a valid Google Account.
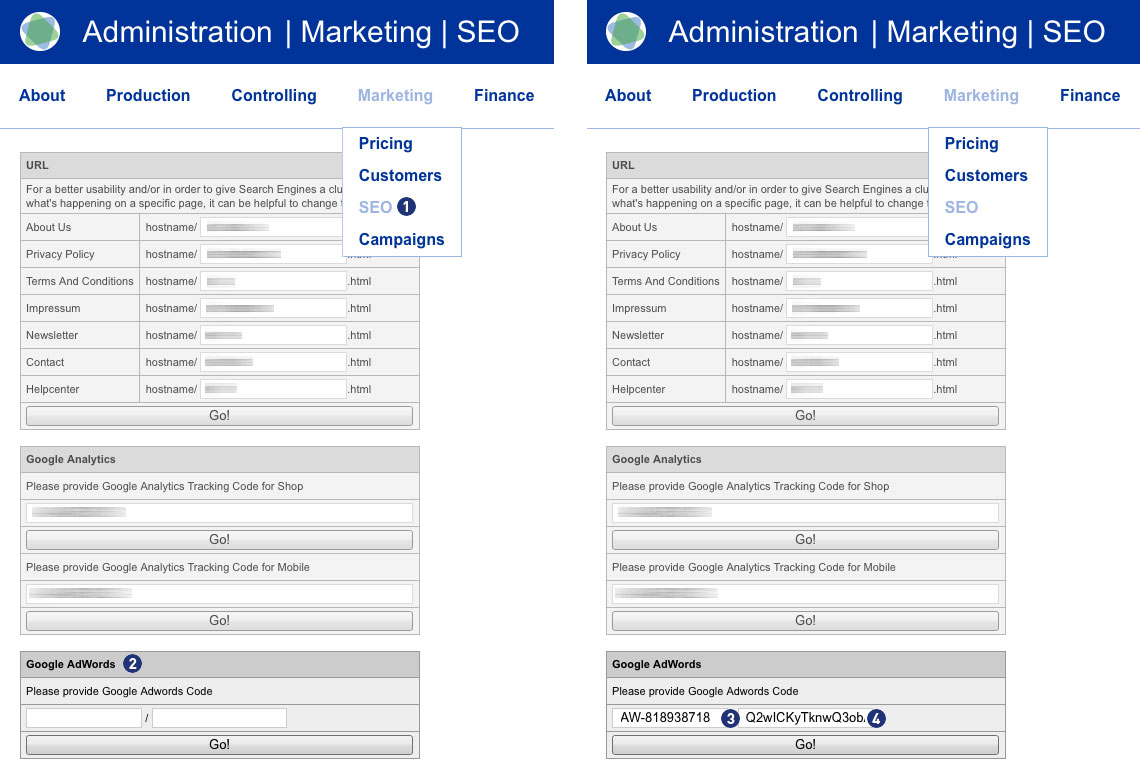
By clearing the two input fields and clicking on the button “Go!” the ID and the key are removed.
The corresponding contents in the source code of the application are deleted.
Note
When entering the Google AdWords ID, make sure it starts with “AW-“.
For more information please go to the Google AdWords Help.
Yes, if your shop pages are indexed, a sitemap index file is created directly below the shop domain.
Example
https://mydomain.com/de/sitemap_index.xml
The content and product pages are referenced in the “sitemap_index.xml”.
In the “sitemap_content.xml” – if indexed – reference is made to the general content pages (General terms and conditions, Privacy policy, Imprint, FAQ and Help).
In the “sitemap_product.xml” – if indexed – reference is made to the individual product pages edited by you.
Note
An XML sitemap is a list of URLs that is created in XML format and contains all indexed subpages of a website.
Production (23)
You have received an order that corresponds to the specifications you made for your own production. At these orders, you are responsible by yourself for checking print data, for production and for dispatch of the goods. In addition, you have to care for the status of the purchase order (“Production” – “Track” – select the appropriate order – “State of order”).
Other steps in the process (e.g., payment verification, print data transfer, etc.) run automatic and without your intervention. Or are dependent on your correct status maintenance in the backend (e.g., dispatch of shipping confirmation mails and billing documents with the dispatched state).
If desired, the print data can now be selected and uploaded on the calculation page. In addition, there is the option of viewing the uploaded print data via a preview function after the upload process.
On the calculation page, there is a selection list with the name “Print data”. Here, you can choose between the following options.
- Transfer print data later
The upload takes place as usual after order completion including print data preview. - Upload print data now
The upload takes place directly on the calculation page including print data preview.
After selecting one of the options above, a layer for the login or guest login is displayed.
Log in there with your user data. Then select the desired print file. Click on the button “Choose print data”. The selected file will be displayed in the window above. Confirm your selection with the button “Upload print files”. The upload process is displayed via a status bar.
Afterward, you have the opportunity to preview and check the previously uploaded print data. Click on the button “Show uploaded print data”.
If the data are correct, confirm your selection via the button “Use uploaded print data”. Otherwise, you can delete the print data. Click on the button “Delete uploaded print data”. You will be redirected to the selection window for the print data upload.
Afterward, you get back to the calculation page. In the selection list “Print data” the selected upload option as well as a preview link (View) are displayed.
Note
Due to security issues, uploading archive files (e.g., zip, rar, tar, gz, etc.) is no longer possible.
In this case, you can accept or reject complaints claims from your customers – without consulting Unitedprint.
Follow these two steps:
- Give your customer a new, reduced invoice (Backend area > Production > Track).
- Transfer the difference back to your customers (for example, from your Worldline Backend).
If you are complaining about self-produced articles, please consider that the calculation basis for commissions charged to you remains the original selling price.
In general, you can operate your own customer complaints management. Therefore, you can accept or reject complaints claims by the customer – without consulting Unitedprint – even if Unitedprint was the producer of the complained goods.
Follow these three steps:
- Give your customers a new, reduced invoice (Backend area “Production” – “Track” – choose the appropriate order).
- Transfer the difference back to your customers (for example, from your Worldline Backend).
- Contact Unitedprint if you want to claim the article at Unitedprint.
Please follow these steps:
- Go to the Partnershop Backend menu> Production> Track and select the desired job. [1]
- Click on the respective order item in the column “Product kind” [2], which is to be canceled.
- Within the detail view in the module “Order information> State of order” select the item “Cancellation” from the drop-down list. [3]
- Confirm your selection by clicking the button “Save”. [4] The following message is displayed. [5]
- Push the (partial) rebooking of your customer’s payment via your Worldline account.
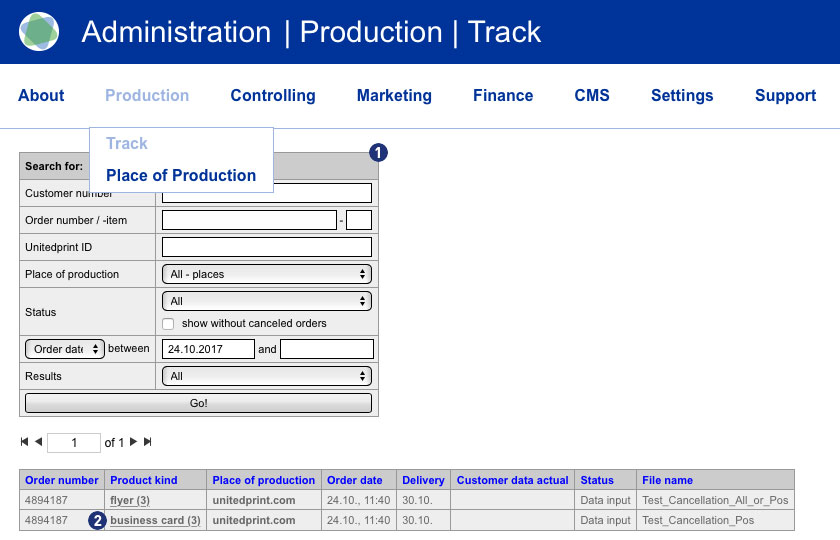
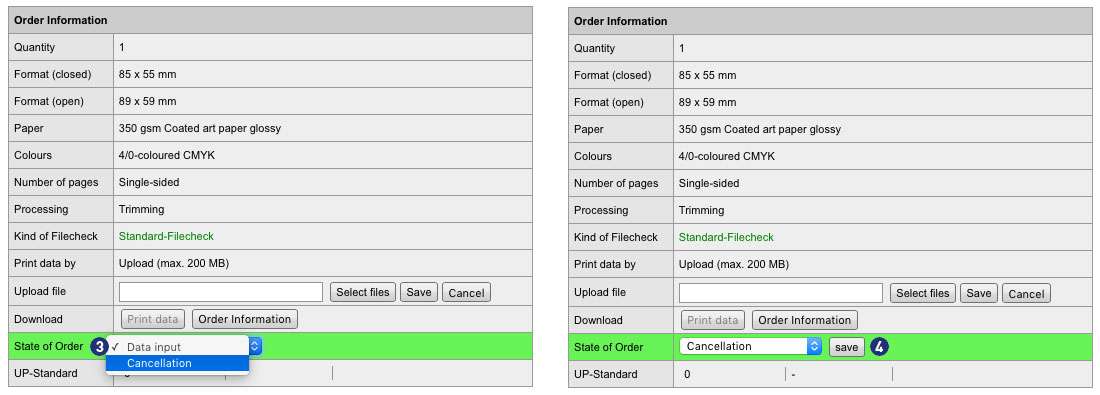
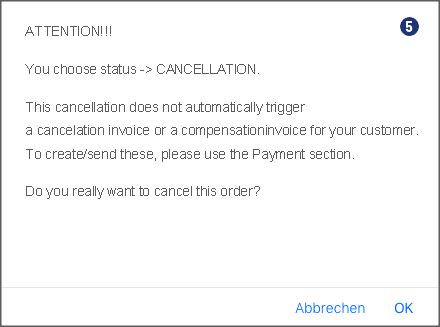
Note
If an invoice already exists for the order you canceled, you must create a separate cancellation invoice for the purchase order or purchase order item and send it to the customer. The details can be found in the section “How do I create a cancellation invoice?“.
Please follow these steps:
- Go to the Partnershop Backend menu> Production> Track and select the desired job. [1]
- Click on the respective order item in the column “Product kind” [2], which is to be canceled.
- Within the detail view in the module “Order information> State of order” select the item “Cancellation” from the drop-down list. [3]
- Confirm your selection by clicking the button “Save”. [4] The following message is displayed. [5]

Note
If an invoice already exists for the order you canceled, you must create a separate cancellation invoice for the purchase order or purchase order item and send it to the customer. The details can be found in the section “How do I create a cancellation invoice?”
To do this, enter the appropriate order number in the search field in the area Production> Track> Order number / item. Confirm the search by clicking the button “GO!”.
Note
Search requests for orders that have already been completed must be indicated by specifying the order number or the customer number. A general search for all orders is not possible for technical reasons. If you are looking for the customer number, the search result includes both – current and completed orders.
Yes. We keep you informed about the progress of your order in the form of status messages by e-mail to the address stored in the system.
In parallel you can view the current order status at any time via the Partnershop backend Production > Track.
In the Partnershop backend please click “Controlling”, select the desired parameters and start the query. The result of your query are displayed as a chart.
In addition, it is possible to print out the query result or export it as an Excel file.
In the Partnershop backend please click “Production” and select “Track”. Enter the necessary parameters (for example, order number or order date) into the search mask and start the query. In the list overview, click on an item under “Product kind” (highlighted in color and underlined). In the detail view of order, you find the current order status under “State of order”.
In the Partnershop backend please click “Production” and select “Track”. Enter the necessary parameters (for example, order number or order date) into the search mask and start the query. Please review the columns “Order number” and “Product kind” in the order detail view. If there are several items for an order, they are displayed underneath each other for the respective order number under “Product kind”.
Ab sofort steht Ihren Kunden die neue Funktion “Bundle” (mehrere Versionen) zur Verfügung.
Auf der Kalkulationsseite – neben der Auswahlbox “Menge” – finden Sie eine zusätzliche Box “Versionen”.
Falls gewünscht, erhalten Sie damit die Möglichkeit, bis zu 10 Versionen zu einem Produkt auszuwählen.
Nach Auswahl der gewünschten Anzahl an Versionen wird der Preis neu berechnet.
Der Preis ergibt sich aus den Kosten der aktuellen Kalkulation – multipliziert mit der Anzahl der Versionen.
Im Warenkorb wird eine Bundle-Bestellung zu jeweils einer Bestellposition zusammengefasst.
Die Versandersparnis wird nicht separat ausgewiesen und direkt von den Versandkosten abgezogen.
In der Produktbeschreibung wird eine Bundle-Bestellung zu jeweils einer Bestellposition zusammengefasst.
Im Burger-Menü > Administration > Bestellungen wird eine Bundle-Bestellung entsprechend der Anzahl der Versionen zusammengefasst dargestellt. Der Objektname jeder Version erhält einen Zusatz.
Beispiel
…_5Vers_Bundle Motif 1
…_5Vers_Bundle Motif 2
…_5Vers_Bundle Motif 3
Im Burger-Menü > Administration > Datenupload werden die Versionen einer Bundle-Bestellung separat aufgelistet, um ein gezieltes Hochladen der Druckdaten pro Version zu ermöglichen.
Yes. If your customers orders several items with the same product properties, these items can be shipped collectively. For these positions, your shop will offer a shipment voucher.
During the ordering process, your customers have the opportunity to select the option “Combined shimpment”. To do this, select the checkbox “Combined shimpment”. [1]
You can use the function “Copy product” in the shopping cart [2] to create several items of the previously configured item (for example, business cards) and to order these with a corresponding dicoount as a collective shipment. The result is displayed in the calculation overview in the shopping cart. [3]
Alternatively, it is possible to configure the same product once or several times over the calculation page and place it in the shopping cart.
Note
An order with the option “combined shipment” is not triggered to production until the print data has been uploaded to all items.
The delivery date changes for the entire order!
In case an order item was selected to be produced by yourself, this is the case because the item ordered is in correspondence with your settings in the backend section “place of production”, where you define which items you want to produce. However, in case you now received such an order but you’re not interested in producing it (e.g. because you changed your mind or because you’re out of paper) you can hand it to Unitedprint. To do so, select the order item in “Track” and click the “Reject order” option in the top section of the order view. You will be charged the price displayed.
Dealing with faulty data decides with the filecheck option selected when ordering. The following two options are available:
- Basic check (free)
- Premium-Check (including correction, paid)
If the premium data check was selected by your customer, mistakes can often be remedied by our team independently.
If new data are required, information is sent by e-mail to you as a partner as well as to the customer.
Example: e-mail content
–>
Dear Mrs./Mr.,
Thank you very much for your order! Our free Basic-Filecheck has led to the following result:
- Customer request not possible:
Your editing request cannot be processed.
Unfortunately, our team cannot correct the errors listed. Therefore we would like to ask you to send us corrected and complete printing data (all pages for order).
Please confirm in the detailed listing of your order (under MyOrders http://myshop.com?orderstep=1_cstmzng&id=2473) that you sent fully corrected printing data. Otherwise we cannot proceed with your order!
PLEASE CONSIDER: Without your response at MyOrders ‘Artworking’, we cannot proceed with your order.
<–
For a new data upload, it is necessary for your customer to use the link from e-mail above. The link leads directly to the order overview (orders). [1]
Select the relevant order within the order overview. Jobs that require new print data to be uploaded have the status “Processing approval”. [2]
A warning symbol [3] is displayed at the corresponding order item in the “Edit” column, which must be clicked by the customer.
After clicking on the warning symbol, the following window opens for the print data check. [4] Confirm the link “I’m sending my data” to continue. [5]
For further processing, the indicated and following instructions must be observed. [6-9]
Select print job, click on “Upload print data”
Select print data – click “Browse”
Analysis of the print data – accepted – click on “Upload print data”
Status file upload – when “finished” continue with click on button “OK”
Then change to the order overview via the burger menu [10]. Click on the link “Orders”. [11]
When the file upload is completed successfully, the status in the order overview for this order automatically changes to “Order Inbox”. [12]
In case the place of production of your order item is Unitedprint: Yes.
Please note:
The automated forwarding of file check information mails to your customers is currently inactive (until June 2016). Please be prepared to forward such information manually to your customers.
There are two file check options for your customers to choose from: A free file check and a premium file check.
Free file check:
Free check of your data for a general printing usability. You will receive our file check feedback within 6 hours after the receipt of your data. Please note that your print data will not be checked for quality.
For example, your data will not be checked for:
– Resolution
– Trimming
– Objects in trim area
– Transparencies
– Bitmap-fonts
– Folding measures
– Color mode
However, if errors – restricting the printing – are found, we offer you three possibilities:
a) Re-delivery of corrected data
b) Approval for printing; this means you will have your artwork printed without further amendments (subject to type of error)
c) Change of order
Premium File check:
This service offers you a personal and comprehensive check of the quality of your print data as well as a file check with time-guarantee.
Your print data is checked based on the following criteria:
– Data matches your order (page format, number of pages, colour space, special colours)
– General useability (minimum size, file type, password, corrupt data, export errors, objects outside the printing area, RGB)
– Line thickness (min. 0.25 mm)
– Colour mode (CMYK, special colours excepted)
– Colour channel layout
– Page orientation/layout
– Overprinted elements
– (Embedded) text
– Printable comments
– Layers
– Data quality
– Bleed (2 mm)
– Setup (individual pages; magazine covers as double pages)
– Resolution (min. 300 dpi; A1 and A0: 150 dpi)
– Folding methods
– Displacement
– Transparency
– Objects in the bleed 1.5 mm from the cutting edge
– Printing area correct
– Stamping requirements
If errors – affecting the print result in a negative way – are found, we offer you four possibilities:
a) Re-delivery of corrected data
b) Processing of your data by our team (subject to type of error)
c) Approval for printing; this means you will have your artwork printed without further amendments (subject to type of error)
d) Change of order
Usually print data will created and sent in the PDF format (Portable Document Format). Please note the default settings for prepress.
You or your customers can also send us a TIFF or JPEG file. In a PDF file, the fonts needs to embedded.
Orders received in the Partnershop go through different statuses, which are displayed in the Partnershop backend.
Under Order > Track > Detail view in the module Order number [1], the current order status can be viewed in the field State of Order [2]. The status update is automatically done in the background.
The module State-History [3] chronologically lists the completed order statuses for an order.
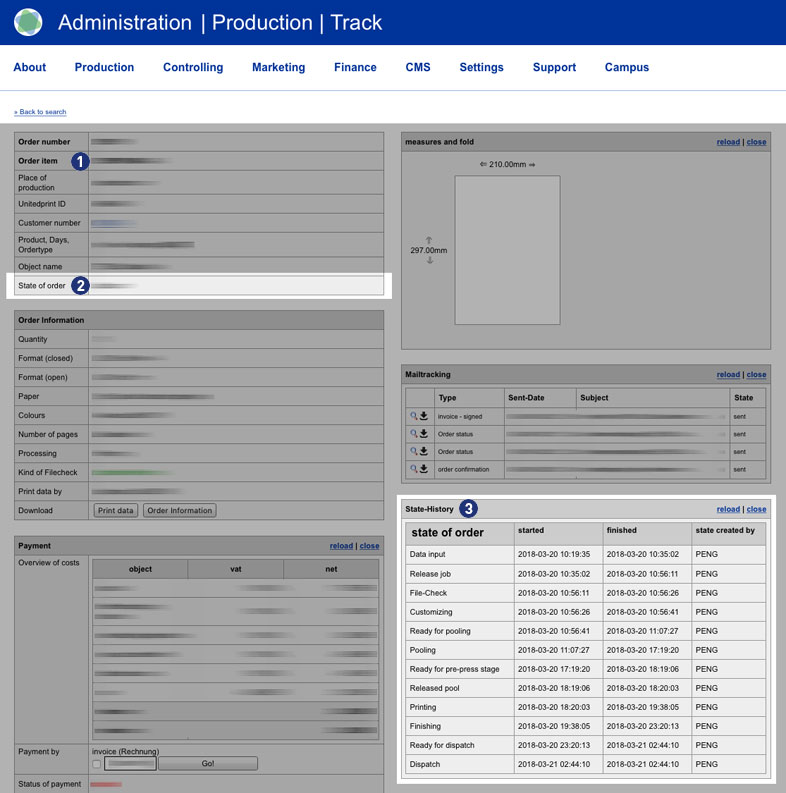
The order status of an order can provide information if an order from the Partnershop can not be transferred to Unitedprint.
Status: Data Input
Data upload – Print data not uploaded
Payment in advance – receipt of payment not confirmed
Payment – Online Payment has not set Clearance
Status: Waiting for Customize-Release
Data upload – Missing new print data after data check
Status: Waiting for Proof-Release
Release – Proof approval of partner shop customer is pending
The following statuses can be displayed for an order.
| Status | Beschreibung |
| Data input ¹ | Data input |
| Release job ² | Release job |
| File-Check | File-Check |
| Waiting for Customize-Release | Waiting for Customize-Release |
| Customizing | Customizing |
| Waiting for Proof-Release | Waiting for Proof-Release |
| Ready for pooling | Ready for pooling |
| Pooling | Pooling |
| Ready for pre-press stage | Ready for pre-press stage |
| Printing | Printing |
| Self-Production | Self-Production |
| Finishing | Finishing |
| Ready for dispatch | Ready for dispatch |
| Dispatch | Dispatch |
| Cancellation | Cancellation |
Notes
¹ If the payment status “Payment in advance” has been confirmed, the print data has been uploaded but the order status “Data input” is still displayed after approx. 15 minutes, please contact the support.
² If the order status “Release Job” is still displayed after approx. 15 minutes, there is usually a payment problem between you as the Partnershop owner and print24. Please contact the support.
This additional special allows your customers to select during the calculation to make a screen proof of their product. To do this, select “Screen proof” from the menu item “Proof”.
If your customer chooses the Screen proof option, he receives the link to the proof release via e-mail. The link leads to the order overview of your customer via the login page of the Partnershop. There, the customer can issue the print approval by means of the Screen proof or re-upload corrected print data after rejecting the Screenproof.
Attention
The display is in a resolution of 150 dpi. Due to the RGB color mode of the monitor, it is not colored.
Oblique texts and elements are displayed edged by the device-dependent resolution of monitors (72 or 96 dpi).
There is a time window of approx. 60 minutes for the Screen proof.
In the case of orders with the option Screen proof, which are ordered and released after 11.00 am, work can be extended by a full working day for each working day of the subsequent release.
Unless the selected payment method is “payment in advance” you don’t need to do anything. The order will automatically be forwarded to Unitedprint. File checks, production, and shippments to your customers will all be handled by Unitedprint. You can track the status of orders in your backend. As soon as an item was shipped, your USS partner shop sends a shipping confirmation mail to your customer including the invoice document.
All of this happens without any involvement on your side. However, since Unitedprint will never directly contact your customers, you should be available for queries of customers or Unitedprint.
In case the selected payment method of an order is “payment in advance”, you need to check whether you have received the payment and release (mark as “Paid”) the individual order items. Only then the items will be forwarded for production.
To ensure that an order is delivered at the indicated delivery time, an order must be triggered by 11:00 CET / CEST at the latest and the print data upload must have been completed. This applies if the order is placed on a weekday (Monday-Friday).
For orders which have not been received by this time, the indicated delivery date shifts by + 1 working day.
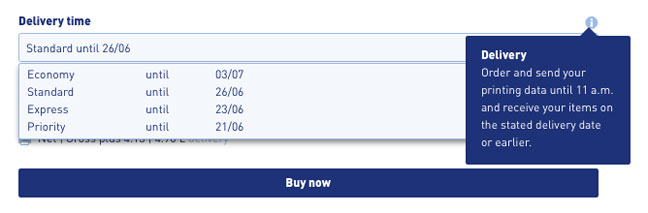
Please, inform within 15 minutes after completion of order our support team Phone (länderspezifisch) / support@print24.de.
Otherwise, your trial order needs to be paid. Additionally please cancel your trial order directly into your Partner backend.
For callback please hold ready the United Print ID of each order.
Your USS Partnershop allows you to produce your customers’ orders. You can make the settings in your Partnershop Backend under the menu item “Production” – “Place of Production”.[1]
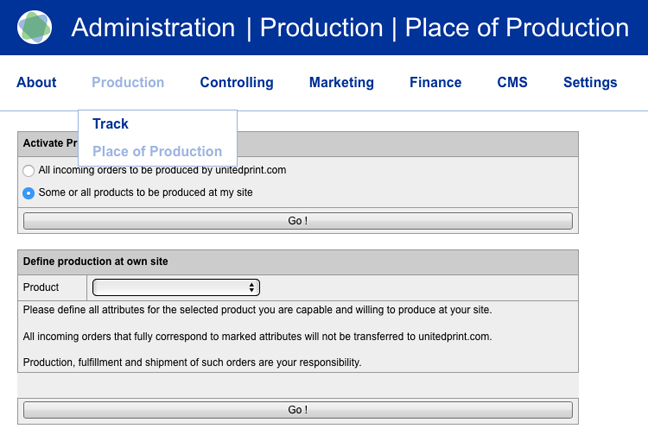
First, activate the radio button „Some or all products to be produced at my side“.[2] Now select the product for which you want to make the settings.[3] Then indicate your production capabilities: Select the product options you are able to provide (e.g. a certain kind of paper or finishing).[4] Confirm your settings by clicking the “Go!” button.[5]
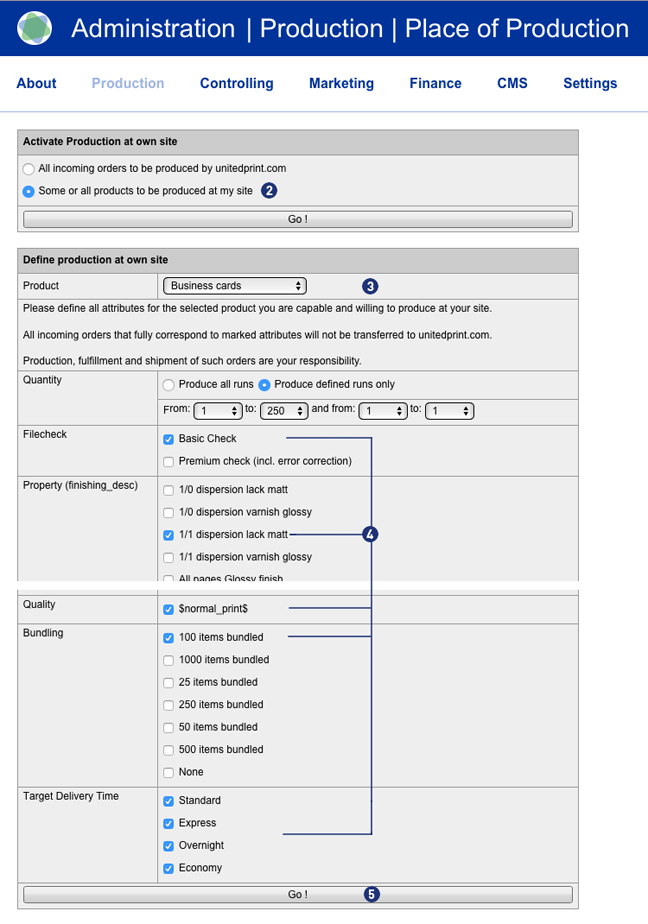
Only when an order item fully fits your individual settings, the order will be classified as an order for your own production.
Attention
Please consider that for every product attribute, at least one option needs to be selected (even when it’s not displayed in the shop frontend) – otherwise, an order item of this product will never be defined as one for your production.
All product options are offered to their customers no matter where they are produced.
Settings (3)
Yes. As a Partnershop operator, you have the option of having copies of certain customer emails sent to you automatically.
This allows them to keep track of communication and ensure that all relevant information is documented.
The prerequisite for this is that you provide a valid email address for this communication.
Go to the Settings / General menu in the Partnershop backend. [1]
Using the “Copies from Customer Communication” [2] module, you can specify which emails to your customers you would like to receive copies of.
Order confirmation [3]
You will receive a copy of the order confirmation for every customer order placed through your partner shop. At the same time, you will receive a second email from print24 to you as a partner. The email will be sent within approx. 30 minutes.
Change of order status [4]
You will be informed about the change in the order status in a copy of the following order processing progress: data receipt confirmation, data control confirmation, printing and further processing status and shipping confirmation.
Customer registration [5]
You will automatically be notified in copy by email as soon as a customer has registered in your Partnershop.
After receiving the notification, you can check the new user account via the backend.
Invoice dispatch [6]
After the order has been dispatched, the customer will be invoiced. You will automatically receive a copy via email when the invoice is sent.
Select one or more options (checkboxes) to automatically receive a copy of these customer emails. [3][4][5][6]
Then enter a valid email address. [7]
Confirm your entries by clicking on the “Go!” button. [8th]
From this point on, you will automatically receive a copy of the customer emails for the options you selected to the email address you previously provided.
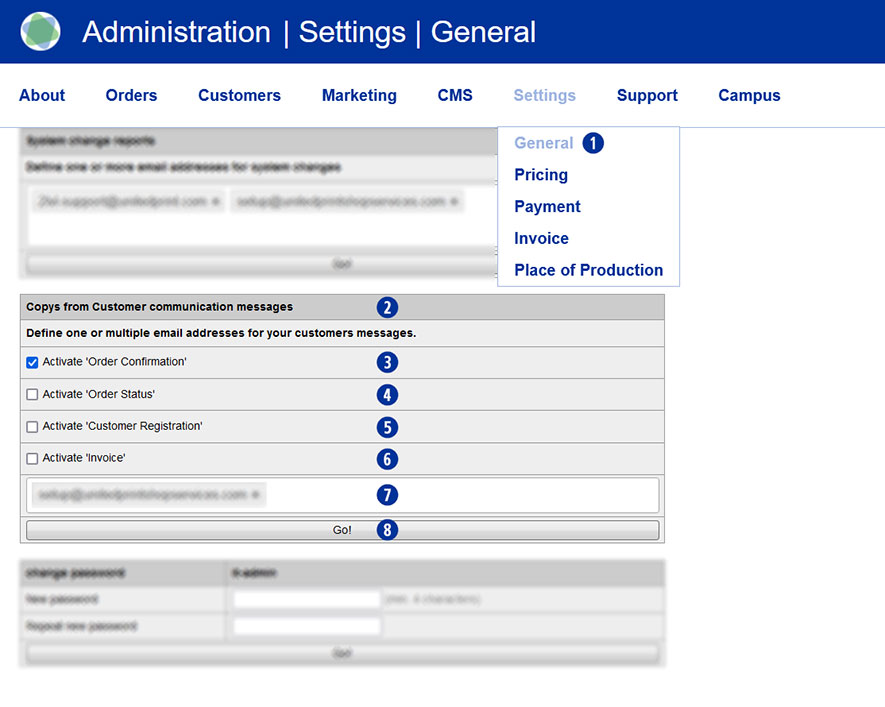
Notice
When entering the email address, it is also possible to store several different email addresses.
Yes. As a Partnershop operator, you have the option of being informed by e-mail via your partner shop when a voucher or a customer discount has been activated. For this it is necessary that you enter a valid e-mail address.
To do this, switch to the partner shop backend – Settings / General. [1] Enter a valid e-mail address in the input field [3] of the “System change reports” [2] module. Confirm your entry by clicking the “Go!” button. [4]
From this point on, you will receive a notification to the previously stored e-mail address each time a voucher code or customer discount is activated via your Partnershop.
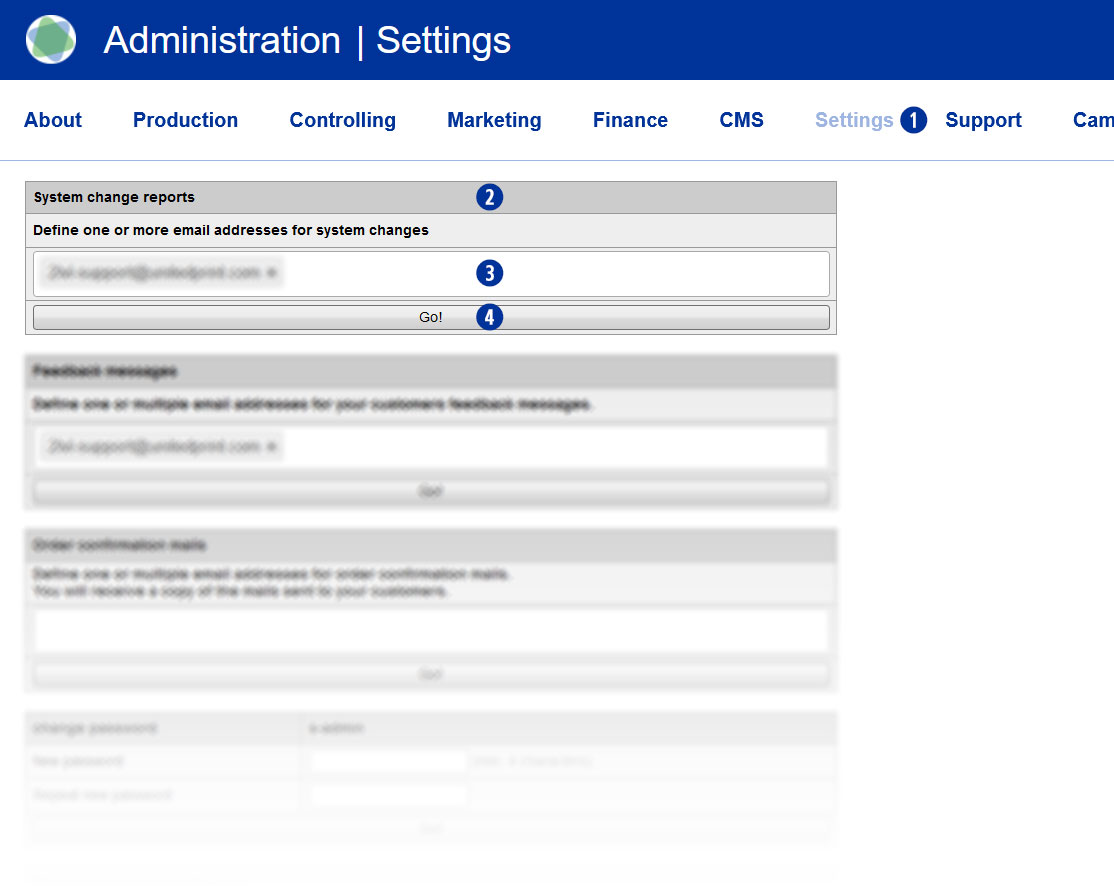
With the sales overview, you can keep track of your Partnershop income and expenses at all times.
Switch to the Settings / Invoice menu in the Partnershop backend. [1]
Under the module “Order revenue” [2], you specify which actions you want to be notified about by email.
For a query, select the desired period (month/year) [3], the desired file format (Excel or CSV) [4] and then click the button “Export” . [5]
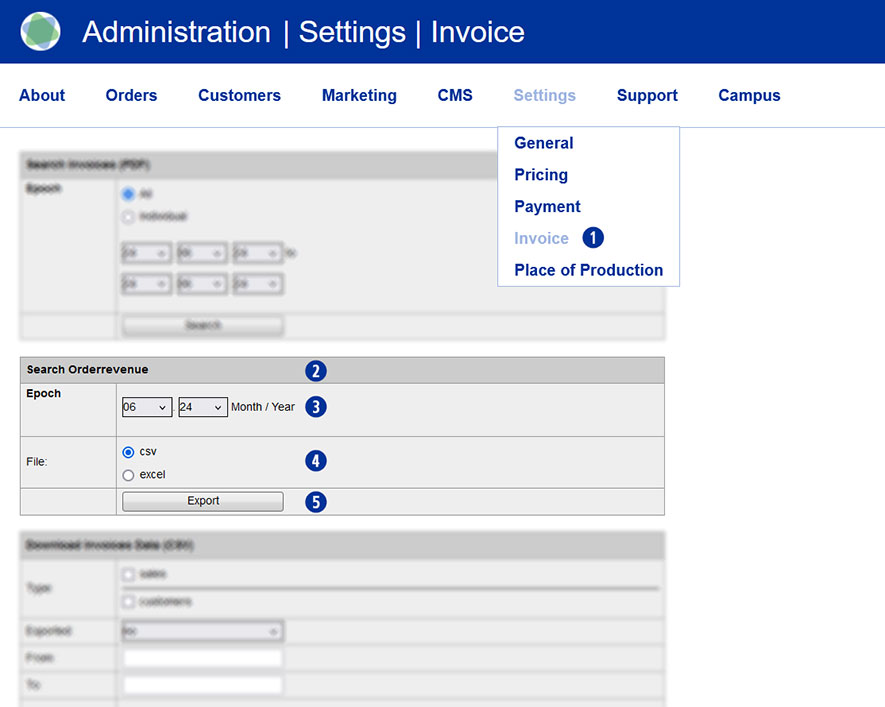
The export file is either opened directly or saved locally with the appropriate name.
Example
Show all sales of my customers in the month June 2024
- shopbrandname_revenues_2024_06.xls
- shopbrandname_revenues_2024_06.csv
The generated report contains the following columns/values including a heading.
- Unitedprint Invoice ID
- Unitedprint Invoice Date
- Unitedprint Orderrevenue
- Unitedprint Order ID
- Unitedprint Paymethode
- Shop Invoice ID
- Shop Order ID
- Shop Orderrevenue
- Shop Paymethode