Marketing (23)
The use of a voucher in your Partnershop takes place in the “shopping cart” order step. [1]
Enter the voucher code in the “Voucher” field. [2]
Confirm the entry and use of the voucher by clicking on the “redeem” link. [3]
The stored voucher value is applied and displayed directly. [4]

Notice
An entered voucher code can be removed within the current order before the purchase is completed.
To do this, delete all items from the shopping cart.
As soon as you add a new item to your shopping cart, the previously used voucher code can be entered again.
A voucher code will not be accepted if the minimum order value is not met.
A voucher code can only be redeemed once.
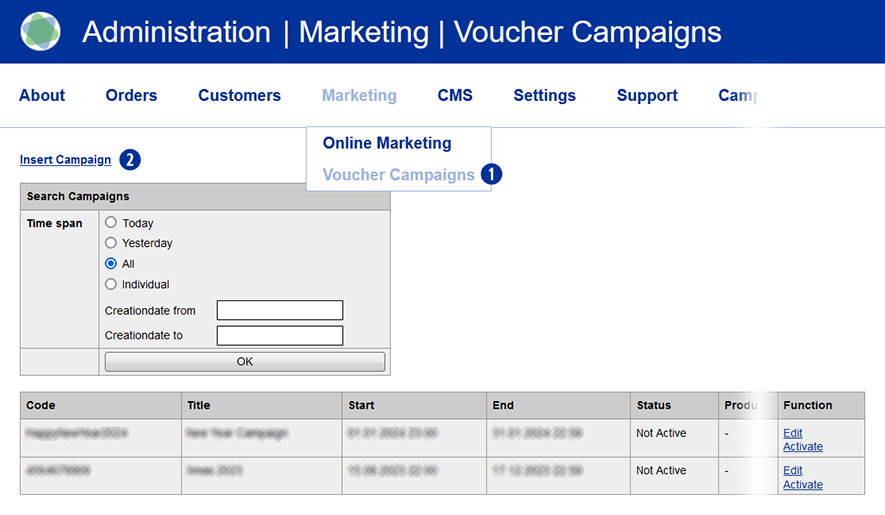
Go to the Marketing / Voucher Campaigns menu in the Partnershop backend. [1]
The overview page is displayed.
Vouchers can be searched for and displayed according to specific criteria (time span) using the “Search Campaigns” field [2]. [3]
- „Today“
- „Yesterday“
- „All“
- “Individual – from/to”
Select a criterion and confirm your search selection with the “OK” button. [4]
The search result is displayed in list form below the search window. The most recently created voucher is always at the top.
The search criterion “Individual – Creationdate from/to” refers to the creation date or creation period of the voucher, not its term.

A voucher is a voucher code with a defined number of letters and numbers.
This will be credited with a corresponding nominal value (“voucher”) for the order and can be entered by your customers in the “shopping cart” order step.
The discount is calculated on the net value of the goods excluding shipping costs.
To create one or more vouchers, go to the Marketing / Voucher Campaigns menu in the Partnershop backend. [1]
The overview page is displayed.
To create a new voucher, click the “Insert Campaign” link. [2]
Configure your voucher with the following setting options.
- Enter a name for the voucher under “Title” [3].
- The “campaign code” [4] can consist of up to 25 characters.
Uppercase and lowercase letters are permitted, but no special characters. - Specify the start date [5] including the start time [6] of the voucher for the validity period of the voucher.
Please pay attention to the correct spelling. When you click in the “Start date” input field, a “calendar” opens. - Specify the end date [7] including the end time [8] of the voucher for the validity period of the voucher.
Please pay attention to the correct spelling. When you click in the “End date” input field, a “calendar” opens. - From the “Product kind” list [9], select whether the voucher should be valid for all products or only for a specific product group.
- For “Users” [10] you specify which customers the voucher is valid for.
– “All Registrations” – the voucher is valid for all registered users
– “New Customer only” – the voucher is only valid for customers without a previous order
– “Customer list” – the voucher is only valid for one or more manually selected customers - Select the desired voucher type under “Voucher Type” [11].
Set it as a percentage or a fixed amount. - Enter the desired voucher value under “Voucher” [12].
Please note the instructions for input. - Set a minimum order value for the voucher in the “Min amount” input field [13].
- In the “Number of mailings” input field [14] you determine how many customers can redeem the voucher.
Complete the entry for the new voucher to be created by clicking on the “Insert” button. [15]
The voucher is saved in the database.
You can return to the overview page at any time using the “List Campaigns” [16] link.
Entries that were not saved using the “Insert” button [15] will be lost.

You will then be returned to the overview page.
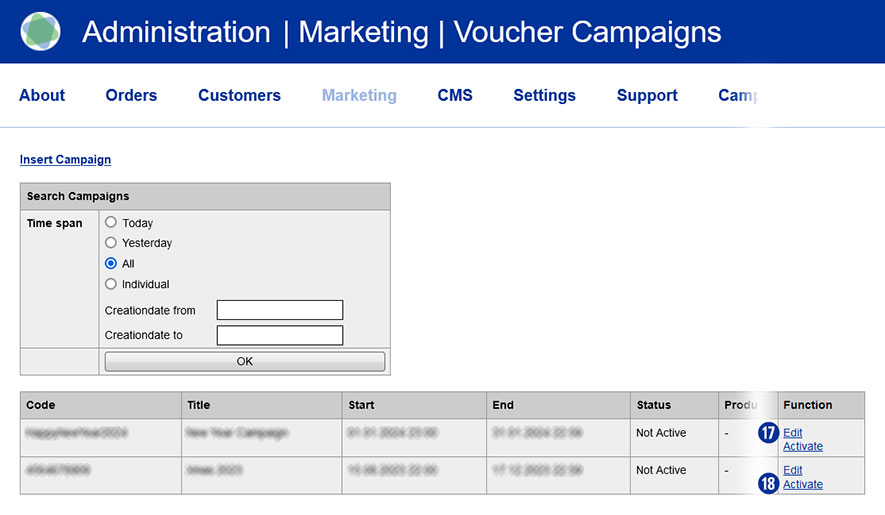
There you will be shown all the vouchers you have created in list form, depending on your selection.
A newly created voucher is deactivated by default.
From the list view you have the option to edit the voucher (“Edit”) [17] and/or activate it (“Activate”/“Deactivate”). [18]
An activated voucher can be deactivated at any time. An active voucher cannot be edited.
Notification
The use of vouchers is only possible for registered users. Guest users cannot enter coupon codes.
A voucher code is intended exclusively for use in one campaign and may not be used for further campaigns.
This also applies to a code that was used as part of an order but was canceled.
To register Google services, you need to confirm the ownership of your domain (verification).
In order to carry out such a Google Site Verification in your Partnershop, you must first ensure that you have access to the website.
For the Google Site Verification of your Partnershop, you have the option of storing a Google Site Verification Key so that it can be verified by Google.
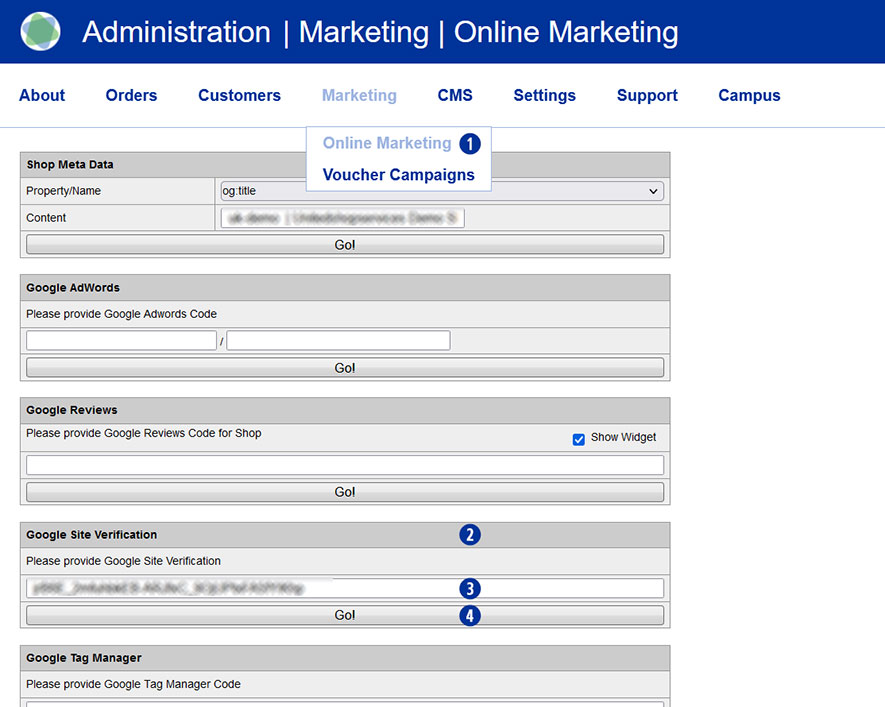
To do this, switch to your Partnershop backend – Marketing / Online Marketing. [1]
In the “Google Site Verification” module [2], copy the verification key you have into the input field. [3]
Save your entry by clicking on the “Go!” button. [4]
After completing all changes, switch to your partner shop backend – CMS / Administration / Redis Management / Exports.
Click on the “Create Productive Version” button.
Your online marketing changes are available in the shop after approx. 30 minutes.
Note
To create the Google Site Verification Key, log in to your Google account and go to Google Search Console (https://search.google.com/search-console).
Yes, you can integrate Trustpilot into your Partnershop.
Go to the Partnershop backend in the menu Marketing / Online Marketing. [1]
Under the Trustpilot module [2], please enter the data you have in the input fields. [3][4][5]
Click on the “Go!” button [6] to save the data permanently.
 The Trustpilot widget is displayed on the start page of your Partnershop. [7]

Note
The prerequisite for this is that you have a valid Trustpilot Business account.
This allows you to create and manage the Trustpilot link [3] and to apply for, create and download the required API key [4] and secret key. [5]
Trustpilot ratings are updated daily at 09:00.
It can take up to 24 hours to display the current values.
Google customer reviews can be submitted for your Partnershop.
To activate Google reviews in your Partnershop, you need a “Google Merchand ID”.
The prerequisite for this is that you have a Google Merchant Center account.
The Google Merchant Center is a tool with which you can make various Google services available (e.g. customer reviews).
You will also find your Merchant ID there. Your Merchant ID is a unique number that identifies your Merchant Center account.
Follow these steps:
Go to the Google Merchant Center website (https://merchants.google.com/).
Sign in with your Google account or create a new account if you don’t already have one.
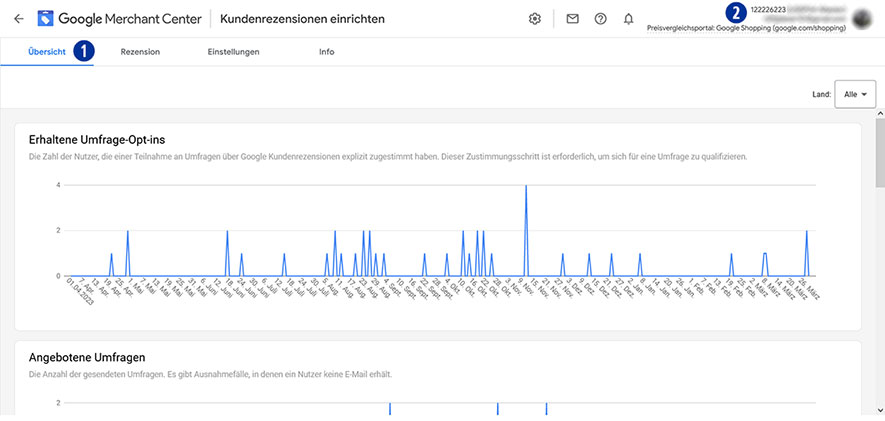
You are on the Overview page of Google Merchant Center. [1]
Copy your dealer ID to the clipboard. [2]
Go to your Partnershop backend – marketing / online marketing [3] to the “Google Reviews” module. [4]
Paste your “Google Merchant ID” [2] from the clipboard into the input field [5].
Activate the “Show Widget” checkbox [6] to display the “Google Reviews” tile on the homepage of your Partnershop.
Confirm your entry by clicking on the “Go!” button. [7]

Notice
Confirm that you are the owner of your website URL under “Company Information” in Google Merchant Center and then claim the URL for this Merchant Center account.
You can find detailed information about this under the link https://support.google.com/merchants/answer/188493?hl=de&ref_topic=3163841.
After completing an order, the customer will be shown a window on the order completion page to take part in the customer survey.
If the customer confirms the message, an email will be sent within X days, depending on the shipping method selected.
The customer then has the opportunity to make the assessment.
The customer reviews submitted are displayed via the Google review widget on the homepage of your partner shop within the slide above. [Fig. follows]
To display reviews, a minimum number of 150 customer reviews is required.
Yes, a robots.txt has been created directly below the shop domain.
The robots.txt file is a text file that specifies which directories may and may not be read by search engines.
The robots.txt is very important for all crawlers, which first search in the robots.txt and read it. It’s like a kind of manual that tells you what you can and cannot do.
The robots.txt defines exactly which crawler is allowed to search which directories, subdirectories or individual files and which are blocked for it.
Example
https://mydomain.com/robots.txt
The robots.txt refers to the “sitemap_index.xml”, among other things.
Link
https://faq.unitedprintshopservices.com/faq/verfuegt-mein-partnershop-ueber-eine-xml-sitemap/
In your Partnershop Backend Marketing > Customers you will find all relevant information about your customers in the result overview on the right. [1]
- Customer number (CN)
- Company
- Name
- Register
- Profil changed
- Orders
- Order Revenue (Umsatzübersicht)
- Invoice
Display Order Revenue
By default, always 25 entries are displayed. The selection box [2] below the display can be used to change the number of results to 10, 25, 50 or 100 per page.
In the column “Order Revenue” [4] the total net sales of the respective customer is displayed..
Sorting
The columns “Customer number”, “Company”, “Name”, “Orders” and “Order Revenue”) can be sorted in ascending or descending order by clicking on the column name. [5] The results overview opens with ascending sorting of the column “Customer number”.
Display invoice payment and open invoices
In the result overview, another column “Invoice” is displayed to the right of the “Order Revenue” column. [6] It is shown graphically with an icon (green dot) [7], if the customer has the option “Invoice”.
In addition – in the case of open invoices – an info text (red) is displayed. [8]
Example
(2 unpaid) for two invoices not marked as “paid”
If no invoices are open, no info text is displayed.
Note
The sorting of the results always refers to all registered customers.
Yes. The search mask on the left contains a new filter “Invoice Payment”. [1]
If you activate the checkbox and then click the button “GO!” [2] all customers of your Partnershop with the payment method “Invoice” will be displayed. [3]
The filter remains active until it is deactivated by youself or left the page.
Yes. Percentage of customer discounts can be granted. To set a customer discount, go to the Partnershop backend under Marketing> Customers. [1]
Enter a search criterion (e.g. customer number) in the input mask [2] and then click the button “Go!”. If the search result is successful, the window “Customer data” is displayed.
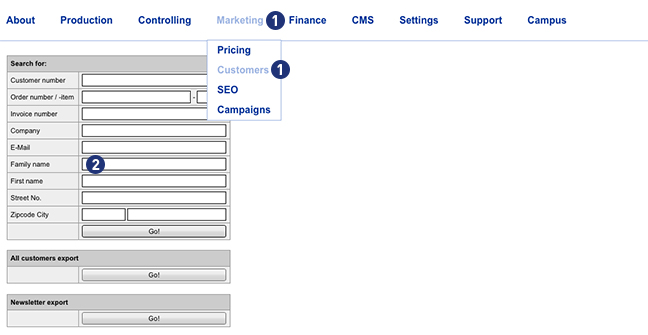
Click the button “Set Discount” to enter a customer discount. [3] A mask “Discount” will opened. If the customer has not yet deposited a discount, the mask “Discount” opens with the setting “Standard”. [4] Use from the selection list [5] a discount rate between 1 and 100%. [6] The setting changes to “Custom discount in %” [7] Save your selection by clicking on the button “Save”. [8]
Apart from the reduction in the product price, a deposited discount does not trigger any further actions on the type of shipment and the production period.
Note
A customer registered in the Partnershop (login) receives the discounted price already at the product selection.
If the customer is not yet registered in the Partnershop (login), the discount is displayed in the shopping basket.
In both cases, the discount is shown on the later invoice.
A partner with a discount can be identified in the Partnershop backend at the “SC …” (Special Condition) in the “Customer data” window. [9]
In your Partnershop backend in the section Marketing > Product [1] you have the possibility to provide your own search engine optimized information for each product.
In the section Product page [2], select a product via the drop-down menu. [3]

After successful selection the standard product image as well as the standard product texts will be displayed. Via the individual input fields the entries can be individualized with your own texts and images. [5-14]

About the section Product image [4] allows you to replace the standard product image with your own product image. Changes at this point are taken over directly and displayed. Click on the active button “Browse” [6].
If you want to change your product image or switch to the standard product image, click the button “Delete”. [5]
The section Page description [7] can be used to store meta information (title and description) for browsers and search engines. These texts are displayed on the calculation page or the individual product page in your Partnershop.
The following entries are available in detail.
- Text: Text in the browser tab [8]
- Product-Slug: URL on the product page – with a speaking label [9] (max 64 characters)
z.B. http://my-shop-shop.unitedprintshopservices.com/print-products/business-cards/ - Description: Description text for search engine results [10]
On the calculation page there are two product information texts for each product – below the product photos. These are the two text blocks Header [12] and Detail [13] under Product information. [11]


All text boxes contain default texts and should be changed. Whether it is a default text, you can see the background color (Gray) of the text box.
To overwrite the default texts, select these and overwrite with your text.
Confirm your changes by clicking the button “Go!”. [14]
Whether your text has been saved can be recognized by the background color (White) of the text box.
To edit and format the texts, you can use the tools known from MS Office programs (such as bold, italic, alignment, etc.). [15]
After a reload of the Calculate page in the Partnershop (Browser > F5) your changed text will be displayed.
The general rule
All text boxes must be filled with text content. Empty text boxes are not saved but reset to the default text.
The text box Product-Slug may not contain special characters. HTML tags or Java script code can not be saved.
The maximum number of characters per input field is 1,024 characters (with spaces).
The headline on the pricing page (e.g. business cards) is the product name and can not be changed. [16]
Important note
A Product-Slug (max 64 characters) should not be changed too frequently – this is punished by search engines (e.g. Google) by a worse ranking “hard”!
Additional information worth knowing about search engine marketing can be found in our CAMPUS section SEM III: SEO-Onpage.
You can define product-specific surcharges for your customers. Go to Backend Marketing > Pricing. [1] Then select the desired product from the product list [2] and set the desired Markup for the selected product. [3] Confirm your entry by clicking on the button “Go!”.
Alternatively, you can simultaneously select multiple products from the product list by using the keyboard shortcut “Ctrl + click”.

By clicking on the button “Select all” [4], all products displayed in the “Product” list are automatically activated. Then enter a Markup value in the number input field and confirm your entry by clicking on the button “Go!”. [5]
To deactivate the selection, click on one of the products within the list.
If you have already set Markup / Markdown values for your products (for example + 10%), these will not be automatically applied to new products. You can use the “Default Markup / Markdown for new products” input field [6] to define a value that will be transferred to new products as soon as they are added to the “Pricing” list.
The “Pricing history” tool [7] gives you the ability to track your changes. Use the various selection criteria for this (Date, Week, Products and User). Confirm your query by clicking on the button “Go!”. [8]

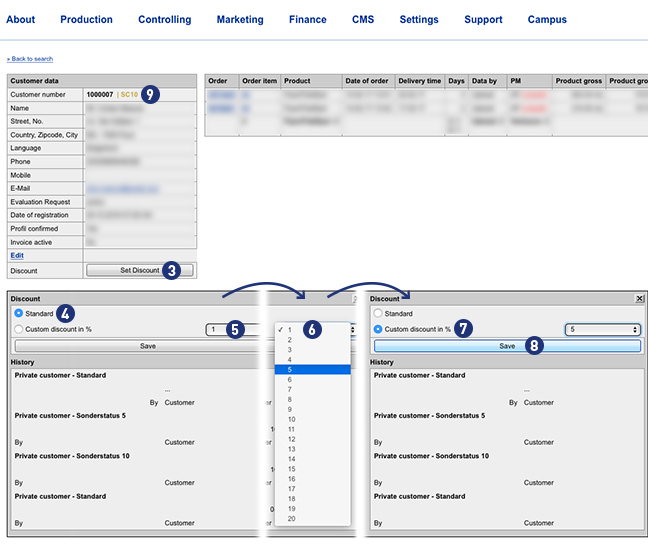
Yes. You can integrate the Google Tag Manager into your Partnershop.
Switch to the backend area Marketing > SEO. [1]
Under the module Google Tag Manager [2] please enter the data you have in the input field – Google Tag Manager ID. [3]
By clicking on the button “Go!” The ID is stored permanently.
This requires that you have a valid Google Account.
No. Unitedprint won’t contact or even communicate directly with your customers. All communication with your customer either takes place automatically via your USS Partner Shop (and hence in your name) or by yourself.
Example 1: Order confirmation
After successfully receiving an order, your USS Partner Shop sends our a confirmation mail to your customer. This mail uses your imprint information and email address.
Example 1: Errors
In case there’s an order-related issue, which cannot be solved through automated emails (e.g. faulty print files), Unitedprint will contact you about it – not your customer.
No. The USS/Unitedprint brand is not openly communicated. Neither in the shop frontend, nor on invoices or shipping labels, etc. All contact points are customized with your brand.
As a default setting, your shop’s URL will have a “…unitedprintshopservices.com” component. In case you want to hide this URL and have your own URL displayed, please contact us.
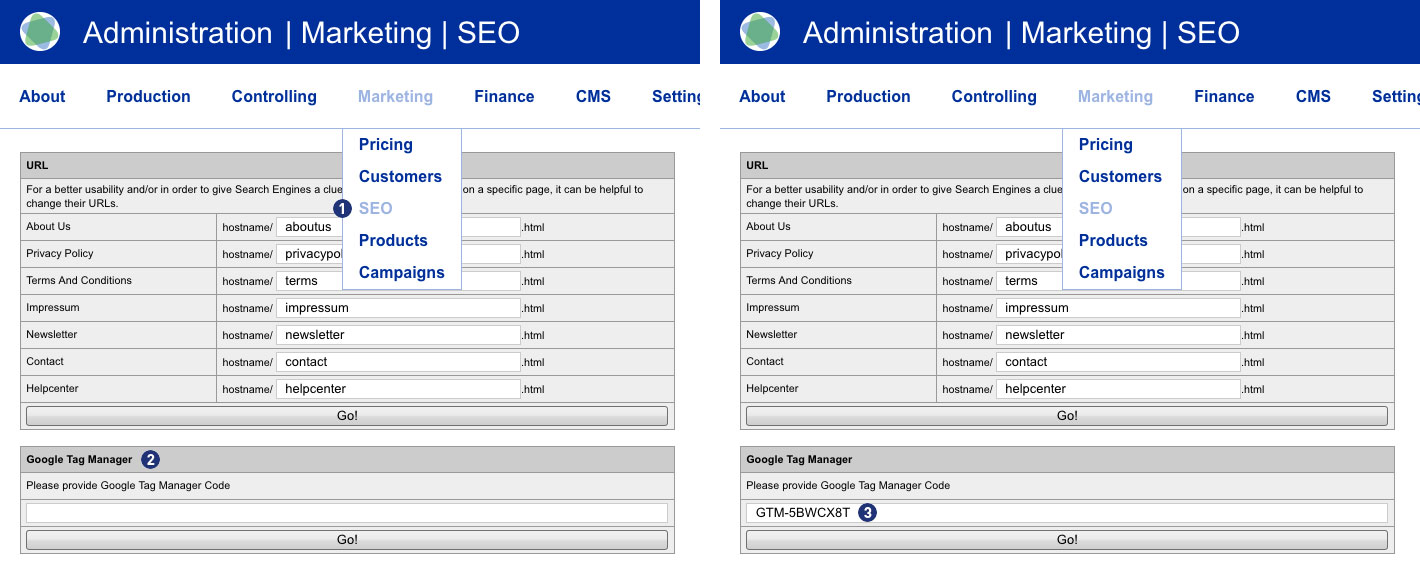
So you have collected a larger number of business contacts over the time and you wonder what to do with these contact details in order to promote your online print shop? No matter if these contacts are existing client or merely prospective buyers: Contact information is a valuable asset that you should use in order to meet your communication targets (such as the establishment of a local brand or the promotion of your portfolio). In today’s widely digitalized world to send out personalized content to a large number of recipients with just a few clicks, saving you time and money – if you do it all right. The most popular mass communication channel is e-mail Marketing. Software solutions manage your contacts and all they need is your contacts’ names and e-mail addresses. The convenience of this channel allows you to put more effort into the preparation of content (and of course into other Sales/Marketing activities).
In case you lack ideas of when and what to write to your contacts, we would like to provide a little inspiration you with a potential year-round-calendar of potential newsletters.
In addition to such seasonal newsletters, you might want to add special campaigns, e.g. for customers who haven’t ordered for a while (you would select/group these contacts in your newsletter management tool) and are now offered a special discount for returning customers.
No matter what the occasion and the actual content of your newsletter are, you should make sure the recipients of your newsletter become readers. The first thing (and unfortunately rather often the only thing) your audience will see of your newsletter is its subject. Hence, this subject should be as attractive as possible so that the newsletter will not be ignored/deleted immediately. Our advice is to for instance mention your town’s/region’s name and maybe a promised benefit in the newsletter’s subject line (e.g. “Birmingham bar owners now safe 10% on catering supplies”). Apart from price campaigns you might also want to mention your businesses’ special services or print shop’s special features. When creating the actual newsletter, put more effort in an attractive image and write as little text as possible. You don’t want to “waste” your target group’s time but make them visit your web shop as soon as possible. For this reason we advice to integrate a “call to-action” button into your e-mail.
For setting up and realizing your newsletter campaigns we recommend the software tool MailChimp (https://mailchimp.com), which is free of charge for campaigns with less than 5.000 recipients. In addition we recommend tracking your newsletter’s success (conversion rate) by using Google Analytics.
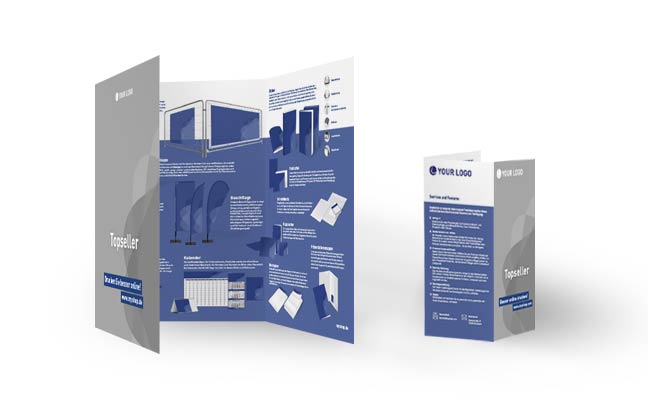
Yes. With the following links, you can download files for flyers about our Topseller products.
A 6-pages DIN A4 letter fold as well as a 6-pages DL (105 x 210 mm) letter fold are available.
You can customize the flyers in the design of your shop for your individual marketing activities.
Note
The files are prepared for high-resolution printing.
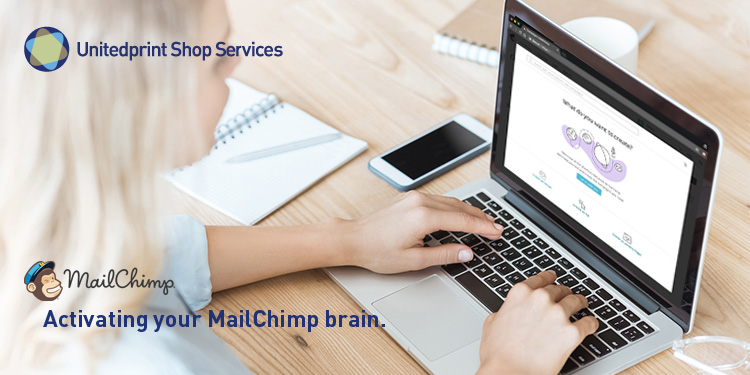
The “MailChimp” tool is a sophisticated newsletter editor offering a wide range of components.
For example, even the free version enables you to send up to 12,000 emails a month to 2,000 recipients (with a small advertising banner).
MailChimp provides a number of templates which, thanks to a “responsive design” also display correctly on mobile end devices.
The instructions below contain further details on using the newsletter tool, and the most important steps to follow for your newsletter campaign.
Note
For your domain to support the required authentication procedures DomainKeys Identified Mail (DKIM) and Sender Policy Framework (SPF), two additional DNS records are required.
To configure your domain for DKIM, add an entry with the following settings:
Type: CNAME
Prefix: k1._domainkey
Value: dkim.mcsv.net
Now add another entry for SPF with the following settings:
Type: TXT
Value: v = spf1 include: servers.mcsv.net? All
Your customers can subscribe to a newsletter list via the button “Newsletter” in the footer of your Partnershop. The collected data are stored in a list as a CSV file and can via the backend under “Marketing – Customers – Newsletter export” retrieved.
Note
The Partnershop system does not include a functionality newsletter tool!
The generation and delivery of a newsletter can be done individually through a separate newsletter software. For this you can import the previously exported list (CSV file) from the Partner Store in your newsletter software.
The administration of subscribe and unsubscribe to the newsletter is performed through the separate newsletter software and is not a function of the Partnershop.
The Facebook Pixel is an analysis tool that you can use to measure the effectiveness of your advertising. In the Ads Manager of Facebook you can see which ads generated which sales.
Entering or saving the Facebook Tracking ID (Facebook Pixel) is done via the Partnershop backend Marketing > SEO [1] in the module “Facebook Tracking Code”. [2] In the provided input field [3] enter your Facebook Tracking ID. Save the entry via the button “Go!”. [4]
![]()
Note
You will receive the Facebook Tracking ID if you create a business account with your Facebook page and create an ad account.
Create the Facebook pixel
- Go to the “Pixel” tab in Ad Manager.
- Click on “Create Pixel”.
- Enter a name for your pixel. You can only create one pixel per ad account. So choose a name that represents your company (Partnershop).
- Check the box to accept the terms of use.
- Click “Create Pixel”.
After you have set up the Facebook Pixel, you can start showing ads on Facebook with conversion optimization and tracking.
For detailed information how to set up a Facebook Business Account, including how to create a Facebook Pixel, you find in this step-by-step guide.
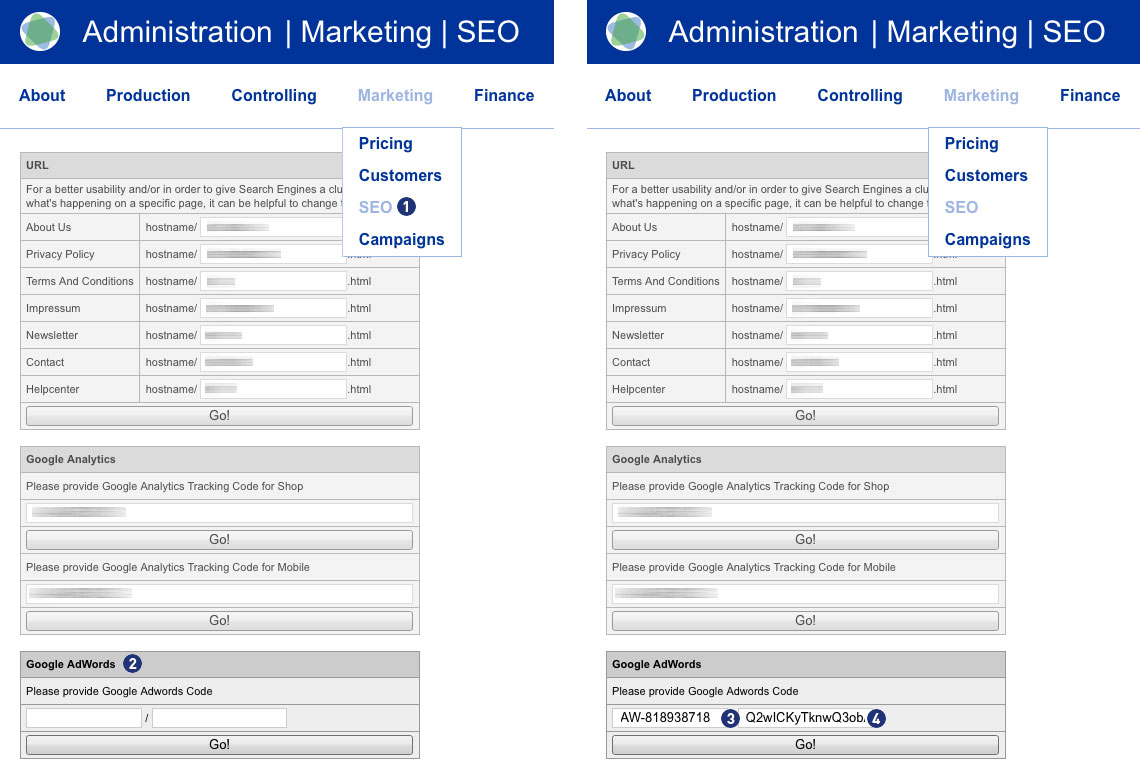
Yes. Please switch to your Partnershop backend to Marketing > SEO. [1]
At point Google AdWords [2] please enter the data you have in the two input fields – Google AdWords ID [3]
and Conversion Key [4]. With the button “Go!” teh ID and the key are saved permanently.
Requirement is you have a valid Google Account.
By clearing the two input fields and clicking on the button “Go!” the ID and the key are removed.
The corresponding contents in the source code of the application are deleted.
Note
When entering the Google AdWords ID, make sure it starts with “AW-“.
For more information please go to the Google AdWords Help.
Yes, if your shop pages are indexed, a sitemap index file is created directly below the shop domain.
Example
https://mydomain.com/de/sitemap_index.xml
The content and product pages are referenced in the “sitemap_index.xml”.
In the “sitemap_content.xml” – if indexed – reference is made to the general content pages (General terms and conditions, Privacy policy, Imprint, FAQ and Help).
In the “sitemap_product.xml” – if indexed – reference is made to the individual product pages edited by you.
Note
An XML sitemap is a list of URLs that is created in XML format and contains all indexed subpages of a website.