CMS (15)
PayPal payment processing is not carried out via the Payment Service Provider Worldline | Six Payment Services, but directly between them and PayPal.
For you as a Partnershop operator, a PayPal business account is required.
To use the payment method “PayPal” within your Partnershop, it is necessary to enter the data from the PayPal business account in the Partnershop Backend – Settings > Payment > Indicate your PayPal business account.
To do this, follow the steps below.
-
- Log in to your PayPal account. [1]
Use the URL https://www.paypal.com/mep/dashboard or go directly to the developer settings https://developer.paypal.com/dashboard/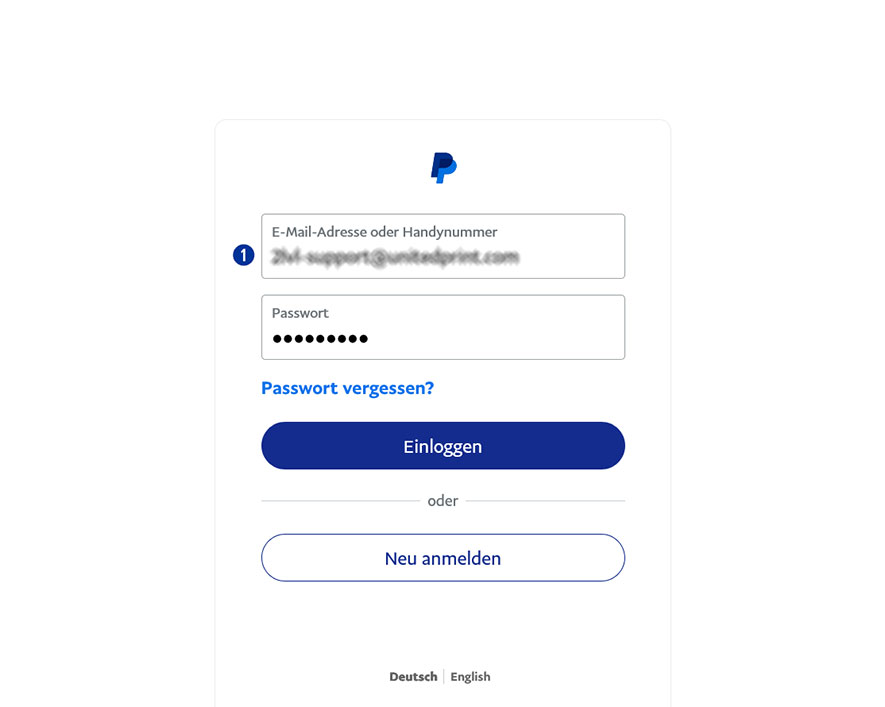
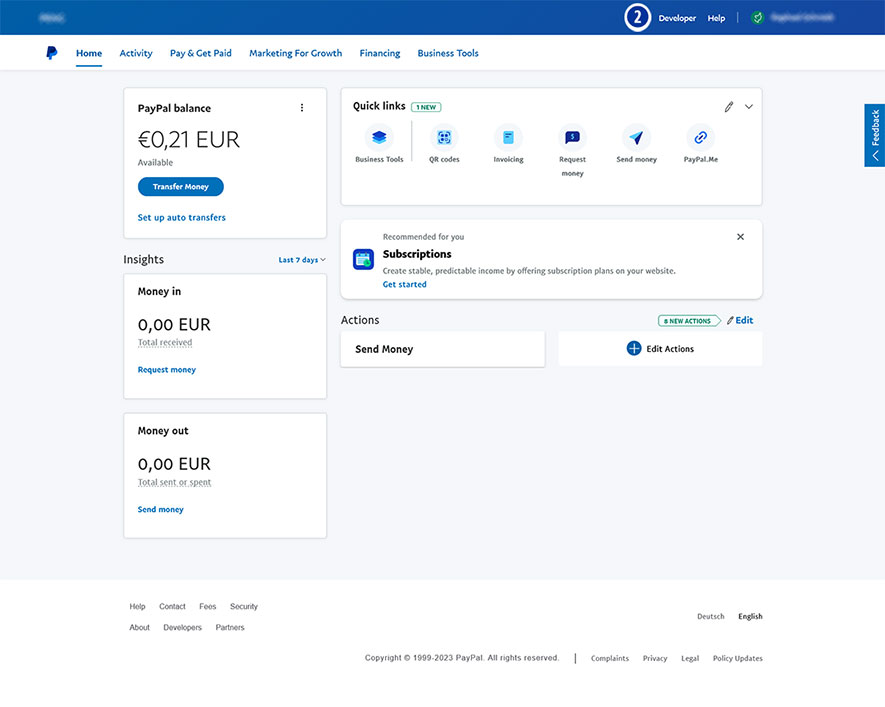
- Click the link “Developer” in the main navigation. [2]
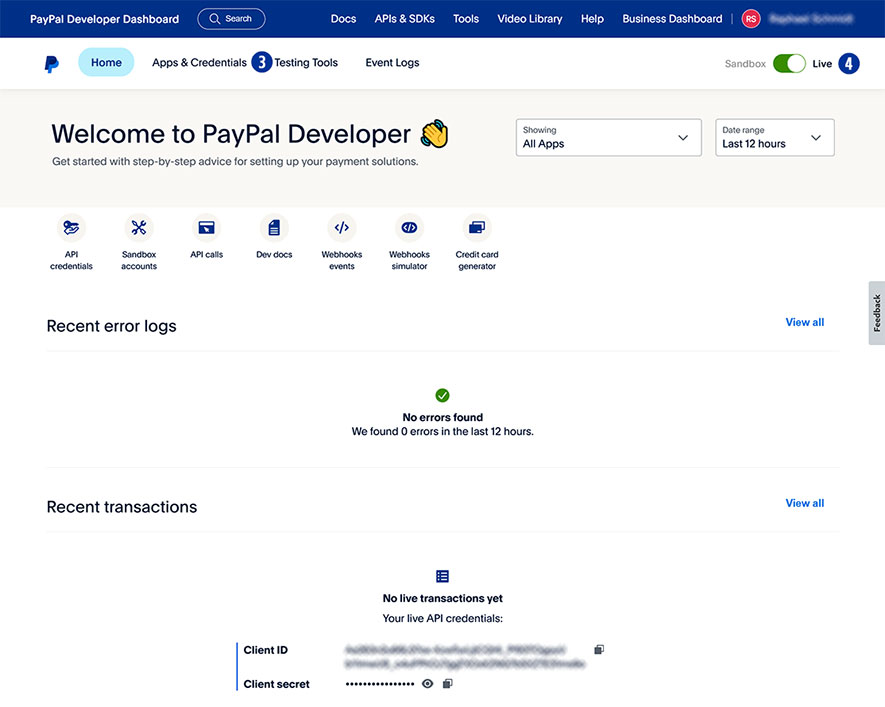
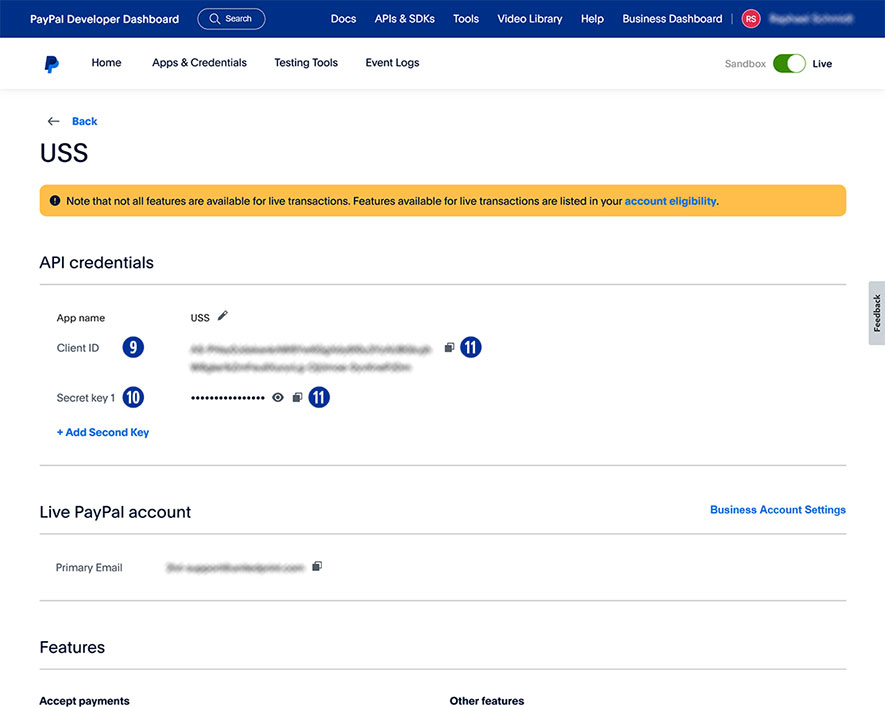
- Select “Apps & Credentials”. [3]
- Click the button “Live”. [4]
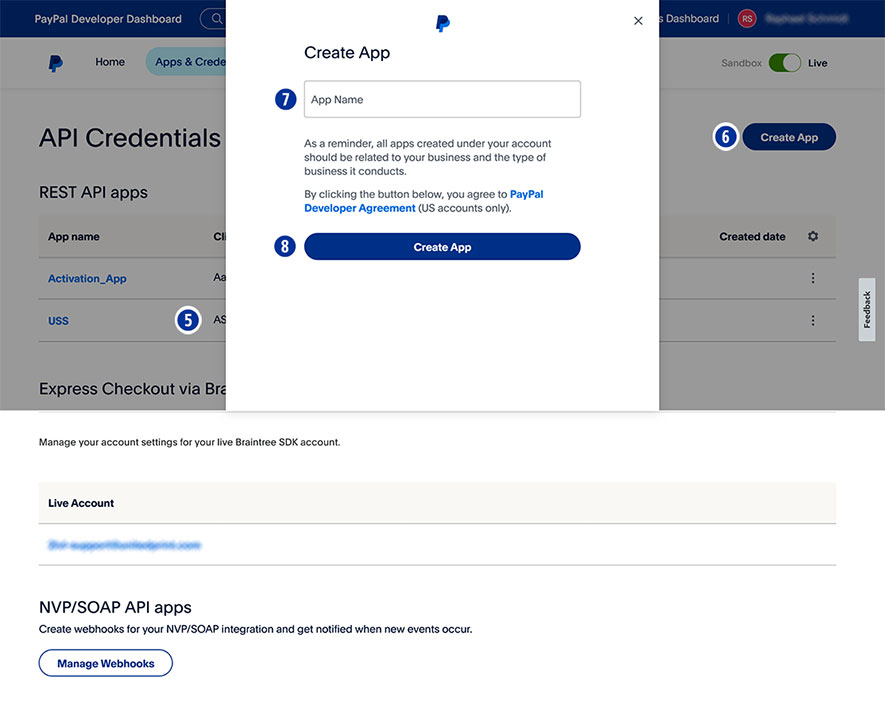
- Under “App name” select your shop name. [5]
- If there is no shop name yet, click “Create App” [6] and assign an “app name” for your Partnershop (e.g. brand name). [7]
- Confirm your entry by clicking the button “Create App”. [8]
- Under “App name”, copy the “Client ID” [9] using the “Copy to clipboard” icon [11] and paste it into the Partnershop Backend – Settings > Payment > Indicate your PayPal business account. [12]
- Under “App name” copy the “Secret key 1” [10] using the “Copy to clipboard” icon [11] and paste it into the Partnershop Backend – Settings > Payment > Indicate your PayPal business account. [13]
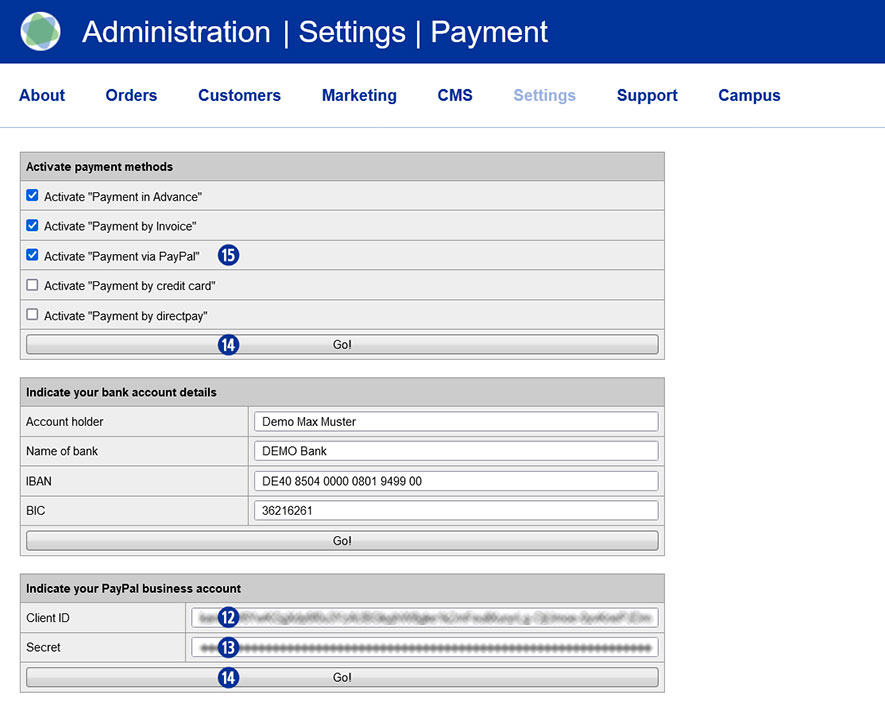
- Confirm your entries by clicking the button “Go!”. [14]
- Finally, activate the payment method “PayPal” for all customers in the Partnershop backend – Settings > Payment > Activate “Payment via PayPal”. [15]
- Confirm your entries by clicking the button “Go!”. [14]
- Log in to your PayPal account. [1]
Use the “Media Upload” option to update existing image material (e.g. home page banners/sliders). This eliminates the need to edit content via the Content / Pages area.
Ensure that the new images meet the technical requirements and are identical in terms of file naming. Check the required image sizes and resolutions of the new images. Adapt the new image material if necessary.
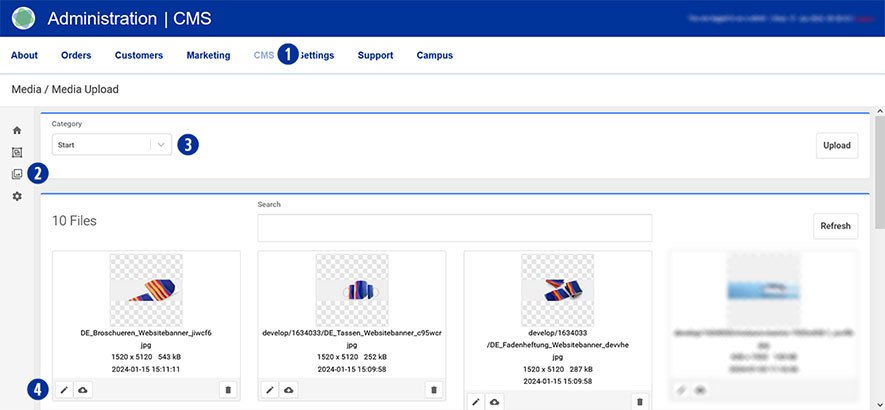
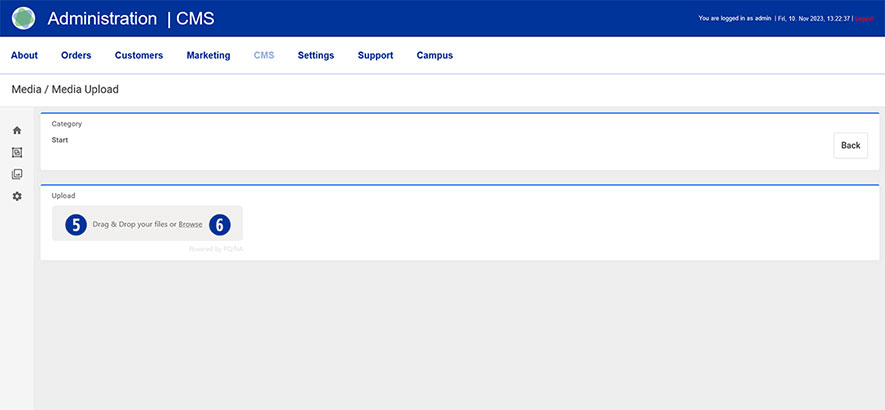
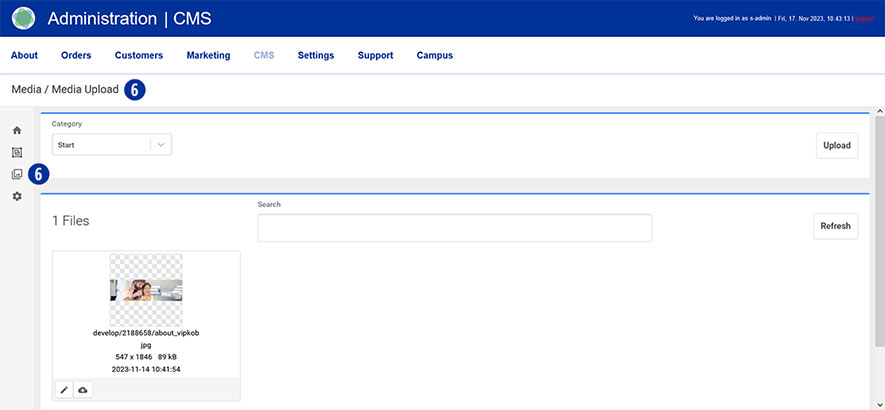
To do this, go to your Partnershop backend – CMS / Media / Media Upload. [1] [2]
To update, e.g. the start page banner/slider, select Category / Start in the left-hand navigation. [3]
Select the image to be updated and click on the “Edit” icon. [4]
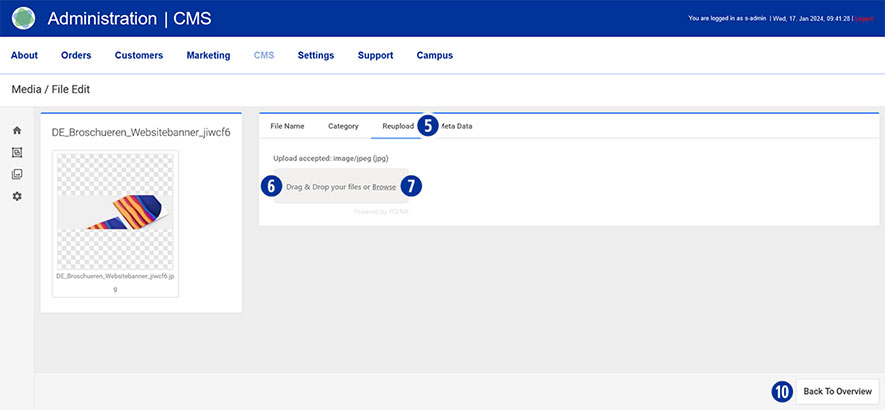
In the next step, click on the “Reupload” tab [5].
Drag the corresponding file of the start page banner/slider (*.SVG or *.PNG) onto the greyed-out area “Drag & drop your files…” [6] or click on the “Browse” link [7] and select the desired file.
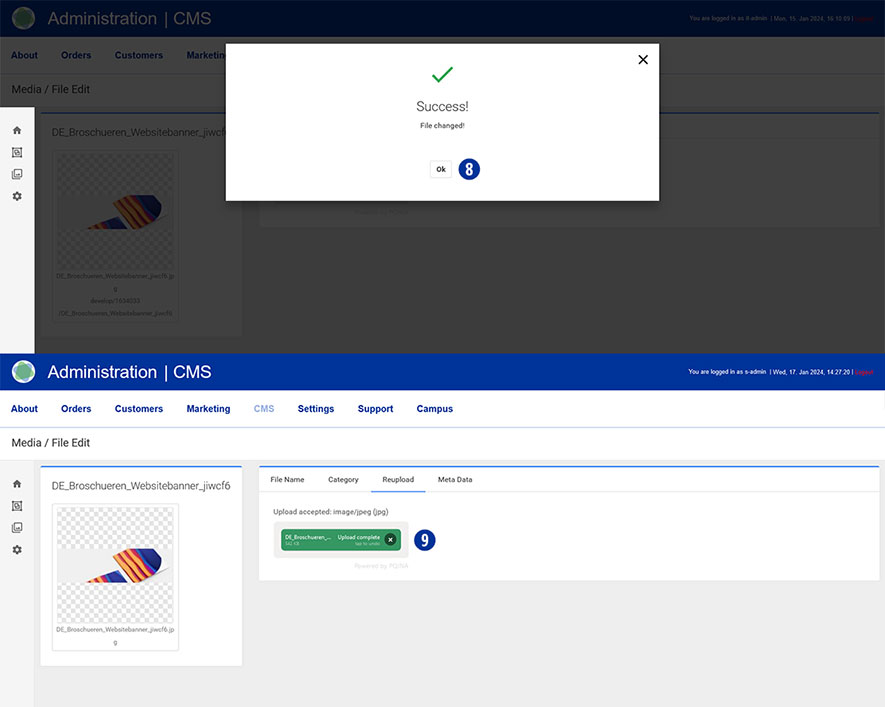
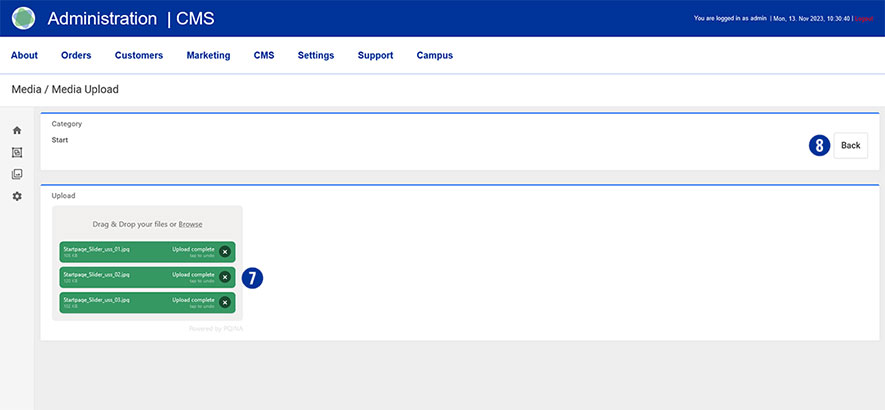
Wait until the process is complete and a layer with the message “Success! File changed!” is displayed. Click the “Ok” button or close the layer. [8]
The successful upload process is also displayed in the form of the file name in a green button. [9]
Click the “Back To Overview” button at the bottom right. [10]
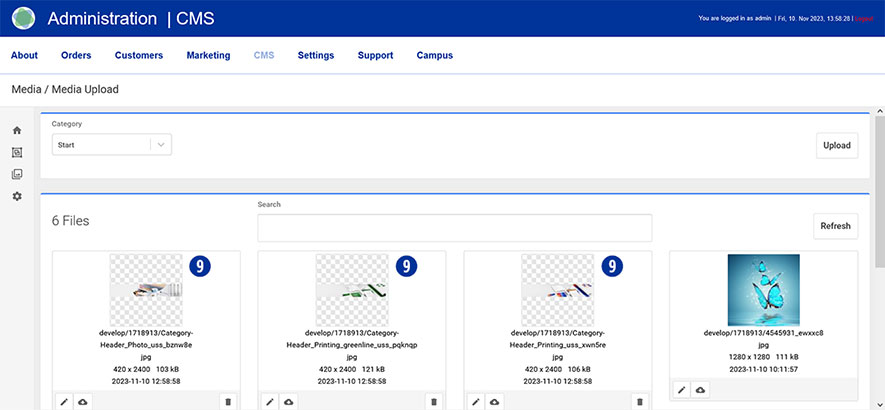
The uploaded image is displayed in the overview.
Note
The updated image of the start page banner/slider will be displayed the next time the start page of your partner shop is called up.
In order to achieve the best possible search results for your partner shop on Google, we recommend making the following adjustments and customisations.
The aim of optimisation is to enable search engines to better understand and present the content of your Partnershops.
Meta Descritpion Tag
Here you have the option of storing SEO-relevant content for search engines.
The meta description is read by search engines together with the page title and the shop URL. This website information is then used to show the user a preview of the content of the individual websites in the search results.
Robots Directive (Index, Follow)
Only activate the two checkboxes if you have previously created customised content.
Non-individualised content does not lead to a positive search engine ranking.
Slug (URL Slug)
The URL slug is an important element of search engine optimisation (SEO). The URL slug is the part of a URL that identifies a page and is usually displayed directly after the domain extension.
Canonical Tag
The canonical tag is used to correctly label shop pages with duplicate content.
If such pages are recognised by search engines (e.g. Google), this results in downgrades in the ranking of search results.
Pages with a cannonical tag therefore link from one or more pages to the original.
Tags
Use tags to further label and categorise topics and content.
Editing
To do this, switch to your partner shop backend – CMS / Content / Product [1] [2] and select the product to be edited under “Page”. [3]
Go to the “General Page Data” component [4] and open it. [5]
Make your individual adjustments to the points mentioned above.
Save your changes by clicking on the “Save Changes” button. [6]

Go to your Partnershop backend – CMS / Content / Global / Style. [1][2]
Drag your logo file (*.SVG or *.PNG) onto the gray area “Drag & Drop your files…” or click the “Browse” link and select the desired file. [3]
Drag your icon file onto the gray area “Drag & Drop your files…” or click the “Browse” link and select the desired file. [4]
![]()
The successful upload process will be shown to you on the left in the form of the file name in a green button. [5]
![]()
Note
Please pay attention to the following technical specifications when creating your logo.
- Image size 175 x 40 Pixel
- Save as SVG or PNG file
- No umlauts or spaces
Go to your Partnershop backend – CMS / Media / Media Upload. [1] [2]
Select Category / Start [3] in the left navigation and click the “Upload” button on the right. [4]

Drag at least two or three home page banners (*.SVG or *.PNG) onto the gray area “Drag & Drop your files…” [5] or click the “Browse” link [6] and select the desired files out of.
The successful upload process is displayed on the left in the form of the file name in a green button. [7] Click the “Back” button on the right. [8]
The uploaded images are displayed in the overview. [9]
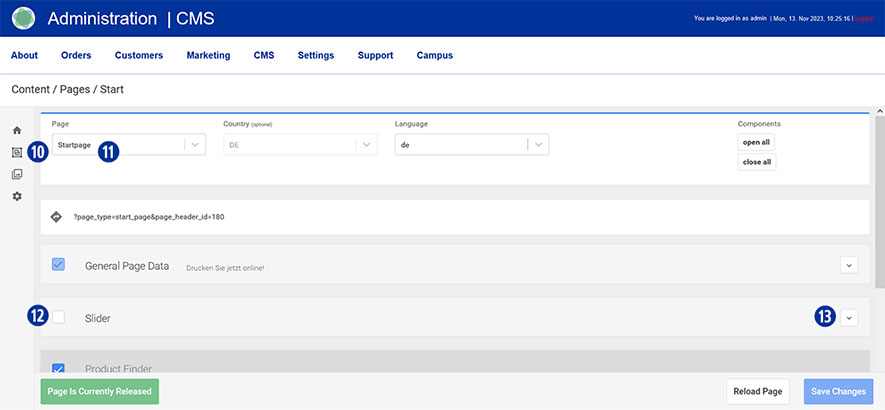
Switch to the area using the navigation (left) Content / Pages / Start. [10] You are here Page / Startpage. [11]
Scroll to the “Slider” tab, click on the checkbox to activate [12] and open it. [13]
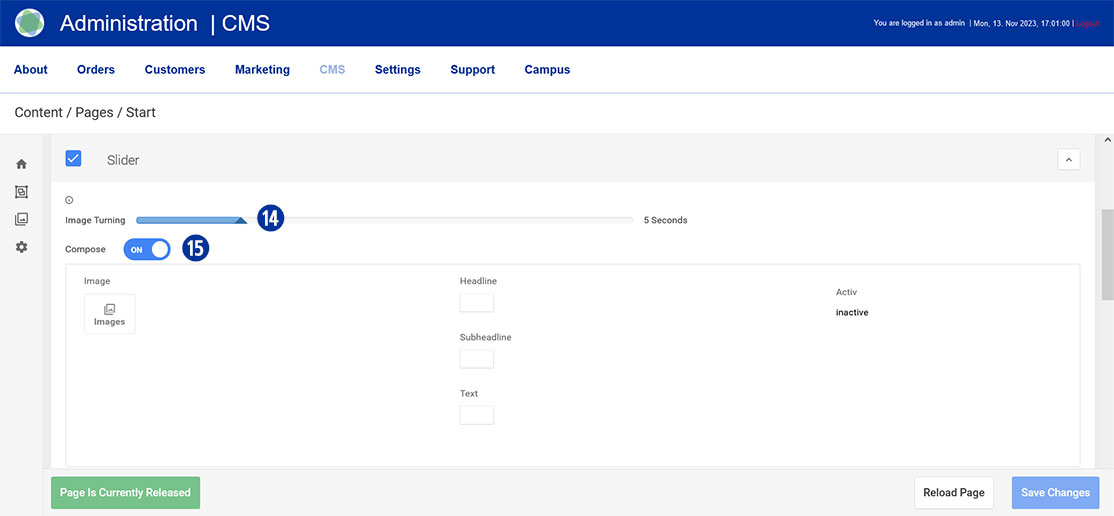
Move the slider under “Image Turning” [14] to the right or left to determine the time for a horizontal change of the home page banner. A value between 1 and 20 seconds is possible.
Under “Compose” drag the slider to “ON”. [15]
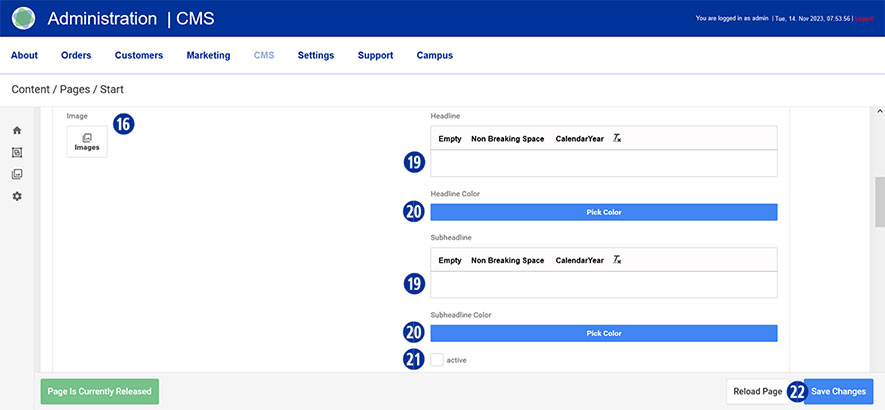
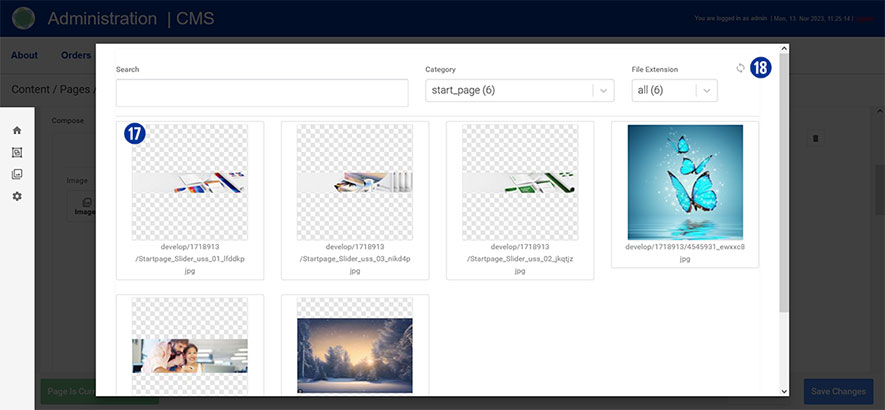
Select the first uploaded homepage banner under “Image”. To select an image, click the “Images” icon. [16]
You will be shown an overview of the uploaded files. [17] Optionally, update the view using the “Update” icon at the top right. [18]
Enter the desired text in the “Headline” and “Subheadline” input fields. [19]
Optionally select a text color by clicking on the “Pick Color” button. [20]
Activate the input by clicking on the “active” checkbox. [21]
Repeat the process for additional homepage banners below.
Save your changes by clicking on the “Save Changes” button. [22] Close the “Slider” tab. [13]
Note
Please pay attention to the following technical specifications when creating your home page banner.
- Image size 5120 x 1520 Pixel with 72 dpi
- Save as a web-optimized JPEG file
- Background color of the sliders HEX F0F0F0
File names must not contain umlauts or spaces.
To create further sliders, please use only the Photoshop template below.
Download
Slider_Template.zip
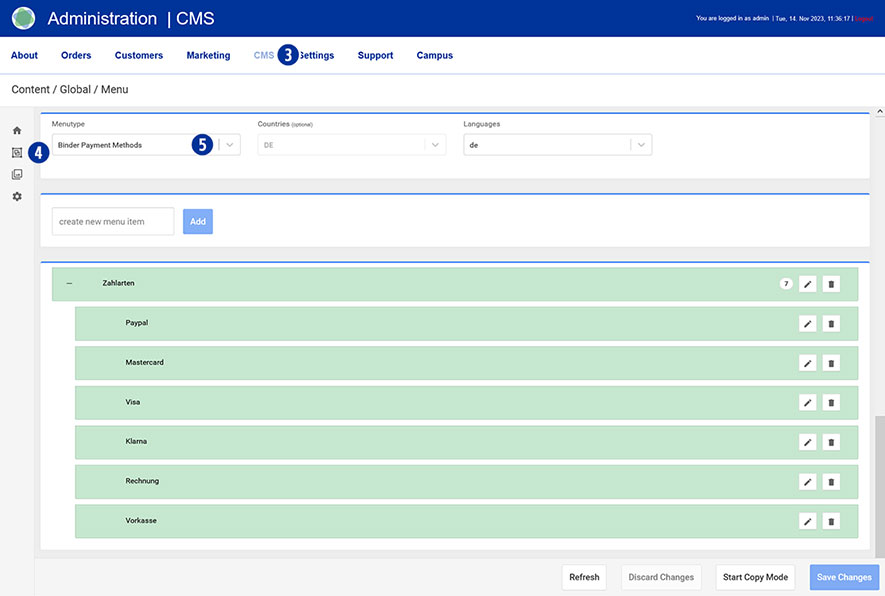
Various offline and online payment methods are available to you within your Partnershop.
The offline payment methods currently supported are payment in advance (bank transfer) or payment on account.
For online payment methods, please use the options provided by your payment service provider Worldline | Six Payment Services.
You can also pay via PayPal.
The individual payment methods are activated/deactivated via the partner shop backend under the menu item Settings / Payment [1] in the “Activate payment methods” module. [2]

Adjust your payment methods on the homepage.
Switch to your Partnershop backend – CMS / Content / Global / Menu. [3] [4]
Select in the left navigation Menutype / Binder Payment Methods. [5]
Note
Please check payment transfers using the above-mentioned offline payment methods outside the shop via your regular business account.
For security reasons, the offline payment method “payment on account” is only available to registered users.
Switch to your partner shop backend – CMS / Content / Global / Style. [1][2]
Under “Color palette” [3], change the colors for font [4], button [5], mouseover [6] and footer. [7]
To do this, click on the “Pick Color” field [8] and select the desired value using the color palette. [9]
Save your changes using the “Save Colors” button. [10]
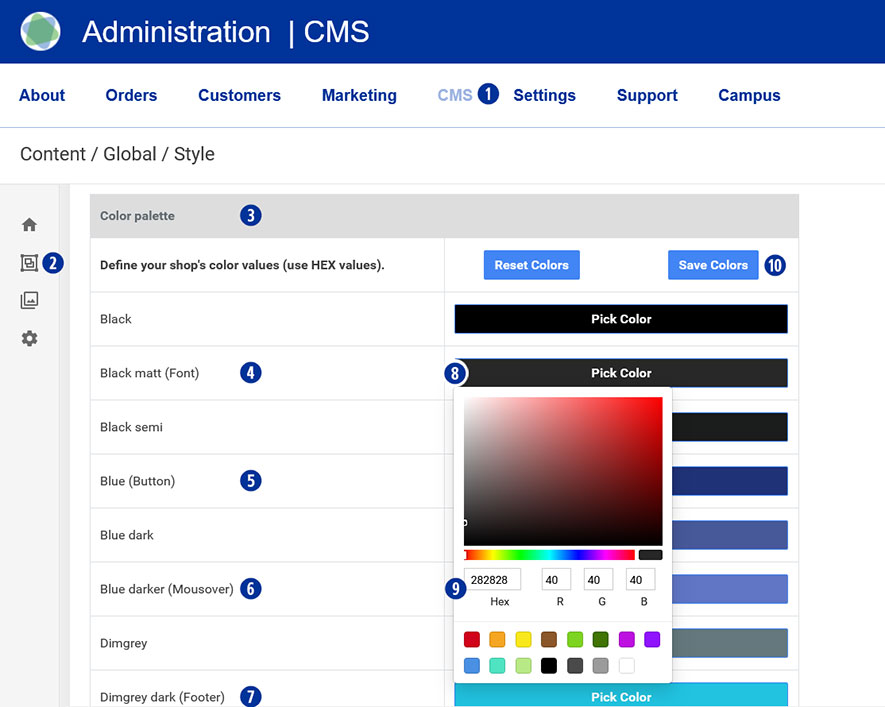
Go to the homepage of your Partnershop. Your individual colors will be displayed.
On the homepage of the Partnershop you can present your company attractively in the form of images and text.
Switch to your Partnershop backend – CMS / Content / Pages / Start. [1][2].
You are here Page / Startpage. [3]
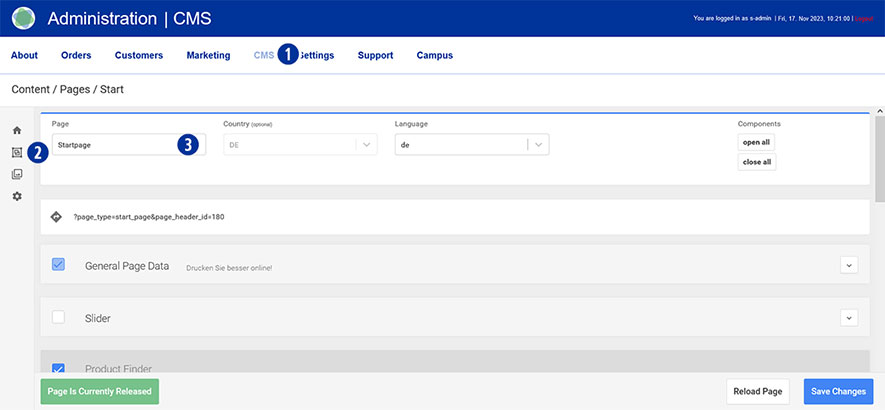
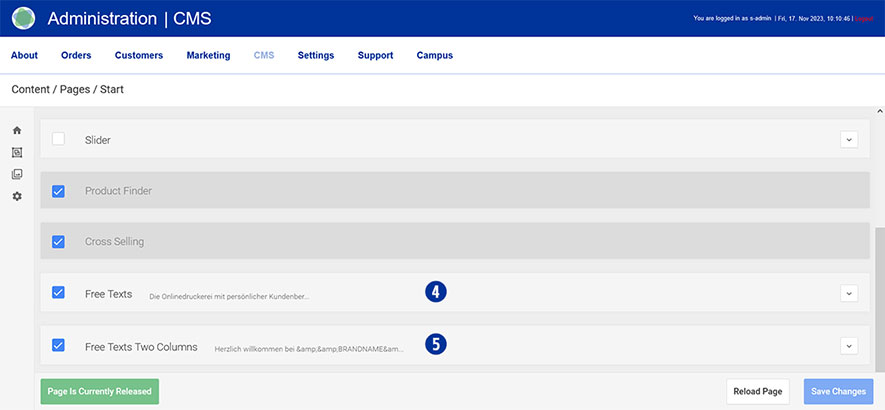
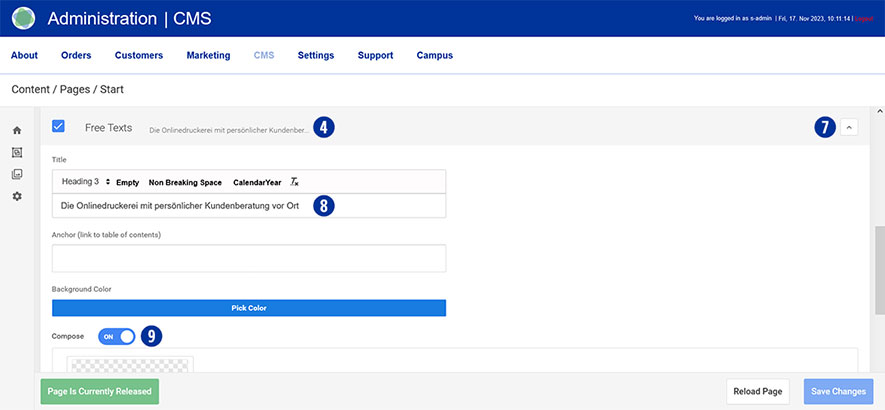
To display it, select a variant from one of the two tabs “Free Texts” [4] or “Free Texts Two Columns”. [5]
Setting options tab „Free Texts“
• Headline
• Content (1-spaltic)
Setting options tab „Free Texts Two Columns“
• Headline
• Content (2-spaltic)
Media Upload
In order to use graphics in your content, images must first be uploaded in “Media Upload”.
Detailed information on the topic of “Media Upload” [6] can be found via this link.
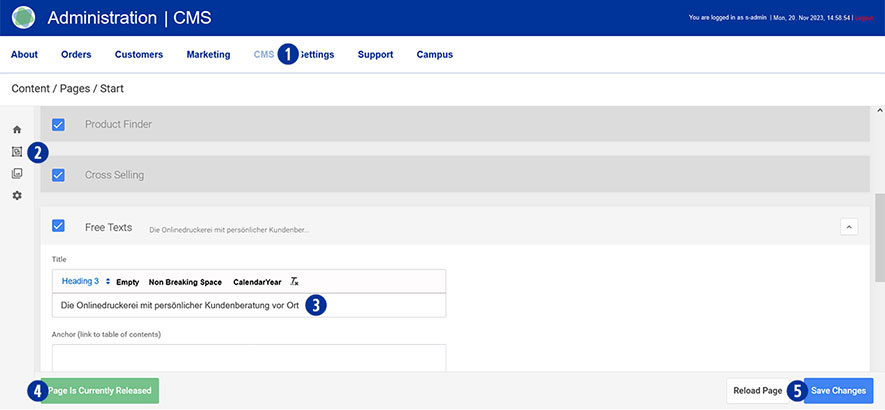
Scroll to the “Free Texts” [4] or “Free Texts Two Columns” [5] tab and open it. [7]
Enter the desired text in the “Title” input field. [8] Make sure to maintain the “Heading 3” formatting.
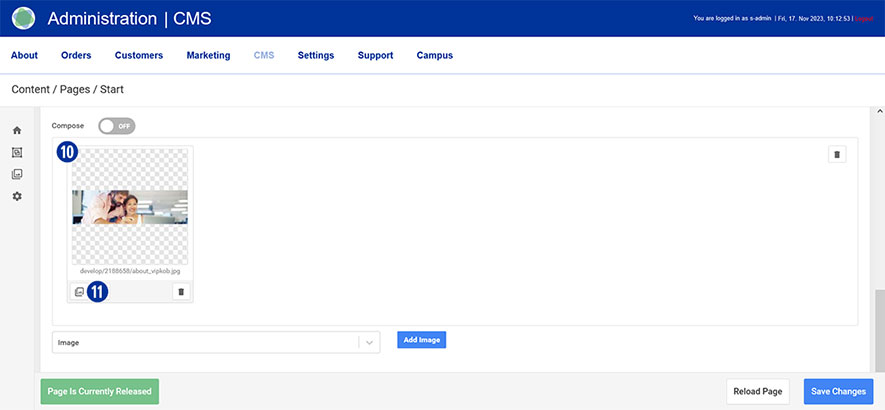
Under “Compose” drag the slider to “ON”. [9]
Select the homepage image [10] previously uploaded via “Media Upload” [6].
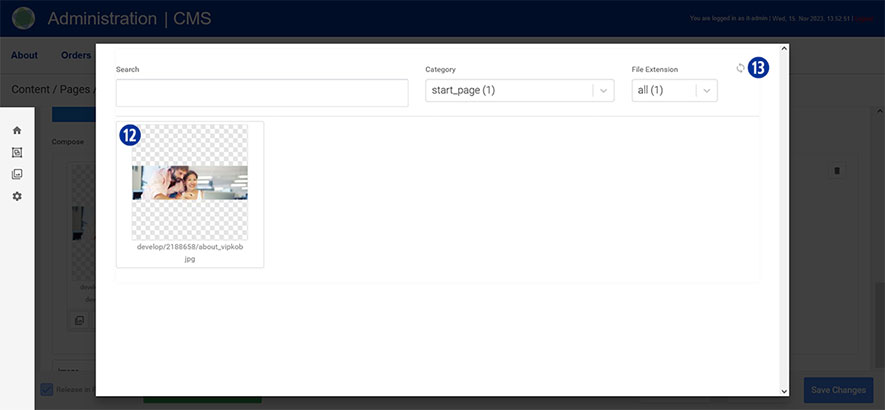
To select an image, click the “Images” icon. [11] You will be shown an overview of the uploaded files. [12]
Optionally, update the view using the “Update” icon at the top right. [13]
Do the same with the “Free Texts Two Columns” tab. [5]
Save your changes by clicking on the “Save Changes” button. [14]
By clicking on the “Reload” button you will return to the original state of the page without saving any changes. [15]
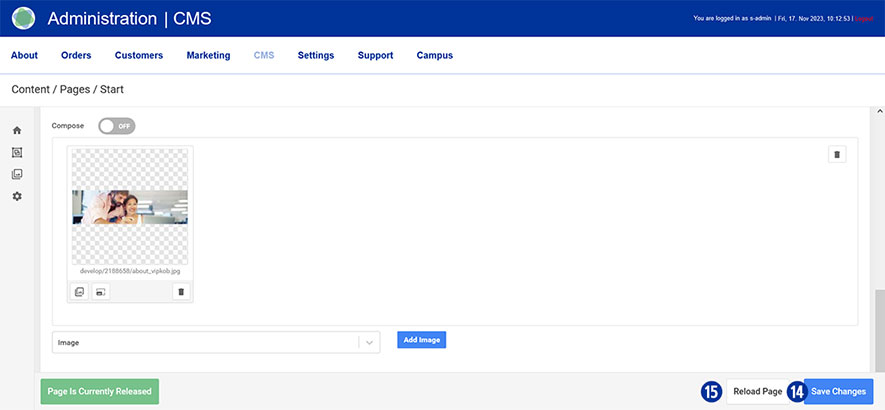
Close the “Free Texts” [4] or “Free Texts Two Columns” tab. [5]
Note
Please pay attention to the following technical specifications when creating your home page text (image).
- Image size: 1530 x 450 Pixel with 72 dpi
- Save as a web-optimized JPEG file
File names must not contain umlauts or spaces.
Content changes that you make via the Partnershop backend CMS module must be saved and published in order to be displayed in the shop. [1][2][3].
The prerequisite for this is that the edited page has the status “Page Is Currently Released” (green button) [4] and has been saved. To do this, click the “Save Changes” button. [5]
After completing all changes, switch to your Partnershop backend – CMS / Admninistration / Redis Management / Exports. [6]
Click the “Create Productive Version” button. [7]
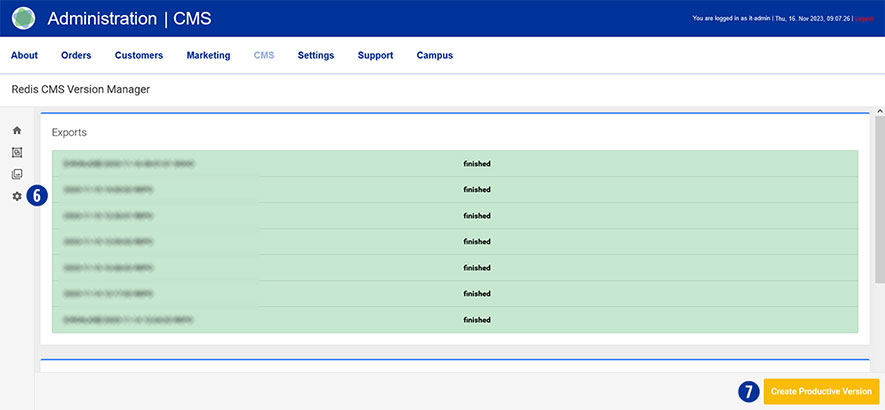
Your changes will be visible to all customers in the shop after around 2 minutes.
Switch to your Partnershop backend – Customer. [1]
You can use various search fields [2] to display information about your customer data.
It is also possible to export customer data from the partner shop backend.
To do this, click the “Go!” [4] button under “All customers export” [3].

The data is saved in a *.CSV file separated by commas.
This data can then be imported into a spreadsheet program (e.g. Microsoft Excel).
It is important that the previously created *.CSV file is not opened – but imported.
The following steps must be taken into account when importing data.
Switch to your Partnershop backend – CMS / Content / Global / Contacts. [1][2]
Change your details using the input fields [3] for
- Fax number (company)
- Phone number (Company, Service)
- E-mail address (Support, Finance)
Save your changes using the “Save Changes” button. [4]

Note
The data stored in the input fields [3] can be adopted in other content areas (e.g. general terms and conditions, imprint) by using these variables.
| Input | Variable |
| ServiceCall | &&SCALL&& |
| FAX | &&OFAX&& |
| &&SEMAIL&& | |
| E-Mail (Finance) | &&PSEMAIL&& |
Switch to your Partnershop backend – CMS / Content / Global / Menu. [1][2]
Select in the left navigation Menutype / Footer Service Times. [3]
Under “Service times” click on the “Edit” icon [4].
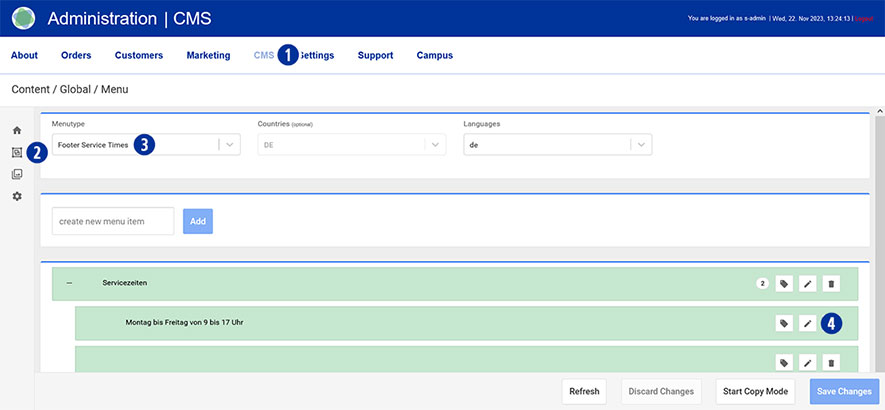
Change your entries. [5]
Save your changes using the “Save Changes” button. [6]

Switch to your Partnershop backend – CMS / Content / Global / Menu. [1][2]
Select in the left navigation Menutype / Footer Social Media. [3]
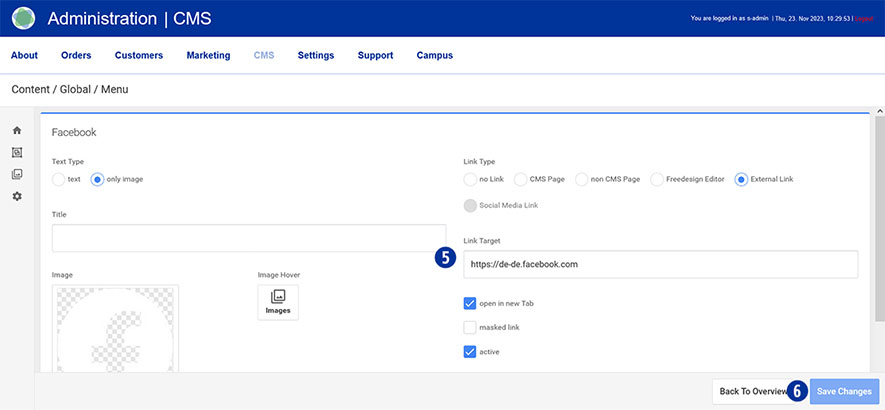
Select the desired link (e.g. Facebook) under “Social Media” and click on the “Edit” icon [4].
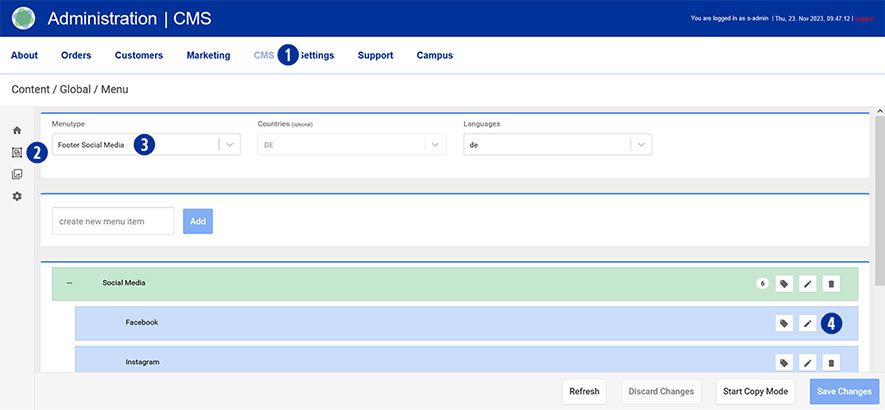
Change your entries. [5]
Customize your display on the homepage. To do this, activate or deactivate individual links.
Save your changes using the “Save Changes” button. [6]
You yourself are the operator of your Partnershop. This requires the provision of legal texts. Yours are affected by this
- General terms and conditions
- Privacy policy
- Imprint
Please ensure that your information is correct and check it regularly to ensure it is up to date.
Switch to your Partnershop backend – CMS / Content / Pages / Content. [1][2]
Select in the left navigation Page / Imprint. [3]
Alternatively, choose Privacy Policy oder Terms + Conditions.
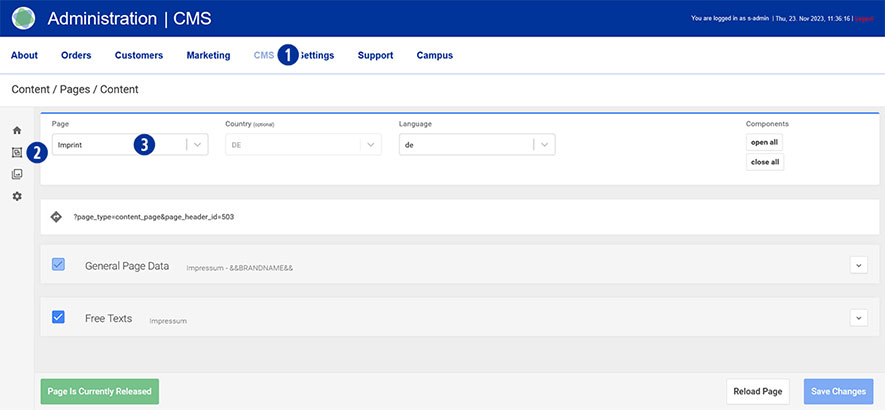
Scroll to the “Free Texts” tab [4] and open it. [5]
Enter the desired text in the “Title” input field. [6] Make sure to maintain the “Heading 3” formatting.
Under “Compose” drag the slider to “ON”. [7]

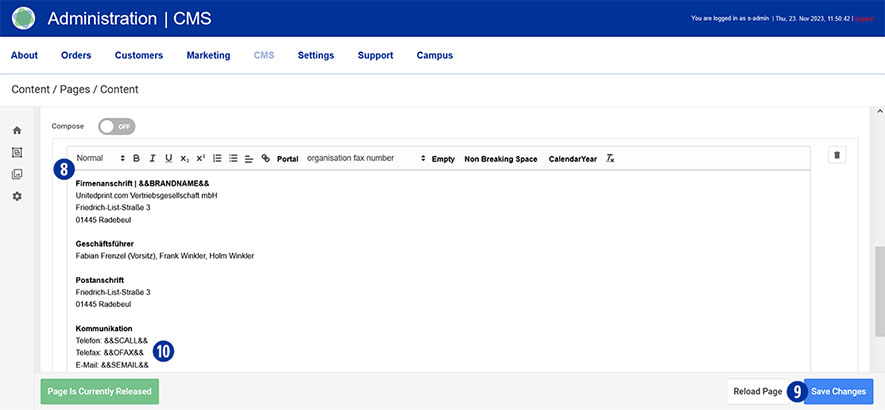
Enter or change the desired text in the input field and optionally carry out formatting. [8th]
Save your changes by clicking on the “Save Changes” button. [9]
Do the same with the pages Privacy Policy sowie Terms + Conditions.
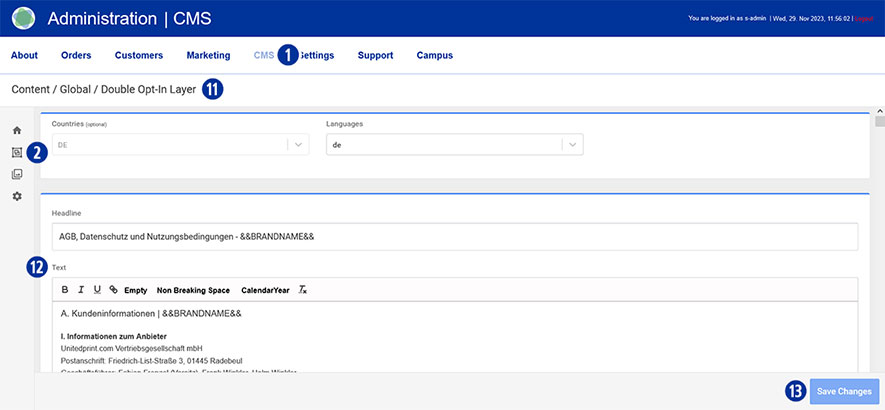
Make sure to also store your legal texts (general terms and conditions and privacy policy) in the Partnershop backend – CMS / Content / Global / Double Opt-In Layer. [1][2][11]
Enter or change the desired text in the input field and optionally carry out formatting. [12]
Save your changes by clicking on the “Save Changes” button. [13]
Note
The variables stored in the input fields [3] in your Partnershop backend – CMS / Content / Global / Contacts can be adopted in the “Imprint” content area. [10]
This eliminates the need for redundant recording of information for brand name, telephone, fax and email.
In the Partnershop you have the option of customizing and editing your product information in the form of images and text.
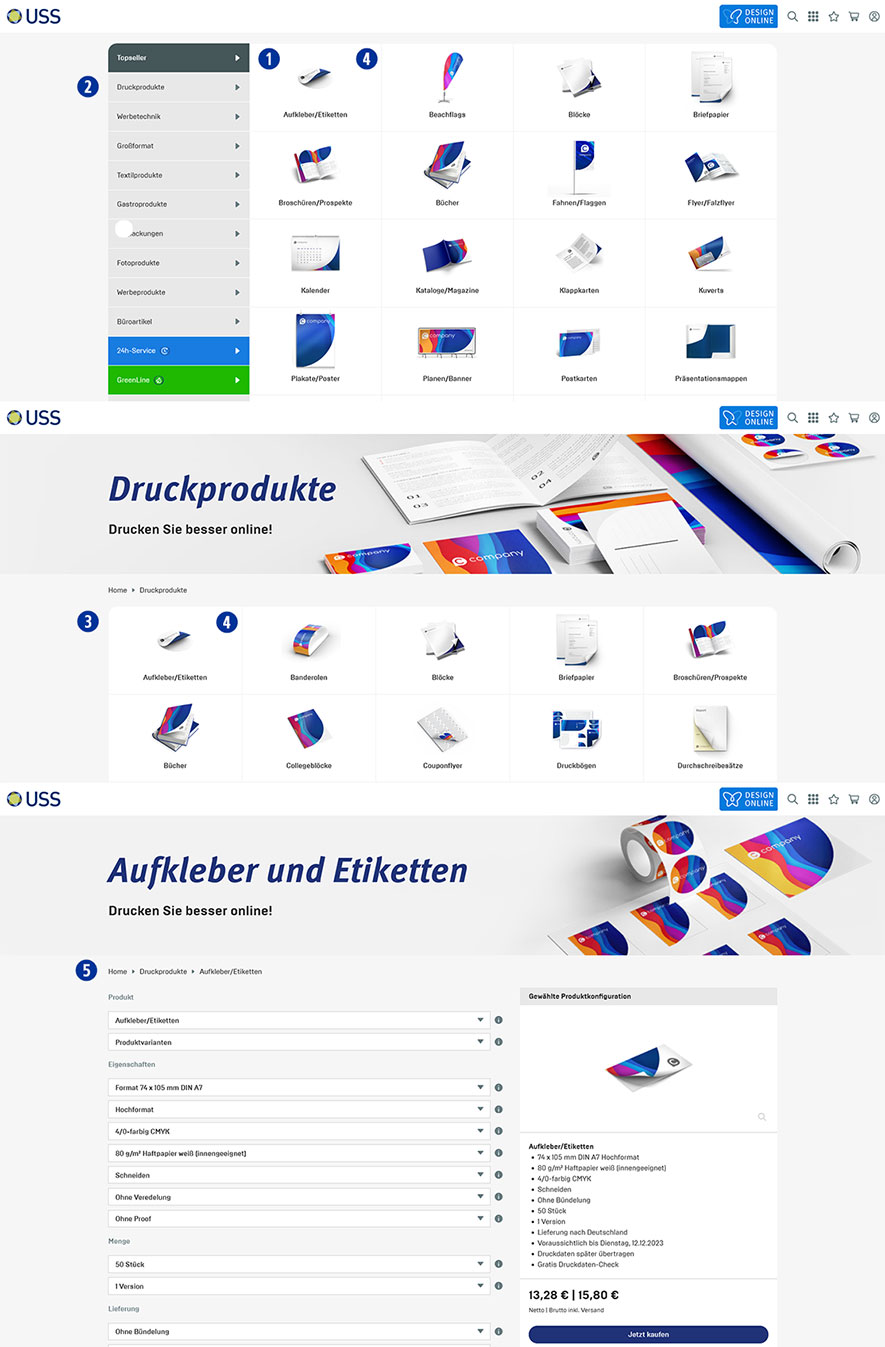
The product catalog is displayed visually in the form of a product overview in your Partnershop.
Frontend
The product overview of the “Top Sellers” product category is automatically displayed on the homepage of your Partnershop. [1]
This feature allows you to discover the most popular products directly.
Change the product category using the navigation bar on the left. [2]
By clicking on a product category you will be taken to a page where all products in this category are listed. [3]
Clicking on a product image [4] takes you to the product detail view. [5]
There you will find further detailed product information and prices.
Backend
There are three areas available in your Partnershop backend for making changes to the product catalog.
- Category
- Product
- Product Variant
These three areas offer you the opportunity to flexibly adapt your product catalog and keep it up to date.
Switch to your Partnershop backend – CMS / Content / Pages and select an area. [6]
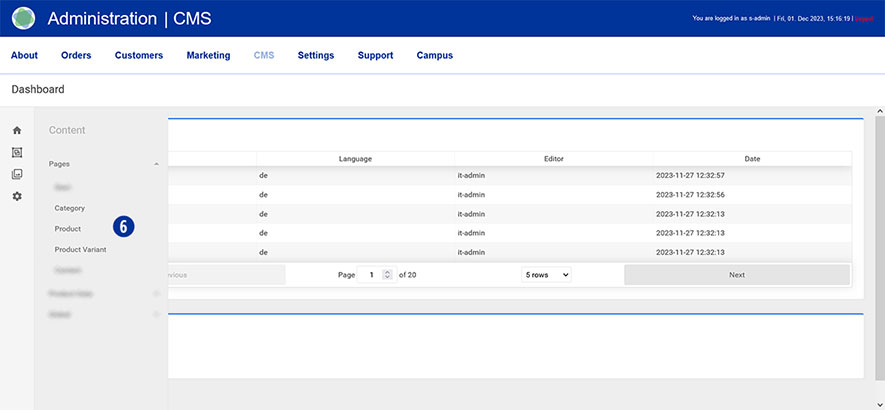
The following components are released for editing.
- General Page Data
- Header
- Free Texts Two Columns
Note
The content structure is identical for every area and every product, with a few exceptions.
Unreleased components contain system-dependent content that cannot be changed.
Your editing options in detail
Exemple
Product category: Printing Products
Product: Flyer/Leaflets
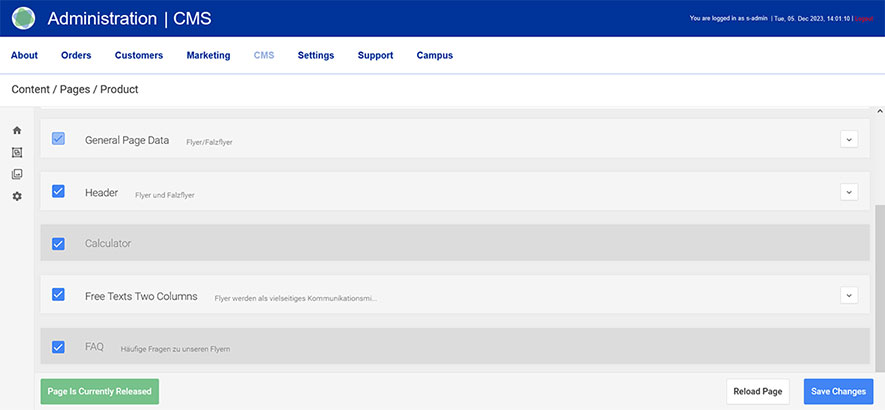
To do this, go to your partner shop backend – CMS / Content / Product [7] and select the product you want to edit under “Page”. [8th]
Go to the “General Page Data” component [9] and open it. [10]
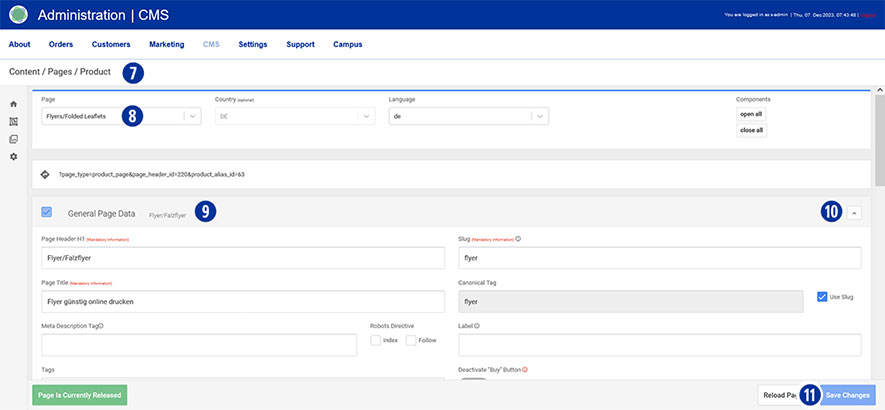
Component “General Page Data”
- Page Header H1
Please note that a change has a direct impact on the display of the product name on the relevant pages. - Page Title
A change directly affects the browser title and the mouseover information text within the product overview.
The browser title should contain keywords relevant to the search.
Make sure that the length of your entry does not exceed 70 characters. - Meta Description Tag
Here you have the opportunity to store SEO-relevant content for search engines. - Robots Directive (Index, Follow)
Only activate the two checkboxes if you have created individual content (product information texts).
Non-individualized content does not lead to a positive search engine ranking. - Open Graph (Image, Title)
Using Open Graph information gives them more control over how content appears when sharing on social platforms. - Search
Under “Search Keywords”, define suitable search terms that will lead to your content as keywords in search queries.
The “preview image” is used to display the product within the product overview.
Save your changes by clicking on the “Save Changes” button. [11]
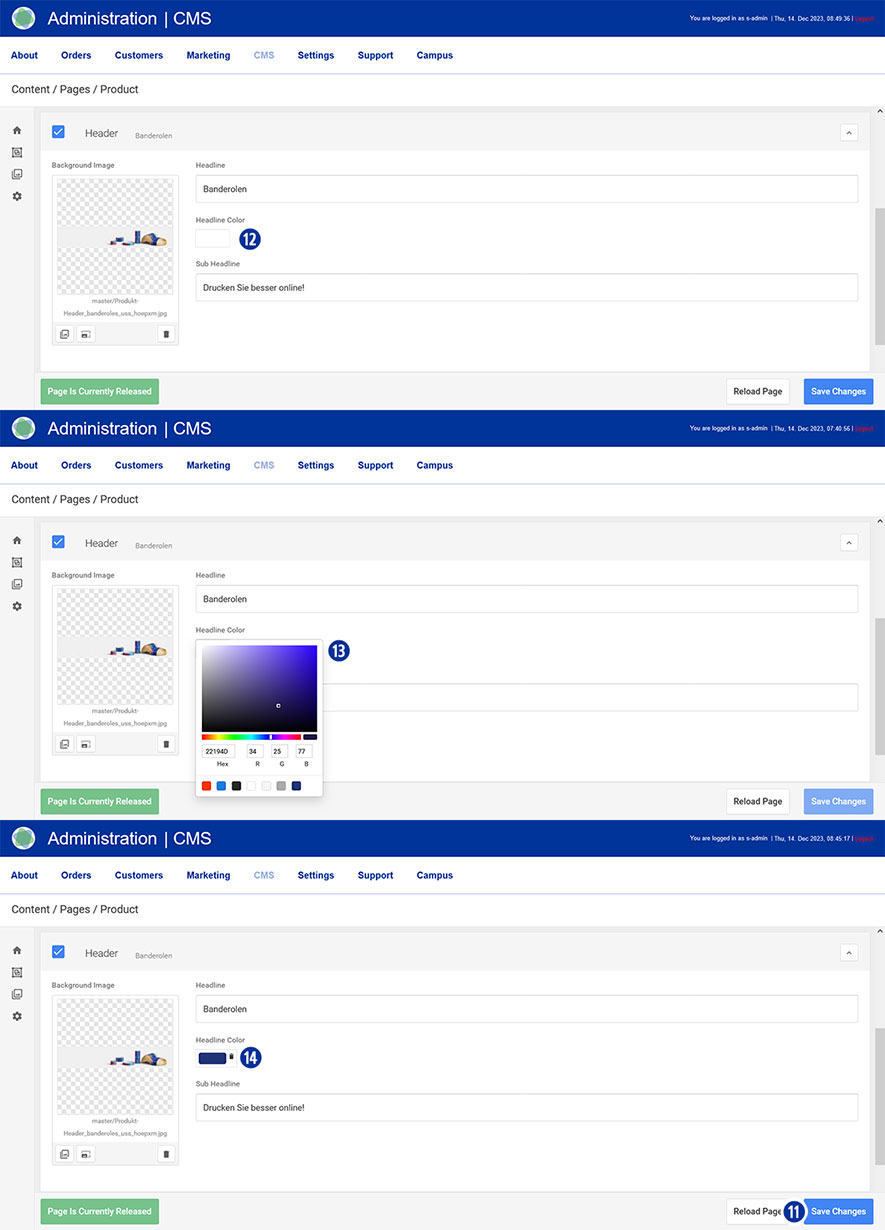
Component “Header”
In this area you can make the following changes.
- Headline
- Headline Color
Click in the input field [12]. Select the desired color from the color palette displayed. [13] Close the palette by clicking next to it. Cancel the color selection by clicking on the icon. [14] - Sub Headline
- Headline Image
Save your changes by clicking on the “Save Changes” button. [11]
The adjustments affect the display of the “product detail view” – not the product catalog.
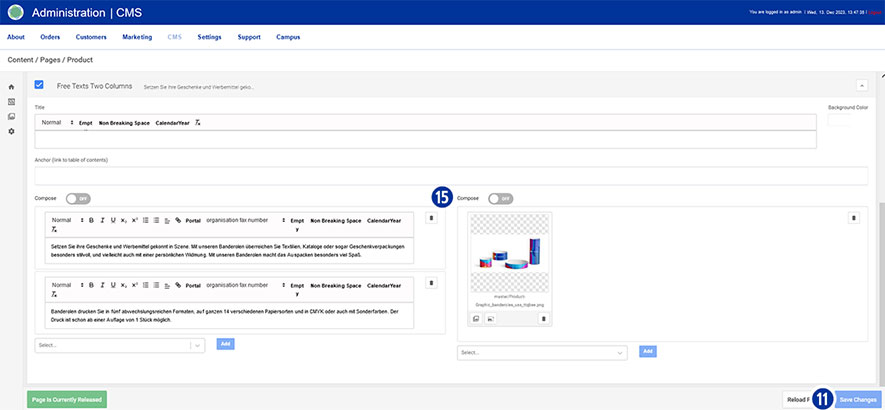
Component “Free Texts Two Columns”
In the 2-column component you have the opportunity to adapt SEO-relevant content for search engines (text and images). [15]
Changes in this area affect the display of the content on the “Product Detail View” page – below the calculation.
Save your changes by clicking on the “Save Changes” button. [11]
Components “Category” and “Product Variant”
The other two areas “Category” [4] and “Product Variant” [6] are processed in a similar way to the “Product” area.
Note
After you have saved your changes in the partner shop backend, it may take some time until the product name is updated accordingly.
In order to use graphics in your content, images must first be uploaded in “Media Upload”.
You can find detailed information on the topic of “Media Upload” via this link.
General (2)
In order for your domain addresses to be able to call up the Partnershop, the following DNS settings are required at your domain provider.
| Domain | Typ | DNS-Eintrag |
| meinedomain.de | ANAME | uss.meinedomain.de |
| www.meinedomain.de* | CNAME | uss.meinedomain.de |
| uss.meinedomain.de | CNAME | elb.unitedprintshopservices.com |
| meinedomain.de | TXT/SPF | v=spf1 include:sendamail24.com -all |
| * optional | ||
The use of more than two addresses (domain + subdomain) or two subdomains is not intended.
A domain may only have one SPF entry.
Notice
It is expressly recommended to choose a provider that supports ANAME Records.
If your provider does not allow the use of ANAME/ALIAS entries, an IP address can be assigned for this exceptional case.
| Domain | Typ | DNS-Eintrag |
| mydomain.com | A | IP: XXX.XXX.XXX.XXX |
Please contact our support team by email at 2lvl-support@unitedprint.com.
The use of an IP address to access the partner shop is only possible temporarily and with reservations.
Your Partnershop is based on the Unitedprint portal print24.com both in terms of technical scope and external appearance.
In the Partnershop there is the possibility of individualization including adaptation to the corporate design of your company.
Important information at a glance
Your customization options in detail
- Logo [1]
- Homepage banners/ slider [2]
- Homepage texts (text and image) [3]
- Payment methods [4]
- Colors
- Product Catalog [9]
- Legal texts [5]
- Contact details [6]
- Service times [7]
- Social Media [8]
- Customer data
- Publish

Marketing (4)
To register Google services, you need to confirm the ownership of your domain (verification).
In order to carry out such a Google Site Verification in your Partnershop, you must first ensure that you have access to the website.
For the Google Site Verification of your Partnershop, you have the option of storing a Google Site Verification Key so that it can be verified by Google.
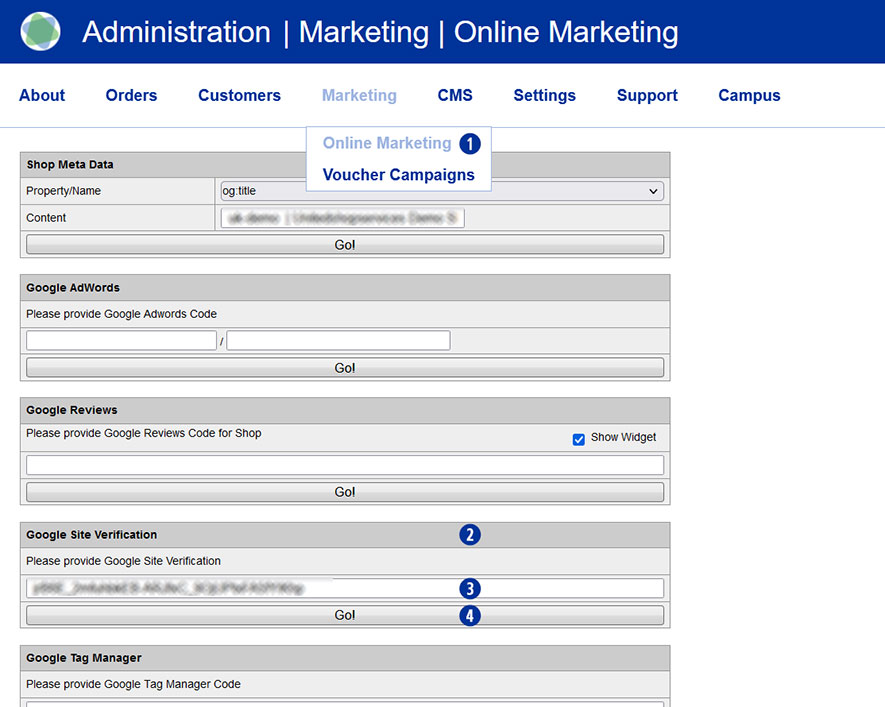
To do this, switch to your Partnershop backend – Marketing / Online Marketing. [1]
In the “Google Site Verification” module [2], copy the verification key you have into the input field. [3]
Save your entry by clicking on the “Go!” button. [4]
After completing all changes, switch to your partner shop backend – CMS / Administration / Redis Management / Exports.
Click on the “Create Productive Version” button.
Your online marketing changes are available in the shop after approx. 30 minutes.
Note
To create the Google Site Verification Key, log in to your Google account and go to Google Search Console (https://search.google.com/search-console).
Yes, you can integrate Trustpilot into your Partnershop.
Go to the Partnershop backend in the menu Marketing / Online Marketing. [1]
Under the Trustpilot module [2], please enter the data you have in the input fields. [3][4][5]
Click on the “Go!” button [6] to save the data permanently.
 The Trustpilot widget is displayed on the start page of your Partnershop. [7]

Note
The prerequisite for this is that you have a valid Trustpilot Business account.
This allows you to create and manage the Trustpilot link [3] and to apply for, create and download the required API key [4] and secret key. [5]
Trustpilot ratings are updated daily at 09:00.
It can take up to 24 hours to display the current values.
Yes, a robots.txt has been created directly below the shop domain.
The robots.txt file is a text file that specifies which directories may and may not be read by search engines.
The robots.txt is very important for all crawlers, which first search in the robots.txt and read it. It’s like a kind of manual that tells you what you can and cannot do.
The robots.txt defines exactly which crawler is allowed to search which directories, subdirectories or individual files and which are blocked for it.
Example
https://mydomain.com/robots.txt
The robots.txt refers to the “sitemap_index.xml”, among other things.
Link
https://faq.unitedprintshopservices.com/faq/verfuegt-mein-partnershop-ueber-eine-xml-sitemap/
Yes, if your shop pages are indexed, a sitemap index file is created directly below the shop domain.
Example
https://mydomain.com/de/sitemap_index.xml
The content and product pages are referenced in the “sitemap_index.xml”.
In the “sitemap_content.xml” – if indexed – reference is made to the general content pages (General terms and conditions, Privacy policy, Imprint, FAQ and Help).
In the “sitemap_product.xml” – if indexed – reference is made to the individual product pages edited by you.
Note
An XML sitemap is a list of URLs that is created in XML format and contains all indexed subpages of a website.